Results 1 to 10 of 24
Thread: Genco Gold Seal Restore
-
06-16-2016, 11:42 AM #1
Genco Gold Seal Restore
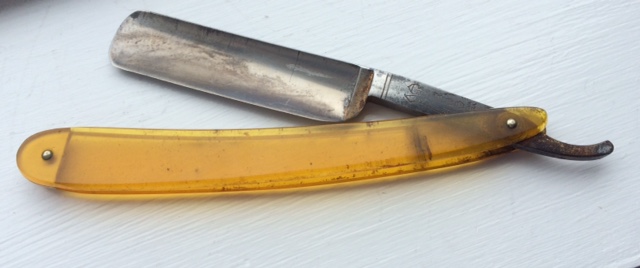
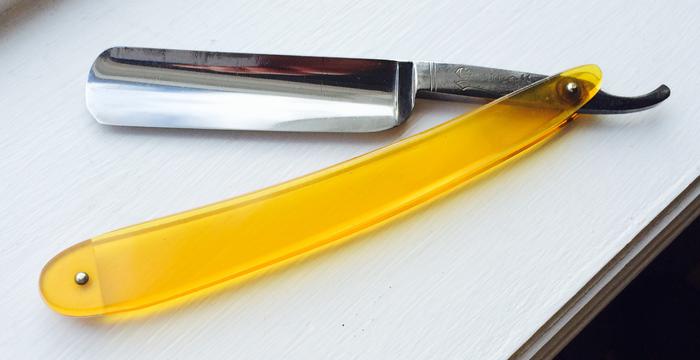
Last evening I spent some time working on my Genco Gold Seal SR. I did not want to remove the pin, so I did this by hand with only Mothers Mag and Aluminium polish on the blade, tang and tail. The rust on the tail and pivot I used a bit of sandpaper, and carefully used a home made sandpaper dental floss and regular dental floss to clean up the pivot. The after photo is not the best -- it shows the tail as being dark, but it is quite clean and shiny. There is some very small pitting on the tail from the rust. There is still some staining on the spine...but I am not going to be too aggressive with this razor at this point in time. It leaves a bit of the original character. For the scales I only used warm soapy water and Q-tips. I am quite pleased with the outcome.
Before:
And after:
-
-
06-16-2016, 02:23 PM #2
Lookin' good. That cleaned up very nice.
-
06-16-2016, 02:35 PM #3
Very nice. Looks great again. Your effort paid off.
-
06-16-2016, 02:39 PM #4
- Join Date
- Feb 2013
- Location
- Haida Gwaii, British Columbia, Canada
- Posts
- 14,443
Thanked: 4828I do not think that razor has seen too much action. A perfect candidate for cleaning and restoring it to it's former glory. It seems you've used quite a bit of patience and elbow grease. Looks good.
It's not what you know, it's who you take fishing!
-
06-16-2016, 03:36 PM #5
It does take time...but it is a pleasant activity and I enjoy taking my time and not rushing. I prefer doing it by hand. I agree...I don't think this razor saw too much action. It just wasn't stored properly and rust set in. As you can see, I didn't do a perfect restoration...but well enough to clean it up and stop any further deterioration. Someday I will take the time and remove the pins on several of my recent SR restore projects and take them to the next level. For now I am just interested in cleaning them up, stopping any further deterioration and getting them shave ready.
-
06-16-2016, 04:24 PM #6
- Join Date
- Apr 2012
- Location
- Diamond Bar, CA
- Posts
- 6,553
Thanked: 3215A coffee stir stick with the end clipped straight and a blue paper towel wrapped around it with a dab of polish, works well to polish and further clean the insides of the scales.
You can put a bit more pressure than a QTip.
The spiral dermal wheels (Abrasive Spirial Detail Wheel), work great getting at the tang between the scales and any tight corners like at the stabilizers. They come in a variety of grits.
You can get them cheaper in sets from EBay but the aftermarket ones, do not use the same grit/color coding and you have to figure out the grit progression. They run from 36 – 2500 and will save you tons of time.
Oh, yea, a flex shaft and variable speed cordless Dremel give you lots more control. I use then at the slowest speed.
I buy the older bolt on one, they are lots cheaper than the quick connect and they last a long time, a year or so, I just use them for around the pins and in corners.
Nice work.
-
-
06-16-2016, 08:55 PM #7
Well done! I sometimes will take months working a couple different "restores". I am not selling them. I just do it as a hobby and it is fun to relax and work "here and there" without any deadlines or pressure. Your razor came out looking great!
What a curse be a dull razor; what a prideful comfort a sharp one
-
06-16-2016, 09:05 PM #8
- Join Date
- Sep 2012
- Location
- Lansing, MI
- Posts
- 202
Thanked: 12
-
06-16-2016, 09:19 PM #9
The scales are celluloid. Beware of cell rot with this razor!
-
06-16-2016, 09:31 PM #10
Yes, I am aware of that possibility...how to prevent cell rot? Keep it out of direct sunlight and extreme heat? Isn't there some kind of preventive program you can implement to prevent this dreaded disease? The scales on this razor are in very good condition...no sign of weakening or deterioration...but I do worry...