Results 1 to 7 of 7
 14Likes
Thread: Lowest Grit Sandpaper While Preserving Blade Etching
-
04-09-2017, 04:10 AM #1Senior Member

- Join Date
- May 2016
- Location
- Yakima, WA
- Posts
- 177
Thanked: 89 Lowest Grit Sandpaper While Preserving Blade Etching


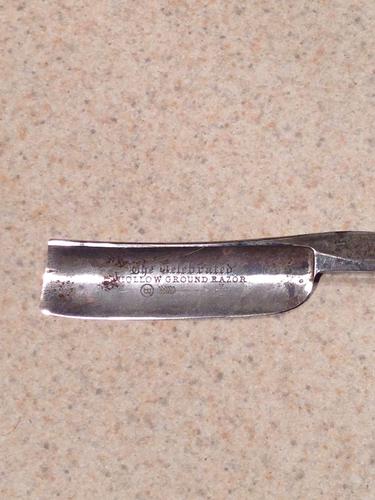
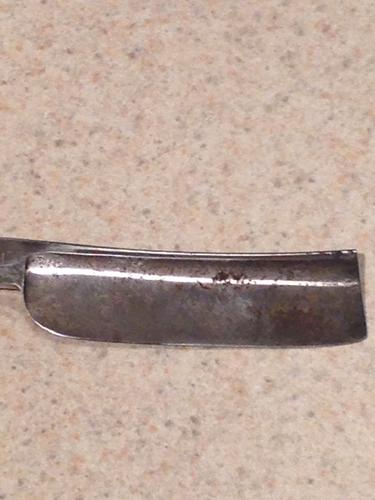
Is there a general consensus as to the lowest grit sandpaper that you can use and still preserve blade etching. I'm going to try my first restoration and plan to hand sand (which I've read up on). The blade is a Wade & Butcher Celebrated. The etching looks good and well preserved, but there is some heaving rusting and pitting elsewhere that would require the really low grits to completely remove. But if I do that, then I'm pretty sure the etching would go along with it. Thanks!Last edited by jseitz; 04-09-2017 at 04:23 AM.
-
04-09-2017, 04:27 AM #2Senior Member

- Join Date
- May 2016
- Location
- Yakima, WA
- Posts
- 177
Thanked: 89
Sorry, I probably should have posted this in the workshop...maybe the forum moderators can move it accordingly

-
04-09-2017, 05:51 AM #3

There really isn't a general rule as to what grits will work. You'll want to start off with steel wool and metal polish. If your not happy with your results at that point, try a higher grit sand paper(1k, 800) and see where that gets you. The sand paper should ALWAYS be used with some kind of a block to prevent softening the etching.
I personally would not recommend that blade for a first attempt at a restoration. Restoring etchings like that can be tricky and pretty to screw up. That's a really nice blade and it would be a shame to bugger it up. IMO you would be better off starting with the basics and moving on to etched blades after gaining some experience.B.J.
-
04-09-2017, 12:33 PM #4

+1 to above
I would suggest not to touching the face of that blade with sandpaper. You could also try soaking the blade in Evaporust for a day, then as Bejay said buff the whole blade with some steel wool followed by metal polish. There will be some pitting left and some oxidation staining, but you wont lose any depth in the etch. It will look shiny, but keep some of its vintage look.Last edited by MW76; 04-09-2017 at 12:37 PM. Reason: Slightly repetitive post
-
04-09-2017, 02:48 PM #5Senior Member


- Join Date
- Feb 2013
- Location
- Haida Gwaii, British Columbia, Canada
- Posts
- 14,443
Thanked: 4828
I'm not sure what you already have in your selection of tools, but after the steel wool you can let it ride for a few days in a vibrating polisher. It will give it a very deep clean and leave a nice finish.
It's not what you know, it's who you take fishing!
-
04-09-2017, 02:52 PM #6Senior Member

- Join Date
- May 2016
- Location
- Yakima, WA
- Posts
- 177
Thanked: 89
Thanks for the advice! I have little (so to speak) in the way of tools; hence the sandpaper. Plus I've gathered that the Dremel is not the place to start either!
-
04-09-2017, 03:15 PM #7Senior Member


- Join Date
- Apr 2012
- Location
- Diamond Bar, CA
- Posts
- 6,553
Thanked: 3215
No, not the Dremel, especially for your first razor.
000 or 0000 steel wool and WD40 will clean the razor and scales without doing any damage to either.
This will give you a good idea of the depth of any pitting, you can follow this up with 1000 grit Wet and Dry wrapped around a wine cork, alternating direction from heel to toe and spine to edge.
From 1k you can go to any good Metal Polish with paper towels. I have had good success with 3M, Marine Restoration and Metal Polish, Maas or Mothers Mag polish.
-
The Following User Says Thank You to Euclid440 For This Useful Post:
jseitz (04-10-2017)


 LinkBack URL
 About LinkBacks


 Reply With Quote
