
Results 1 to 10 of 16
 57Likes
 LinkBack URL
 About LinkBacks
Threaded View
-
08-10-2017, 06:34 AM #1Captain ARAD.


- Join Date
- May 2011
- Location
- Pacifica, CA
- Posts
- 2,474
Thanked: 2227 Very early 1800's Roberts Warranted restore
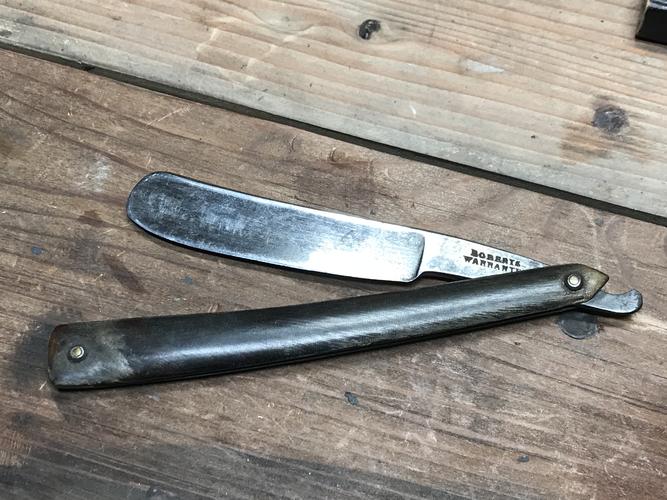
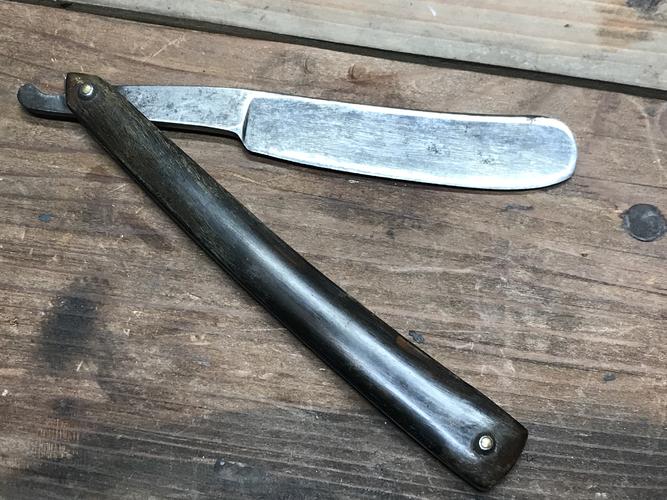
This is the condition I got the razor in. It's actually really good shape for a razor of its age (1800-1805). Horn scales with few bites. Not much hone wear. Never sanded, maybe cleaned with steel wool or a wire brush. The original surface treatment is pretty clear -- crocus polish on the blade face and glaze on everything else.
First of all: Roberts?
Probably Joseph Roberts or perhaps his son. There were several other Robertses running around making razors in that time period, but these are somewhat common to find, and Joseph was the only Roberts to get an entry in Gales & Martin, suggesting the others were smaller outfits at the time. Still, it's just a guess.
To take it apart, I've got a variety of specialized tools that I deploy.
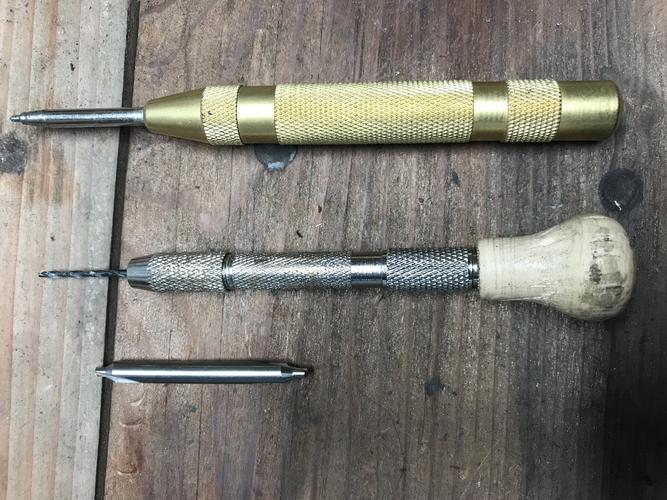
That's a machinist's drill bit, a pin vise with a 1/16th inch bit in it, and a modified center punch.
The goal is to drill out the pins without touching the washers, and that's where that machinist bit comes in handy. It's very stout and quite short, so if your drill press has minimal runout, it'll very accurately cut the hole without wandering at all. Happily, my 1960's Rockwell radial drill press has very, very little slop in it, so I can often get the pins out very cleanly. This was no exception.
Once the first washer pops off, I gently push the pin out with the modified center punch (I chucked up the bit on it and filed down a 1/16th inch spindle instead of a conical punch).
I didn't need the pin vise for this one, but when I do I use it to drill deeper into the pin, which I do very slowly and and entirely by hand.
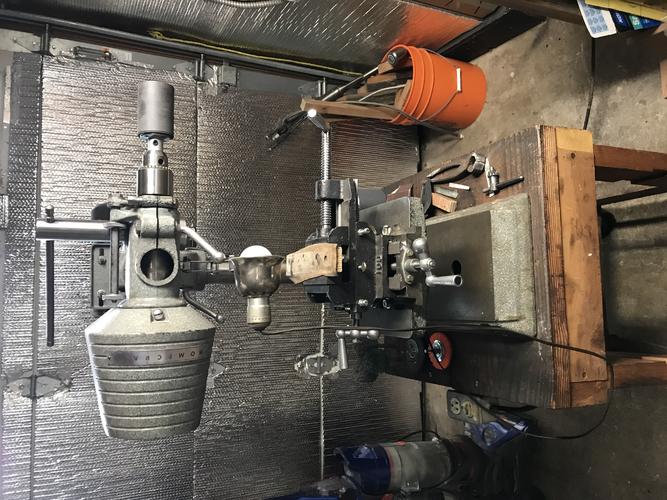
The drill press is the most important tool in my arsenal these days. I use it as a contact grinder as well as a drill. I've got a 2 axis mill vise bolted to the table and a custom tool for razors clamped into it. It's a wooden block with a piece of leather glued over it and a threaded hole I can put a bolt into in one end. The bolt is for re-pinning. It lets me lay the scales flat (on leather, which won't scratch them) and adjust the level of the 'anvil' surface depending on the size of the washers.
For sanding and polishing, I've tried a lot of stuff and ended up pretty simple.
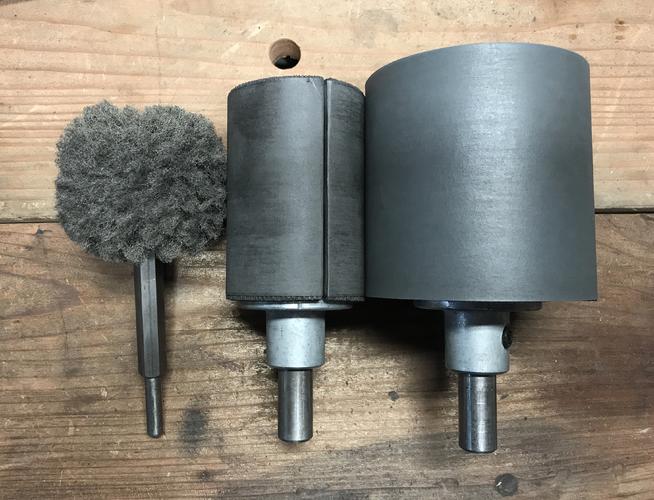
That fuzzy thing is like a Dremel sanding puff on steroids. Next to it are a 3" and a 5" sanding drum that let you load any kind of sanding paper you want.
I've tried lots, including a full progression of 8x10 metal-specialty micromesh. What I've ended up using is mostly regular sand paper.
For bad pits and regrinds (yes, it's possible with this setup, though it's FAR from ideal -- a real contact grinder would be a lot better), I'm cutting appropriately sized segments from 3x24 sanding belts. They're super tough and they last a long time.
For the middle round, Norton wet/dry 240/320/600. For the last pass, Norton fancy 800/1500.
On this razor, I did the full progression on the blade face, then just 240/600 on the tang & spine. The sanding drums have just enough bump at the seam that I wasn't getting the uniformity I wanted, so once I had the surface I wanted, I went back over it with that giant sanding puff.
To polish, it's the cheap & cheerful Harbor Freight grinder (heh) with gooseneck lamp:
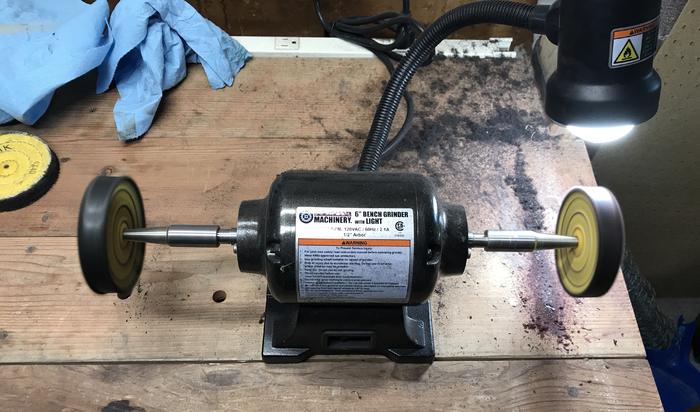
I've got 3 different grades of polish -- black, red, and pink. All from a company called Luxi. It's definitely better than the stuff I'd previously been getting at Home Depot. It lasts a lot longer, plus it turns out I only really need the red compound. With a bit of work, it takes out pretty much everything from 600 grit up. The pink polish didn't improve anything.
The wheels are tightly sewn cotton, so there's no flop to'em at all.
When is and razors, I try to always do so in the same direction it was done at the factory. That means, for the blade face, the drum spinning counter clockwise. All the swarf is pushed toward the edge of the blade, and I flip it around to do the opposite side the same way.
That's actually a pain in the butt with the 3" drum, getting the length of the blade on the front blade face means that the tang tends to hit the drill chuck, which is super annoying. So I mostly used the 5" drum (I have a 4" drum as well, from Harbor Freight, but it's got wobble to it so I don't like using it if I can get away with it -- the two good ones, and the super sanding puffs came from Woodcraft).
The flat sides of the tang are also up/down sanding, but it doesn't matter which direction it goes. The underside of the tang and the spine are actually lengthwise (grinding marks were still visible when I got the razor). It's a bit tricky to keep it all rounded, but it's doable.
I did get slightly overzealous on the blade and accidentally left a very slightly flat spot on the rounded point.
There's two pieces of equipment that're absolutely vital to getting a good polish.
You've got to have good lighting on the buffer. If you can't see the scratch patterns, you can't know when you've polished them out.
Also -- and this is the most important -- you've got to have a temperature probe to make sure you don't overheat the metal. Fortunately, you've almost certainly got at least a few of them.
Fingers.
If the blade is too hot to touch, you gotta back off.
And now, in the next message, the end result of all this blatheration.Last edited by Voidmonster; 08-10-2017 at 06:34 AM. Reason: I am typoman.
-Zak Jarvis. Writer. Artist. Bon vivant.
-
The Following 7 Users Say Thank You to Voidmonster For This Useful Post:
782sirbrian (08-12-2017), Barreno (08-14-2017), ejmolitor37 (08-10-2017), JimmyHAD (08-10-2017), JOB15 (08-10-2017), markbignosekelly (08-10-2017), xiaotuzi (08-11-2017)


 Reply With Quote