
Results 21 to 29 of 29
 110Likes
Thread: I. Barber stub tail restoration
 LinkBack URL
 About LinkBacks
-
03-10-2018, 03:59 PM #21Str8Faced Gent.


- Join Date
- Aug 2013
- Location
- Orangeville, Ontario
- Posts
- 8,463
- Blog Entries
- 1
Thanked: 4207
Beautiful save G.
Well done buddy. Great translucency to the scales and finish on the blade itself.
Enjoy!"Depression is just anger,, without the enthusiasm."
Steven Wright
https://mobro.co/michaelbolton65?mc=5
-
The Following User Says Thank You to MikeB52 For This Useful Post:
xiaotuzi (03-10-2018)
-
03-10-2018, 08:38 PM #22Senior Member


- Join Date
- Feb 2015
- Location
- Duluth, GA - Atlanta OTP North
- Posts
- 2,546
- Blog Entries
- 1
Thanked: 315
Great work. You really got that blade cleaned up. What progression did you use getting the pitting out and finishing it?
xiaotuzi likes this.
-
The Following User Says Thank You to JP5 For This Useful Post:
xiaotuzi (03-10-2018)
-
03-11-2018, 12:07 AM #23Senior Member

- Join Date
- Jun 2016
- Location
- NH
- Posts
- 1,924
Thanked: 1363
Thanks, I really appreciate it. Good question about the process. I worked sanding by hand from low grit to high to get the pitting and corrosion out. I went as low as 150 for a while there, but I would recommend caution to anyone starting out with restorations. I didn't just dive in at 150, I tried less aggressive grits and ended up at 150 for a while and was only able to do that because this is a thick blade. Low grits like that would be a no-no on thinner grinds. There's faster ways to do this, I'm sure, but this is how I do it with the tools and skills I have at this time. Originally Posted by JP5

So, something like 150, 220, 320, 400, 600, 800, 1000, 1500, 2000, 3000, 4000 using a piece of dowel as a backer through most of it... this took some time, you can see some pictures in the beginning of the thread where it was at this point.
Then to apply the satin finish, working spine to edge, down the grits 2000, 1500, 1000, 800 all dry with just my finger for a backer. Just like coats of paint. Then 800 with oil, then 2000 with 1 micron diamond lapping paste to soften. The finish took probably close to a couple hours when all said and done both blade faces.
Finally, a quick polish on the shiny areas. It was a fun project and I always find it so freakin' rewarding to shave with one I've worked on. Good stuff, that is "Go easy"
-
-
03-12-2018, 03:22 PM #24Senior Member


- Join Date
- Jan 2011
- Location
- Lorton, VA
- Posts
- 349
Thanked: 153
Tuzi, great job on that Satin finish. Now the secret is out. Thanks for sharing your technique with all. Beautiful razor. Know that it will be a great shaver with that nice thin bevel which is also so well done. But all yours seem to turn out like this! Go figure.
xiaotuzi likes this.
-
The Following User Says Thank You to ajkenne For This Useful Post:
xiaotuzi (03-13-2018)
-
03-12-2018, 03:48 PM #25Senior Member
- Join Date
- Feb 2015
- Location
- Duluth, GA - Atlanta OTP North
- Posts
- 2,546
- Blog Entries
- 1
Thanked: 315
Thanks for the detailed response.
 I'm always interested in learning about different approaches to restorations
Threads like this really make me want a nice stubtail!
I have one, but with the condition it is in, I will probably leave it as is.xiaotuzi likes this.
-
03-13-2018, 12:16 AM #26Senior Member
- Join Date
- Jun 2016
- Location
- NH
- Posts
- 1,924
Thanked: 1363
Thanks for the very kind words, compliments and encouragement from all. It's a real gift to be able to share with you guys on here, you have great passion and enthusiasm as well as knowledge and experience. I always look forward to seeing what you are talking about and sharing, and I've learned a lot from everyone on here so here's a big THANK YOU!
Dieseld likes this."Go easy"
-
03-16-2018, 06:42 PM #27Captain ARAD.

- Join Date
- May 2011
- Location
- Pacifica, CA
- Posts
- 2,474
Thanked: 2227
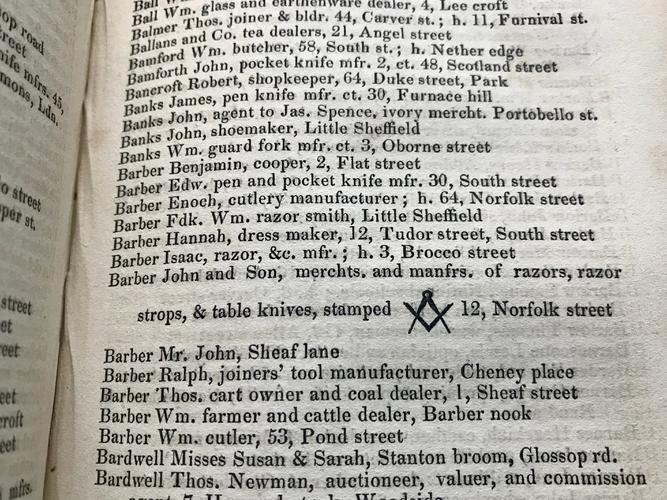
Its definitely Isaac. John Barber never wouldve let a razor with a cold shut appear with his name on it. The story goes, he personally inspected every razor he sold. Originally Posted by karlej
Isaac was a cheeky guy banking on the confusion with I/J.
Here they both are listed in my copy of Whites 1833 directory:
 -Zak Jarvis. Writer. Artist. Bon vivant.
-
-
03-17-2018, 07:59 PM #28Senior Member
- Join Date
- May 2016
- Location
- Yakima, WA
- Posts
- 177
Thanked: 89
Phenomenal restoration work per usual. Some things just can't be rushed, and this yet another example of that! Looking forward to the next installment in your restoration schooling series
 xiaotuzi likes this.
-
The Following User Says Thank You to jseitz For This Useful Post:
xiaotuzi (03-17-2018)
-
04-14-2018, 06:47 PM #29Senior Member

- Join Date
- Oct 2015
- Location
- Knoxville,IA
- Posts
- 2,368
Thanked: 762
Wonderful work Tuzi! That is a killer restore.
Nothing is fool proof, to a sufficiently talented fool...


 Reply With Quote