Results 1 to 9 of 9
 46Likes
Thread: Bone Scales
-
06-27-2018, 09:13 PM #1
 Bone Scales
Hey fellas
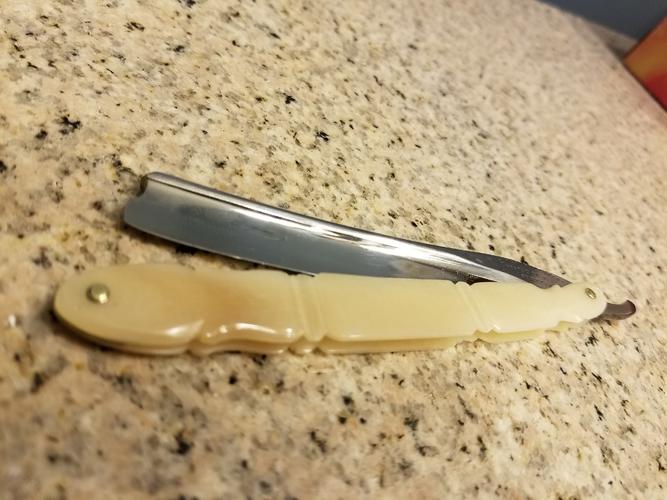
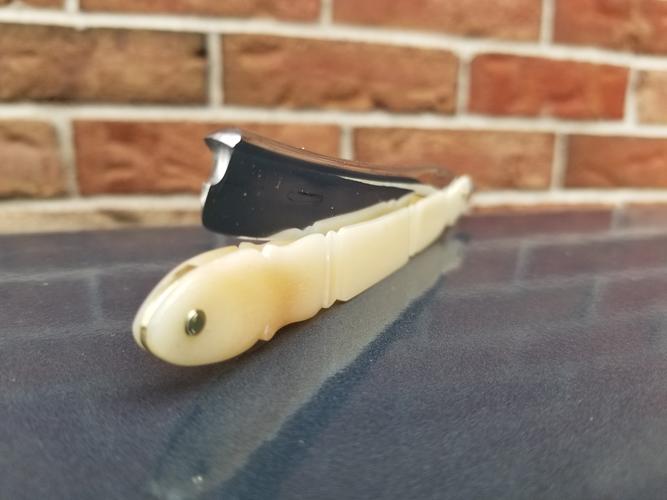
Here is a set of bone scales I did for a friend
Mike


Last edited by Mcbladescar; 06-27-2018 at 09:17 PM.
mwfick on instagram
-
-
06-27-2018, 09:25 PM #2

I like 'em, very nice
 Our house is as Neil left it- an Aladdins cave of 'stuff'.
Kim X
-
06-27-2018, 09:52 PM #3Senior Member

- Join Date
- Aug 2016
- Location
- Tel Aviv, Israel
- Posts
- 653
Thanked: 174
Looks really nice, and true to the period too. Great job!
Care to share the details of the process - tools for carving, grids of polishing etc.? It would be really interesting and educational, and I guess some of the guys here would like to try something like that themselves.
-
06-27-2018, 10:15 PM #4Senior Member


- Join Date
- Feb 2015
- Location
- Duluth, GA - Atlanta OTP North
- Posts
- 2,546
- Blog Entries
- 1
Thanked: 315
Beautiful work. I would also like to know more about how you made those scales.
- Joshua
-
06-27-2018, 10:33 PM #5

These scales are cut from a dog bone from the grocery store
I first split the bone with a handsaw
Then found the flattest portion of the bone that was 6" long and re-sawed using again, a handsaw
With those portions sawed off i was left with something like 3/16" thick x 5/8" wide slab.
I filed out and sanded 1 side fairly flat and stuck it to a piece of melamine board with 2 faced golf grip tape.
I ran that through the table saw to flatten a face, then flipped it over and re-flattened the face that had been stuck to the tape
from there, I just took multiple passes on the table saw to thin it out to about where i wanted it
then, i stuck 2-faced tape to a board and hand sanded from 80 to 120 to 220 to 400 grit and ended with 2 pretty similar slabs
I had drawn out on paper the shape I wanted so I stuck the 2 slabs together with 2-faced tape and cut them out to my pattern with the scroll saw.
Once they were cut out to basic shape, I used triangular and round files to rough out the contours.
From there it was 220-400-800 wet dry and then polishing with the dremel tool and Mothers Mag and Aluminum Polish
TaDa .... there ya have it. about 10 hours start to finish + brass wedge and pinning.
The brass wedge is just some hardware that I salvaged, pounded, filed, sanded and shaped to fit.
I hope that helps everyone understand the process, the only thing stopping you from doing it yourself is you.
Dive in and try it. worst case scenario, you wreck a $5 dog bone
Mikemwfick on instagram
-
-
06-27-2018, 11:26 PM #6Senior Member


- Join Date
- Feb 2013
- Location
- Haida Gwaii, British Columbia, Canada
- Posts
- 14,457
Thanked: 4830
Nice job.
I love working with bone.It's not what you know, it's who you take fishing!
-
06-27-2018, 11:40 PM #7

Thatís some ingenuity there. Keep the dogs away from it

-
06-28-2018, 02:29 AM #8

I think a tremendous endeavor. Hat's off to making it happen!

I have several sets carved by Rezdog.
Holding them in-hand and looking at them always amazes me. The work and workmanship is miraculous to someone like myself.
I treasure things like this.
Nothing is finer in the hand than bone, IMO.
Nice Job!
-
06-28-2018, 02:41 AM #9

Thank you all for the compliments
I really like them too
I will find more excuses to use it in the future
I am surprised at the polish you can get
Pictures don't really do it justice, I can't get the light right
Mikemwfick on instagram


 LinkBack URL
 About LinkBacks


 Reply With Quote
