
Results 1 to 5 of 5
 12Likes
 LinkBack URL
 About LinkBacks
Hybrid View
-
02-23-2021, 12:14 AM #1Member

- Join Date
- Jul 2016
- Location
- Burbank, California
- Posts
- 44
Thanked: 5 Joseph Rodgers: 1st Full Restoration
This Joseph Rodgers is my first full restoration. I have previously done a ‟Light Restore on about a dozen razors. A Light Restore for me is leave the scales on, do a Dremel metal polish, hone, strop & shave. I have some nice shavers with just that, but some needed a little more attention.
Open to suggestions for improvement.
This Rodgers had some solid black scales. I dont know if they were Bakelite or celluloid, but there was a light black shadow on the blade. Suspected the beginnings of cell rot. The Dremel polish took that away, but alas, the shadow came back after about 2+ years. It was time to replace the scales and do a full restoration!
The metal work was easy for me. I did a little light sanding for three reasons. One, to remove the cell rot. Sanding goes deeper than a polish and I dont want it to come back. I will keep an eye on it to attack early if any signs of return show up. Second, there were some circular scratch marks around the pivot hole. The previous scales were likely a little too tight, and there were no inside washers between the blade and scales. Third, there were some minor scratches along the blade, and it was not as smooth and shiny as Id like. Light sanding was the right remedy for all three.
Then took it to a buffer wheel with compound. This was almost fun! I take great pleasure in making metal shiny. The blade was a good shaver before, but now is smoother and shinier than a simple Dremel polish could ever do. I did use a damaged beyond repair razor for practice, but the sanding and buffing went well and went as expected.
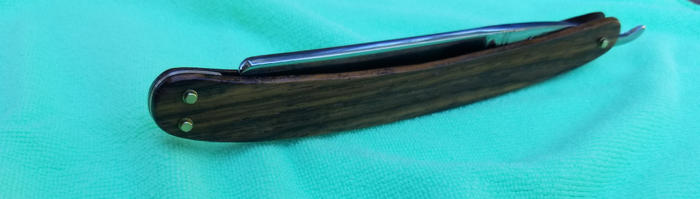
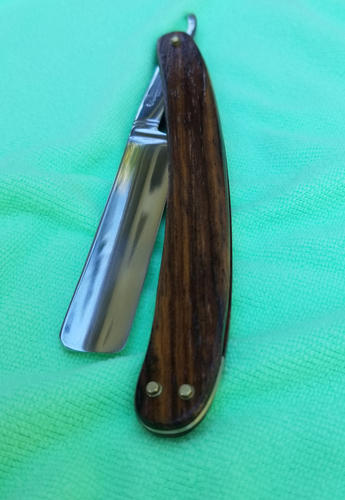
The scales was the challenging part for me. This is the third set of scales I made for this razor, the first two was ‟Lessons Learned practice. I have 14 shavers, one an AOS that I bought brand new. Most, including the new AOS, have the solid black scales. I wanted to add some color to my collection. I used Cocobolo wood. No stain for color, this is natural color with a few coats of clear coat.
I used brass micro fasteners, with matching brass wedge. Ill do brass rod pins in the future. I did two wedge ‟pins for a couple of reasons. One, it can be a design choice, and it works. Two, sanding the wedge down flush with the scales was my first time. This is my first wedge. I thought metal might be a little more grabby on the belt sander than other material, and two pins would make it more stable during sanding. With more experience, I may opt to do only one pin in future. But for my first restore, this was the right choice.
The blade was not centered in the scales. Placing the bare blade on a flat tabletop, it was not true and flat. It was bent slightly, something not uncommon as I discovered on this forum. I know there are some more complicated solutions, but I made it simple. I knew I wanted inside washers between the blade and scales to avoid the circular scratching that I just sanded away. I put one washer on one side, and two washers on the other side, and the blade drops dead center no problem. As far as I am concerned, this is a simple solution. I know reading on this forum, some guys dont like to do that, and there are more complicated ways of doing something different. The scales were flat and true, the blade was the problem. With more experience, and a solid argument on why two washers on one side is a bad idea, I may do something different in the future. But for my first restore, this worked fine. A slightly bent blade also helps explain the circular scratch marks from the previous scales that I just sanded away. I believe the inside washers will prevent the circular scratches from happening again.
I dont have very good photos before. Below are photos after the restore. I have no light box, so photos are just OK. I honed, stropped, and shaved. Its a good shaver!
I know there is no science to support this idea, but I believe the new scales made it a better shaver!
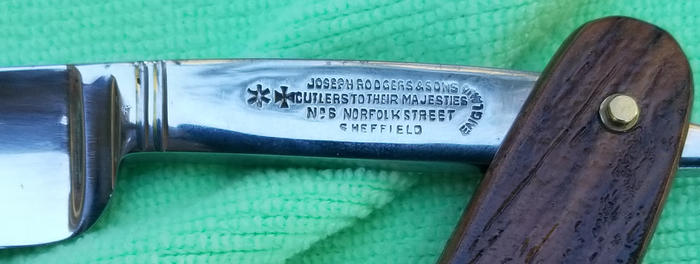
My estimate is this Rodgers was manufactured sometime 1880-1920. Any additional info on time of manufacture?
Thanks to all the guys on this forum who have posted tips for restorations. I learned a lot from reading, photos, and videos; but learned even more from doing.
My next restore is a Clauss that also had the dreaded black shadow, also light. Ive already removed the scales and done the metal work. Next is new scales on that one as well.

-
02-23-2021, 12:32 AM #2Senior Member


- Join Date
- Feb 2018
- Location
- Manotick, Ontario, Canada
- Posts
- 2,814
Thanked: 563
Looks like a great restore. I think your scales and the wedge look great.
PaulFLUS likes this.David
Shared sorrow is lessened, shared joy is increased
― Spider Robinson, Callahan's Crosstime Saloon
-
02-23-2021, 01:14 AM #3
Good job!
Looks greatIf you don't care where you are, you are not lost.
-
02-23-2021, 01:54 PM #4Senior Member

- Join Date
- Apr 2012
- Location
- Diamond Bar, CA
- Posts
- 6,553
Thanked: 3215
Looks good. The problem with wood is you can only get it so thin.
Try some horn, it is inexpensive, easy to work and polish. Pinning is not as difficult as it sounds, especially in brass.
A wedge in place of a spacer will keep the scales tight at the pivot pin. A wedge is easy to make, cut you wedge a bit large then shape with a belt sander, file or sandpaper glued to a stick, once pinned tight.
If you use a single pin you can push the pins to better center the razor. Did the razor close centered in the old scales. Study the razor and old scales before you disassemble, you can learn a lot.
Try to get a high finish by sanding with a backer to 2k, then buff to a high gloss with Stainless Compound. This will prevent rounding of detail and edges.
Nice work.rolodave likes this.
-
02-24-2021, 01:37 AM #5Senior Member

- Join Date
- Dec 2018
- Location
- Gainesville, FL
- Posts
- 6,845
Thanked: 681
Looks better than my first restoration. I like the wood.
Iron by iron is sharpened, And a man sharpens the face of his friend. PR 27:17


 Reply With Quote


