Results 1 to 10 of 14
Thread: Second Restore Crown & Sword
-
03-01-2010, 05:49 PM #1
 Second Restore Crown & Sword
This is my second restore, a Crown & Sword. Scales done in Leopard wood with gold leaf stripe, finished with 8 coats of pre-catalized laquer. The wedge was made from the old broken scales. Thank you SRP for the wealth of information I have obtained and used for this restore. Looking forward to hearing your comments and suggestions. Thanks Tony B.
-
03-01-2010, 06:48 PM #2

That is a beautiful razor. Great work!!
“Two things are infinite: the universe and human stupidity; and I'm not sure about the universe.”
Albert Einstein
-
03-01-2010, 08:38 PM #3

Very nice!
I have a few questions. What did you use to cut off the tip of the blade? Also, what did you do for polishing? I'm just curious, because your restoration came out really well.
Thanks
-
03-01-2010, 10:27 PM #4
-
03-01-2010, 11:11 PM #5

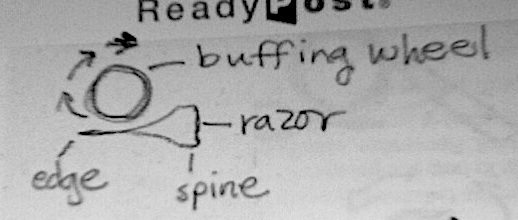
To cut razor I used my dremel with a carbon fiber cut off wheel, then shaped it with dremel using a grinding stone and diamond file. Polishing I wet sanded starting with 400 gt, 600 gt, 1000 gt and finished wet sanding with 2000 gt. I prefer 3M sand paper. Then I polished using dremel with polishing wheel using " Stainless" polishing compound and finishing with " Jewelers rouge" polishing compound. And final cleaning polish with " Mothers" metal polish, or any standard metal polish will work fine. BECAREFUL USING DREMEL POLISHING POLISH WITH ROTATION OF WHEEL GOING TOWARDS RAZOR NOT AWAY!!!! Hope that helps
Tony B.
-
The Following User Says Thank You to Brando For This Useful Post:
heirkb (03-02-2010)
-
03-02-2010, 12:45 AM #6

Nice polish & good job on the cut & shut.
Scales look a tad beefy compared to original but might be the pics or new shape.The white gleam of swords, not the black ink of books, clears doubts and uncertainties and bleak outlooks.
-
03-02-2010, 04:41 AM #7
-
03-02-2010, 12:07 PM #8

That is an excellent job! Congrats!

It looks better than new, and the scales you made are great!
-
03-02-2010, 07:51 PM #9

very nice. I really dig those little gold lines - how did you do taht? also just curious, what exactly do you mean "rotation toward blade not away" - ?
-
03-03-2010, 02:33 AM #10

This is a tough one to describe through words, because the word towards is confusing. The dremel is technically going towards the edge in either direction that it's rotating.
Here's a quick drawing I made that may help. The arrows indicate the direction the dremel should be spinning so as to avoid damaging the edge. You can see that if it were spinning the other way, it could get caught and chip the edge badly (I speak from personal experience here)

-
The Following User Says Thank You to heirkb For This Useful Post:
Mijbil (03-03-2010)


 LinkBack URL
 About LinkBacks


 Reply With Quote


