
Results 1 to 10 of 23
 7Likes
Thread: My first WIP
 LinkBack URL
 About LinkBacks
-
08-03-2012, 01:33 AM #1Learning something all the time...


- Join Date
- Jul 2012
- Location
- Central Missouri
- Posts
- 1,690
Thanked: 247 My first WIP
This is nothing special compared to some of the fantastic restorations I have seen here, but I thought I would share my enthusiasm with you anyway.
A little background first. A co-worker found his grandfather's razors and offered them to me for very little. Knowing nothing of them I purchased them anyway. Come to find out they were in reasonable shape, but like many vintage attic finds....they needed some work.
I honed them first, and repaired the edge damage that was present on some of them, unfortunately I took very few photos of them prior to doing any work. Regardless, my photography skills are lacking lately, and there is little to no chance of me capturing an edge restoration in photos.
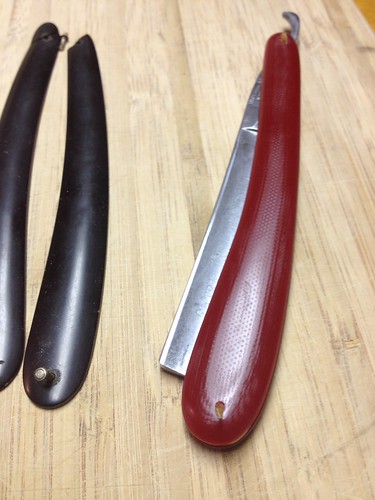
Another problem they had was the scales were loose...and in the process of attempting to tighten one, I broke both scales.
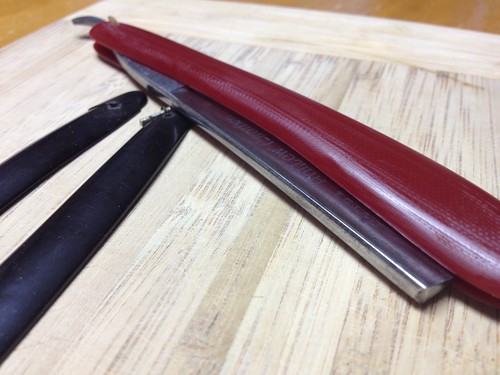
That brings us to the subject of this thread. Here is my meager attempt at making a set of slabs (and cleaning up the blade) on one of my attic finds.
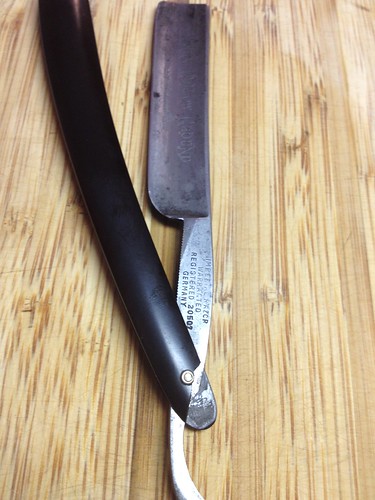
These are from earlier tonight. The scales were broken and the blade still looked a bit rough...though it had a nice shave ready edge.
So I traced out a pattern on some red G-10 I had laying around and started sanding...Ill spare you a bunch of progress photos, here are the scales after 600 grit sanding/polishing. I will probably leave them at this finish because I like the looks of it...and any finer polish might get a little slicker than I would like.
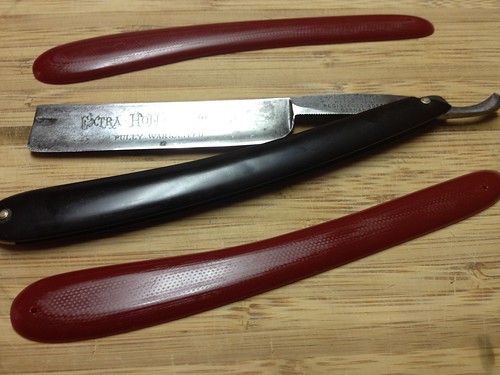
This image shows a nice close up of the blade:

So I headed back down to the basement and removed the pins and old scales. I cleaned up the blade, wire brushed it, and buffed it a bit. No real effort to put a brilliant polish on this one, I wanted to keep the etching and just remove some of the heavy spots. I then did a test fit, and reassembled it with the old wedge (which is too small) and pinned it together with some wood pins I carved (just for a few pictures).
That is enough for tonight. I will probably work on a wedge (perhaps lead) this weekend, and relieve the interior of the scales a bit for better fit. At some point perhaps Ill get some photos of the slightly improved blade...I just wanted to show off the scales so far.
Nothing amazing, but I am pretty happy with them so far.
Thanks for reading (for those of you that made it this far)
-
08-03-2012, 02:18 AM #2
Dang respectable, Unit. 'Looks very good.
When it comes time to hone, put 80% of the effort into getting a really good bevel, and the other 80% into the finish. Should you wish a hand on the honing - pm me. 'Just the cost to mail it back to you.
'Hope this one brings many smiles to your face.
-
The Following User Says Thank You to pinklather For This Useful Post:
unit (08-03-2012)
-
08-03-2012, 02:25 AM #3Learning something all the time...
- Join Date
- Jul 2012
- Location
- Central Missouri
- Posts
- 1,690
Thanked: 247
Thanks a lot. I have honed this one and shaved with it, but it's going to need to be redone

I'll keep that in mind...it's going to be a while though...I still have to source pins and washers and learn how to set them LOL.
I am starting to think a ghost jade G-11 wedge might look interesting...must...not...rush...this...one
-
08-03-2012, 04:07 AM #4< Banned User >
- Join Date
- Mar 2012
- Location
- Frozen Wasteland, eh
- Posts
- 2,806
Thanked: 334
Unit, you're doing some pretty good work there, buddy! You may have a future in razor restoration.

-
The Following User Says Thank You to mapleleafalumnus For This Useful Post:
unit (08-03-2012)
-
08-03-2012, 10:54 AM #5Senior Member

- Join Date
- Jun 2009
- Location
- Colorado Springs
- Posts
- 1,769
Thanked: 1045
The scales look nice, but you have the same problem I have... I can't quite master that inside curve.. About 1/3 othe way down from the fat end it is hard to get perfect like the old set, it bulges slightly... I don't know the secret to nailing that... I have been trying for over a year now now.. I want to make them more symeetrical like the originals... It seems like,the pros like Undream, glenn, and Max do it easily, but I don't know how they do it.. I have burned through a lot of G10 trying..
-
The Following User Says Thank You to Wintchase For This Useful Post:
unit (08-03-2012)
-
08-03-2012, 11:19 AM #6Who's that guy think he is...

- Join Date
- Jun 2011
- Location
- The North Coast, Ohio
- Posts
- 2,455
Thanked: 146
Great looking work.
Luck is a matter of preparation meeting opportunity. ~Lucius Annaeus Seneca
-
The Following User Says Thank You to JoeSomebody For This Useful Post:
unit (08-03-2012)
-
08-03-2012, 11:58 AM #7Learning something all the time...
- Join Date
- Jul 2012
- Location
- Central Missouri
- Posts
- 1,690
Thanked: 247
Wintchase, thanks for your constructive comments. However, I am afraid you have exposed more of my ignorance regarding straights because I do not understand what bulge you are referring to. I'd enjoy dome education here.
Please go not misunderstand. I certainly do appreciate your comments and I do not expect that my work is great on my first attempt. I seriously just want to learn from more experienced members here
I inspected both of my new slabs and both old slabs and cannot see any bulges that are not similar between them. I do see that my slabs are more massive and wider, but I wanted that. Also the "grain" of the G-10 makes for some illusions that I'm not sure I love
-
08-03-2012, 12:17 PM #8Senior Member

- Join Date
- Jun 2010
- Location
- Chapel Hill,NC
- Posts
- 709
Thanked: 262
Very nice. That's very nice work, especially to start off with. Looking forward to seeing more.
-
The Following User Says Thank You to nipper For This Useful Post:
unit (08-03-2012)
-
08-03-2012, 12:44 PM #9Learning something all the time...
- Join Date
- Jul 2012
- Location
- Central Missouri
- Posts
- 1,690
Thanked: 247
I am sure there will be more at some point...but I am in no hurry to damage the few razors I have
-
08-03-2012, 01:00 PM #10Who's that guy think he is...
- Join Date
- Jun 2011
- Location
- The North Coast, Ohio
- Posts
- 2,455
Thanked: 146
I think Wintchase may have been referring to the bow that the wedge puts on the scales. Ideally you would manipulate the wedge that causes the bow so the tang would be "square" when the razor closed I believe. Some of our more experienced restorers should chime in here.
Luck is a matter of preparation meeting opportunity. ~Lucius Annaeus Seneca


 Reply With Quote

