
Results 11 to 19 of 19
 19Likes
Thread: My first two homemade razors
 LinkBack URL
 About LinkBacks
-
09-25-2012, 12:15 PM #11Senior Member


- Join Date
- May 2011
- Location
- Merthyr Tydfil South Wales UK.
- Posts
- 5,601
Thanked: 1413
Clever Man indeed, I have thought about having a go at making a razor, but I don't have access to that kind of tooling, but I'm a long time British Blade member and have watched numerous blades with O1 steel having heat treatment with very informative video's, forgot to say great looking pair of blades very well done.
Jamie.Wherever youre going never take an idiot with you, you can always find one when you get there.
-
09-25-2012, 01:02 PM #12I'm on The Straight Road


- Join Date
- Sep 2011
- Location
- Toronto
- Posts
- 1,371
Thanked: 183
Good job! Those turned out really nice.
-
09-30-2012, 11:02 AM #13Member

- Join Date
- Apr 2011
- Location
- Brisbane, Australia
- Posts
- 1,434
Thanked: 642 My first two homemade razors
Well done. Two fine razors. They look really nice.
Stu
-
09-30-2012, 12:19 PM #14I love Burls....... and Acrylic

- Join Date
- Mar 2012
- Location
- Baden, Ontario
- Posts
- 5,475
Thanked: 2284
I can only imagine how awesome you felt when you finally got these done. Its always a great feeling when you have created something that will last forever. Just think, in 200 years someone could still be using one of these and posting it on a website like this saying " look what I scored today!" great job!!
Burls, Girls, and all things that Swirl....
-
10-01-2012, 09:22 AM #15Grinder

- Join Date
- Jul 2007
- Location
- Baytown, Texas
- Posts
- 324
Thanked: 340
Thaat's a good start....keep it up. Your finish is very nice
Bob
-
10-01-2012, 12:42 PM #16Member
- Join Date
- Mar 2012
- Location
- Somerville, MA
- Posts
- 46
Thanked: 18
Thanks HARRYWALLY. It does feel awesome, and its nice to think these might be useful for a long, long time. I think a more likely scenario is that whomever is dealing with my stuff when I die will toss them in the dumpster! But even if that is the case they could be recycled easily or would degrade well in a landfill. They do have some technical issues so I don't know how much they would be valued by some future RAD afflicted personage, though if they made it to 200yrs that would make them interesting for age alone. Originally Posted by HARRYWALLY

-
10-01-2012, 12:48 PM #17Member
- Join Date
- Mar 2012
- Location
- Somerville, MA
- Posts
- 46
Thanked: 18
Thanks Bob. The finish is ok, probably looks worse in person than on camera. I think up close a knowledgeable person could quickly tell they are amateur efforts, but I'm pretty happy with them as a first effort. Originally Posted by boballman
-
11-30-2012, 05:11 PM #18Member
- Join Date
- Mar 2012
- Location
- Somerville, MA
- Posts
- 46
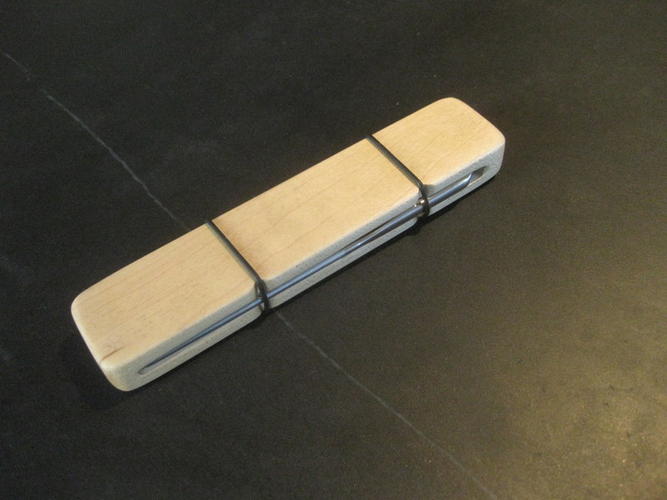
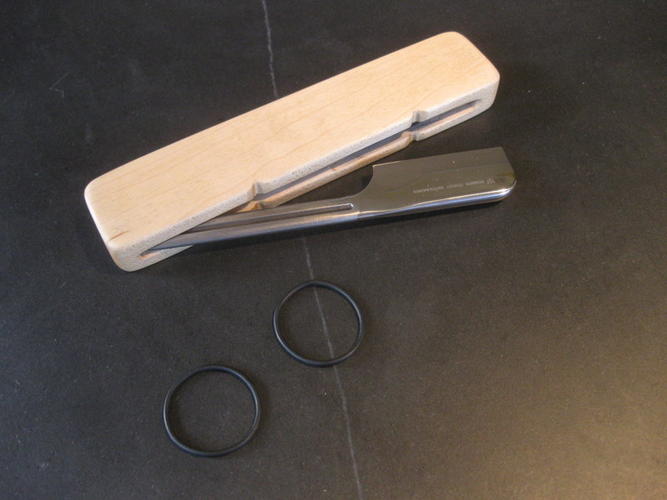
Thanked: 18 Made a quick blade protector for these razors
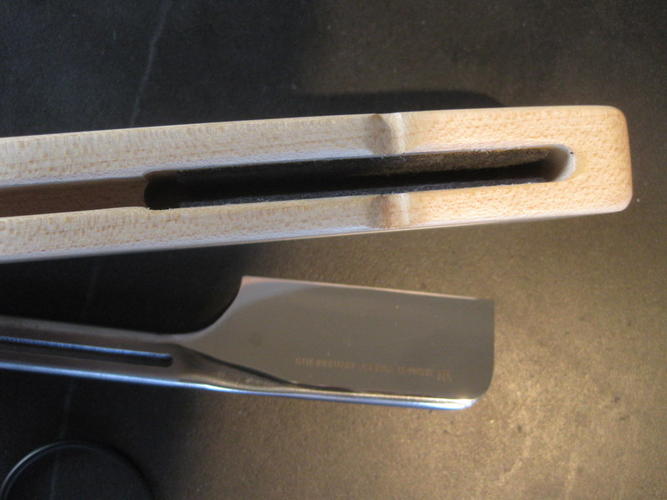
One problem with the fixed blade design is of course blade protection, which is inherent in a folder but totally absent for a fixed. I've been just keeping my razors resting on a piece of fabric on the top shelf of my medicine cabinet, but this is hardly idea from a safety or blade protection point of view. In august I travelled to California to visit with family, and I wanted to take along a straight shaving kit to use while there.
So the day before I left I took a chunk of maple from the scrap pile in my basement to work with me and made a super simple razor carrier with the help of the milling machine. I milled a slot in the edge using a 6.35mm end mill (which is the same as the starting stock thickness), as long as the blade section and a few mm deeper into the wood. Then I used a smaller diameter cutter to mill a shallower, longer slot for the handle. Then a cross file for the O-ring detents, some sanding, and a few coats of Waterlox finish. When I got back from California I superglued a piece of felt into the blade well; I'm pretty sure the blade is not actually resting on the felt at the bottom, but I wanted it in there to help guide the blade into place and brace it once it was there. The O-rings of course stop the blade from falling out
Not as fancy as some of the stuff I've thought up for fixed blade covers, but easy enough that it has become a reality instead of a day dream. And its pretty functional, I think, as a travel case.
-
-
11-30-2012, 05:37 PM #19Senior Member

- Join Date
- Nov 2012
- Location
- Brooklyn, NY
- Posts
- 111
Thanked: 12
Great looking work. I really like the style of your work.


 Reply With Quote