
Results 1 to 9 of 9
 8Likes
Thread: My first restoration/custom build
 LinkBack URL
 About LinkBacks
-
10-03-2012, 02:11 AM #1Senior Member


- Join Date
- Sep 2012
- Posts
- 112
Thanked: 10 My first restoration/custom build
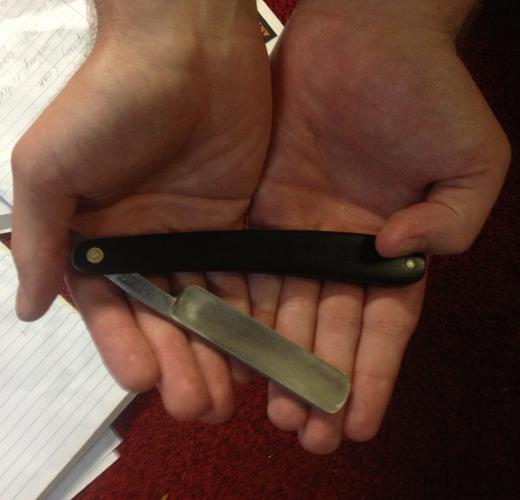
This is a Hoffritz that I was given to me by someone who bought it then lost interest. It was nothing short of dilapidated when I got it so this was more of a practice run for future work that will be with razors of better condition.
When I got it the scales were in disrepair, the blade had tons of black streaks and black marks, and the pivot area was badly rusted. I buffed and polished it to remove the filth on it then rather then grind away a lot of metal I decided to do a white vinegar patina on it to cover up the black marks. I topped it off with some ebony wood scales I found on ebay.
There was only one problem with it, the tang had become uneven somewhere along the line and it doesn't sit perfectly in the scales and has a slight angle to it. Given this was my first time and that it was with a seriously damaged razor I'm actually pretty happy with how it turned out. I cautiously declare this a success!
-
10-04-2012, 12:58 AM #2Razor Vulture


- Join Date
- Oct 2010
- Location
- Lone Star State
- Posts
- 26,134
Thanked: 8616
Good you got it going, SteelStubble! Take it out into the sunlight and take some pics so we can see it better!
Hoffritz is an excellent brand. If I may, try to find some skinnier washers for the top. What you have done on the scales and top pin is super functional. The wide washers will provide great stability. However, matching pins is key to a balanced job. If you mod the top pin, mod the bottom one! If it is clean and tight, that is most important!
From here, it looks like a likely shaver! Good job!
Tom
-
The Following User Says Thank You to sharptonn For This Useful Post:
Steelstubble (10-04-2012)
-
10-04-2012, 01:45 AM #3Senior Member
- Join Date
- Sep 2012
- Posts
- 112
Thanked: 10
Thank you! I did shave with it and it performed excellently. In regards to the washers, the scales I ordered came pre-drilled and pre-pinned on the end ( I didn't want my first restoration to be to big a mess ). That is strange though that the washers would be provided for use on the top but the bottom pin wasn't done that way, and I didn't like the idea of pinning it without the washers. I'll work on getting better pictures soon, I'm not a big camera guy and had to borrow one real quick to take that picture.
sharptonn likes this.
-
10-04-2012, 07:43 PM #4Senior Member

- Join Date
- Jun 2011
- Location
- Torhout, Belgium
- Posts
- 473
Thanked: 41
Isn't there a small chance those big washers are for the inside of the scales - blade and not the outside??
sharptonn likes this.
-
The Following User Says Thank You to Dimitry For This Useful Post:
Steelstubble (10-04-2012)
-
10-04-2012, 07:57 PM #5Razor Vulture
- Join Date
- Oct 2010
- Location
- Lone Star State
- Posts
- 26,134
Thanked: 8616
Yes! Kindof obvious as you mention, Dimitry! If you want, PM me, Steelstubble, and I will try to help you with some collars and advise. If you can unpin it, it won't take much to sort it!
-
The Following User Says Thank You to sharptonn For This Useful Post:
Steelstubble (10-04-2012)
-
10-04-2012, 10:09 PM #6Senior Member
- Join Date
- Sep 2012
- Posts
- 112
Thanked: 10
That does make sense that the washers would go on the inside. I'll have to carefully unpin them and sort this out. Thanks, I never thought of that but its so obvious now. Here's to hoping I don't wreck the pin while I'm unpinning it!
-
10-09-2012, 10:56 PM #7Senior Member
- Join Date
- Sep 2012
- Posts
- 112
Thanked: 10

All finished! This time the washers are on the correct side and everything turned out great. Its not perfect, namely because of my questionable aim with a hammer, but its finished. I even got the lockup tighter on this pinning and it sits square in the scales now with no problems. The closest thing to a glitch is that the scales when looked at closely are ever so slightly uneven because of the unevenness of the pivot area on the blade itself. Basically each scale is bent differently to conform to the razor.
I already know its a shaver from tests and I think this little project will be in my shaving rotation for quite some time. Its my least fancy razor due to the original damage on the blade and my amateur mistakes but it has its worth in spades for sentimental value.JBHoren likes this.
-
10-09-2012, 11:23 PM #8Razor Vulture
- Join Date
- Oct 2010
- Location
- Lone Star State
- Posts
- 26,134
Thanked: 8616
Sweet! Nice going, Sir! I have a saying, "nothing is perfect". It looks perfectly nice!

Tom"Don't be stubborn. You are missing out."
I rest my case.
-
The Following User Says Thank You to sharptonn For This Useful Post:
Steelstubble (10-09-2012)
-
10-11-2012, 02:26 AM #9Member

- Join Date
- Apr 2011
- Location
- Brisbane, Australia
- Posts
- 1,434
Thanked: 642
Well done on you first restore.
Stu
-
The Following User Says Thank You to Str8Raz0r For This Useful Post:
Steelstubble (10-12-2012)


 Reply With Quote