
Results 1 to 10 of 10
 10Likes
 LinkBack URL
 About LinkBacks
-
05-11-2013, 06:38 PM #1Senior Member


- Join Date
- Aug 2011
- Posts
- 174
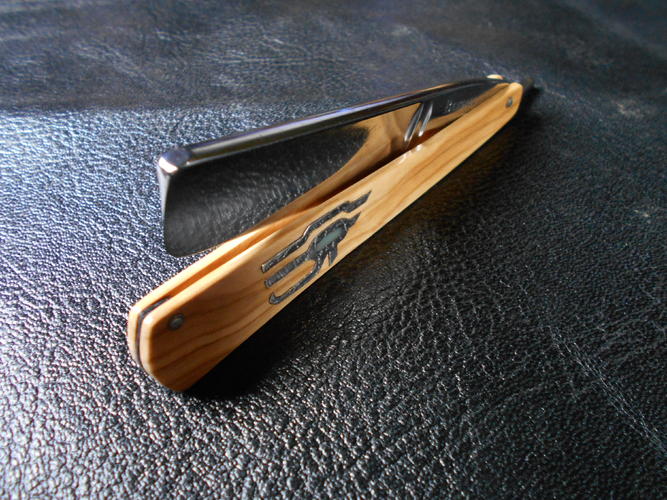
Thanked: 15 "Eye of Horus" 13/16 Bengall in olivewood w/inlay
Hello everyone, this is my latest :
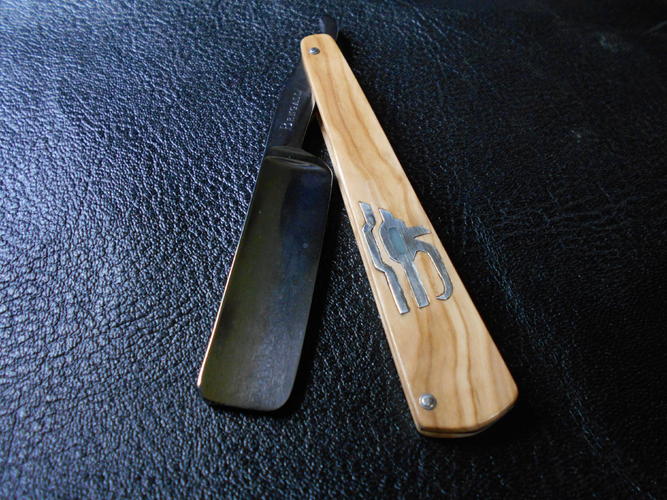
It is a bigger Bengall hollow ground blade in olivewood scales, the inlay is nickel silver and epoxy filled with turquoise dust.
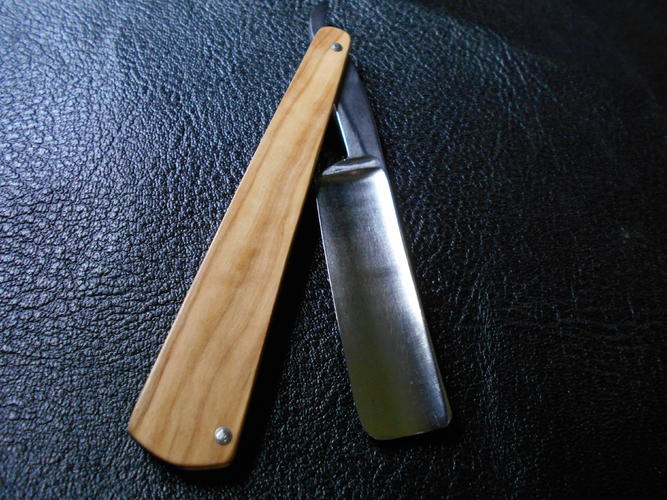
I've always liked olivewood, and the blade was a gift so I wanted to mess around with something for myself.
The wedge is black plastic. Gonna hone it up today, and hopefully test it on Monday. Thanks for looking
-
05-11-2013, 07:14 PM #2Senior Member

- Join Date
- Mar 2013
- Location
- Tallahassee, FL
- Posts
- 354
Thanked: 57
Love the idea behind it. How did you go about getting the shape into the wood?
-
The Following User Says Thank You to Jonah For This Useful Post:
dfrazor (05-11-2013)
-
05-11-2013, 08:38 PM #3Senior Member
- Join Date
- Aug 2011
- Posts
- 174
Thanked: 15
I made the inlay first, traced the shape where I wanted it, and then cut a channel fitting it to a depth even with the wood's (finished) surface. I use clear epoxy as adhesive. Just takes practice is all. Originally Posted by Jonah

-
05-11-2013, 09:00 PM #4Senior Member
- Join Date
- Mar 2013
- Location
- Tallahassee, FL
- Posts
- 354
Thanked: 57
How did you cut the channel into the wood? I was thinking I would like to do an inlay at some point, but I don't have a dremel or anything similar.
-
05-11-2013, 09:06 PM #5Senior Member
- Join Date
- Aug 2011
- Posts
- 174
Thanked: 15
I use a rotary tool now, but when I first started I didn't have one. If your inlay material is thin enough, you can cut the channel somewhat reasonably with files and rifflers. Micro chisels and other small hobby tools would work as well. Originally Posted by Jonah
Jonah likes this.
-
The Following User Says Thank You to dfrazor For This Useful Post:
Jonah (05-11-2013)
-
05-12-2013, 12:36 AM #6Historically Inquisitive


- Join Date
- Aug 2011
- Location
- Upstate New York
- Posts
- 5,782
- Blog Entries
- 1
Thanked: 4249
Nice blade and interesting scales, the inlay looks very good, Enjoy!
-
The Following User Says Thank You to Martin103 For This Useful Post:
dfrazor (05-12-2013)
-
05-12-2013, 01:49 AM #7Senior Member

- Join Date
- Nov 2012
- Location
- Indiana
- Posts
- 258
Thanked: 30
The location of the pins is interesting. Did you use any adhesive at the wedge?
-
05-12-2013, 02:03 AM #8Senior Member
- Join Date
- Aug 2011
- Posts
- 174
Thanked: 15
The pivot pin had to be that far off-center to allow the blade to fit right. I wanted straight scales, because I like the really old ones that were straight. The wedge pin is where it is because I wanted it as far in toward the blade as possible. The other side is not clamped together perfectly tight but the gap is so small it is barely noticeable. I thought about doing two pins on the wedge, but after test-fitting it with just one I realized that it didn't really need it. The shoulder of the tang is pretty wide, and it causes the scales to kind of "pinch" down on the thinner wedge, if that makes sense. Originally Posted by CastSteel
-
05-12-2013, 02:08 AM #9Senior Member
- Join Date
- Nov 2012
- Location
- Indiana
- Posts
- 258
Thanked: 30
I really like it. You did a very nice job.
-
The Following User Says Thank You to CastSteel For This Useful Post:
dfrazor (05-12-2013)
-
05-12-2013, 02:25 AM #10Senior Member


- Join Date
- Nov 2012
- Location
- Across the street from Mickey Mouse in Calif.
- Posts
- 5,320
Thanked: 1184
Love the inlay. It's out of the ordinary and you did a great job on it. Be proud.
Good judgment comes from experience, and experience....well that comes from poor judgment.
-
The Following User Says Thank You to 10Pups For This Useful Post:
dfrazor (05-12-2013)


 Reply With Quote