Page 1 of 11 12345 ... LastLast
Results 1 to 10 of 101
Like Tree139Likes

Thread: RSO # 1

  1. #1
    Senior Member blabbermouth 10Pups's Avatar
    Join Date
    Nov 2012
    Location
    Across the street from Mickey Mouse in Calif.
    Posts
    5,320
    Thanked: 1184

    Default RSO # 1

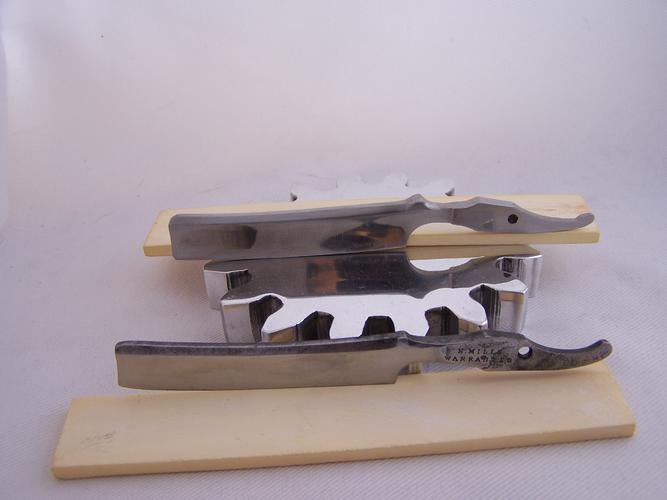
    I bought some 1/4 by 3/4 01 to play with and learn the forge and grinder. The first piece I used (and let others use) to get acquainted to the grinder. This piece turned into something after forging a tang. I had no thought pattern except I picked it up one day and decided to see how hard it would be to replicate an old favorite of mine with some style of my own added.


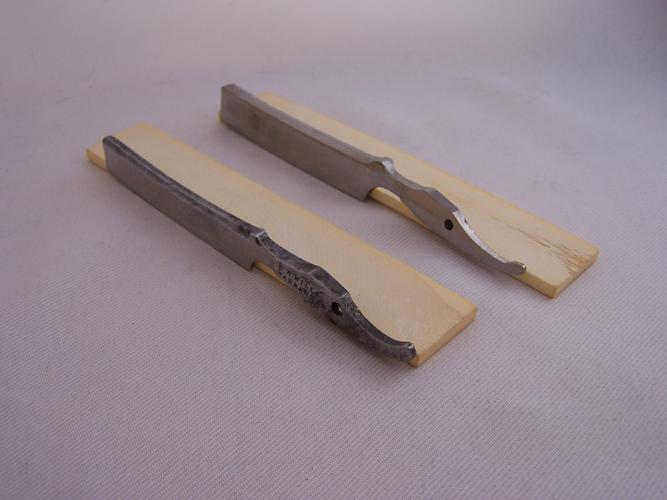
    The American point, if there is such a thing. If not there is now :<0) I will explain the details of my version if your really past the joke of it. The blade will be 5/8 x 3 " and the bone in the picture will be the scales for it.
    Name:  nnm1.jpg
Views: 823
Size:  23.0 KB
    It's not an exact copy and I wasn't going for that. This is my first grind :<0)
    Name:  nnm2.jpg
Views: 785
Size:  26.4 KB

    I have to hit the top of the tang some more near the spine. I hadn't noticed the transition on the Mills being part of the drop in the spine. So many details to think about on this one.
    Name:  nnm3.jpg
Views: 772
Size:  24.2 KB

    The Mills had some seriously bad regrinding done and so I copied the details from the back side of it more or less. I think I will wait until it is heat treated to do any more clean up on the detail work. There are more fine details like rounded bevels in the thumb notches and things like that.
    Name:  nnm4.jpg
Views: 812
Size:  24.7 KB

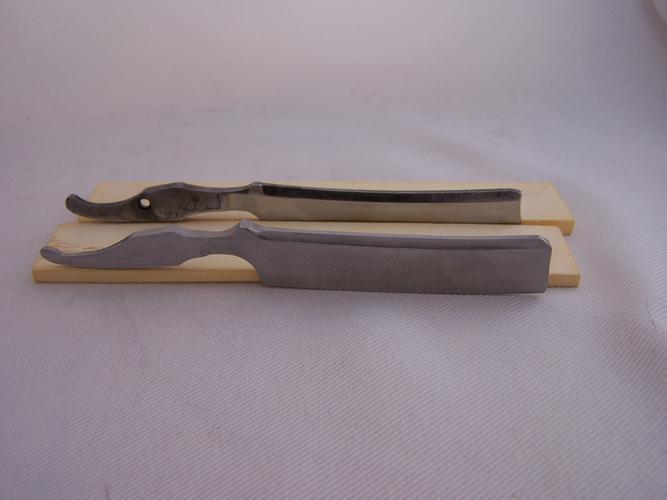
    Just before the heat treat I am going to try to punch the pin hole blacksmith style. I hadn't thought about a hole until the thing actually started to look like it was going to work out. Now it's so freaking hard no drill will penetrate it. I think the blacksmith method (if it works ) is going to be more my style of custom anyway. Old methods as much as possible and old looks. Clones or recreations if you will.

    So the plan now is 1. A little more grinding on the spine/tang transition to smooth it out for stropping. 2. 1 more heat to punch the hole. 3. Right after that heat bring it to temp and quench. Not sure which oil to use so I could use best suggestion there. I don't have a lot of room or bucks for 5 gallons of quenching oil right now. 4. Final grind will be 8" on the blade face. 5. Check all the detail work and finish as necessary. 6. Make some scales. ( bone is new territory for me). Can hardly wait to hone and try it.

    Thanks for looking and stop me before I make any big mistakes. :<0)
    Good judgment comes from experience, and experience....well that comes from poor judgment.

  2. The Following 6 Users Say Thank You to 10Pups For This Useful Post:

    Chevhead (06-09-2014), MikeB52 (02-07-2016), Phrank (03-19-2015), ScottGoodman (06-21-2014), spazola (06-09-2014), Trimmy72 (06-10-2014)

  3. #2
    Senior Member
    Join Date
    Mar 2011
    Location
    Corcoran, Minnesota
    Posts
    665
    Thanked: 170

    Default

    If you normalize the blade, it should be soft enough so you can easily drill the pivot hole. I think Charlie posted a video about normalizing some time back. Bring the blade up to almost non-magnetic and air cool twice, and then again and cool in vermiculite or ashes overnight. I quench in used McDonald fry oil. Got it free, and it works fine. Good luck with your journey.

  4. The Following User Says Thank You to skipnord For This Useful Post:

    10Pups (06-10-2014)

  5. #3
    DVW
    DVW is offline
    Senior Member
    Join Date
    Jun 2014
    Location
    Eastern Washington State USA
    Posts
    406
    Thanked: 59

    Default

    Quote Originally Posted by skipnord View Post
    If you normalize the blade, it should be soft enough so you can easily drill the pivot hole. I think Charlie posted a video about normalizing some time back. Bring the blade up to almost non-magnetic and air cool twice, and then again and cool in vermiculite or ashes overnight. I quench in used McDonald fry oil. Got it free, and it works fine. Good luck with your journey.
    Agreed, It should not be hard to drill. I cool mine down in a bucket of sand, but get the same results. Also, you don't need that much oil. In the past I just filled up a cheap steel bread loaf pan from a second hand store. I would think that half a gallon would work. Motor oil, olive oil or any cooking (vegetable) oil should all work for O1.

    It is looking nice. Can't wait to see it finished. Very impressive, especially for a first attempt.

  6. The Following User Says Thank You to DVW For This Useful Post:

    10Pups (06-10-2014)

  7. #4
    Senior Member blabbermouth Chevhead's Avatar
    Join Date
    Feb 2013
    Location
    Upstate, New York
    Posts
    2,751
    Thanked: 708
    Blog Entries
    4

    Default

    That is BAD A$$!
    spazola and Euclid440 like this.

    Ed

  8. The Following User Says Thank You to Chevhead For This Useful Post:

    10Pups (06-10-2014)

  9. #5
    Senior Member blabbermouth Substance's Avatar
    Join Date
    Jun 2013
    Location
    Gladstone QLD AUSTRALIA
    Posts
    3,245
    Thanked: 804

    Default

    Looking Good so far
    can't wait to see the final product
    Saved,
    to shave another day.

  10. The Following User Says Thank You to Substance For This Useful Post:

    10Pups (06-10-2014)

  11. #6
    Senior Member blabbermouth 10Pups's Avatar
    Join Date
    Nov 2012
    Location
    Across the street from Mickey Mouse in Calif.
    Posts
    5,320
    Thanked: 1184

    Default

    Thanks for the tips, comments :<0) I figured I work hardened it when I shaped the tang and I have seen all of Charlie's vids a dozen times at least. I may go ahead and normalize but I was just thinking it would be quicker to punch a hole and I don't see many guys doing it these days. Got to try it. My first plan for this blade was a 6/8 but my metal guy only has limited supply of O1. I can get what I want in O1 in a day if I order it but I just got the 3/4 to fool around with the forge and anvil before I got serious. I thought I could draw it out at first and one hit on the spine ruined that idea. I guess what I am saying is I started fooling around to take a break from restoring once in awhile and it's working out better than I expected. I am so not ready I don't even have tongs made yet. I got this far and couldn't hold onto what's left of the stick of O1. This will be one of those drawn out threads. Come to think of it I started restoring the N. Mills ummmm a year ago. I was waiting 'till I got the grinder built to finish off the edge on that. Crap, talk about lists of things to do gotta go :<0)
    ScottGoodman and Chevhead like this.
    Good judgment comes from experience, and experience....well that comes from poor judgment.

  12. #7
    No that's not me in the picture RoyalCake's Avatar
    Join Date
    May 2013
    Location
    Los Angeles South Bay
    Posts
    1,340
    Thanked: 284

    Default

    Looking good pups! Man that piece came a long way. After everyone had played around with it I figured you'd use it to chuck at cars driving too fast down your street.
    Very nice my friend...
    Chevhead and dexter90723 like this.
    I love living in the past...

  13. The Following User Says Thank You to RoyalCake For This Useful Post:

    10Pups (06-10-2014)

  14. #8
    Senior Member blabbermouth 10Pups's Avatar
    Join Date
    Nov 2012
    Location
    Across the street from Mickey Mouse in Calif.
    Posts
    5,320
    Thanked: 1184

    Default

    Yeah that bit you gave me barely made a scratch. It's either normalize then drill or punch the hole before heat treat. Coin is in the air :<0)
    And the grinder practice blade still looks the same at about a 1/16 spine.
    RoyalCake likes this.
    Good judgment comes from experience, and experience....well that comes from poor judgment.

  15. #9
    Senior Member
    Join Date
    Mar 2011
    Location
    Corcoran, Minnesota
    Posts
    665
    Thanked: 170

    Default

    There is more than one reason to normalize. Soft enough to drill is one. Another is grain structure. If you don't normalize, you will have a very coarse grain structure, which is definitely not conducive to good steel in the final product. As far as vegetable oils are concerned, you need to be concerned about the flash temperature. Peanut oil is one that has a relatively high flash temp.

  16. The Following User Says Thank You to skipnord For This Useful Post:

    10Pups (06-10-2014)

  17. #10
    Senior Member blabbermouth 10Pups's Avatar
    Join Date
    Nov 2012
    Location
    Across the street from Mickey Mouse in Calif.
    Posts
    5,320
    Thanked: 1184

    Default

    Well I would rather do it right as long as this experiment is going good. I mean that's the purpose of it. To see what happens before I make a few at once. I still may try to punch the hole just to see how that goes although I do have 2 more blanks of O1 to play with. I'll check into the cost of quenching oil when I order more O1 the right size.
    Good judgment comes from experience, and experience....well that comes from poor judgment.

Page 1 of 11 12345 ... LastLast

Posting Permissions

  • You may not post new threads
  • You may not post replies
  • You may not post attachments
  • You may not edit your posts
  •