
Results 21 to 30 of 31
 22Likes
Thread: steel rounds as anvils..
 LinkBack URL
 About LinkBacks
-
11-23-2015, 06:21 PM #21Hones & Honing


- Join Date
- May 2005
- Location
- Saint Paul, Minnesota, United States
- Posts
- 8,023
- Blog Entries
- 1
Thanked: 2209
[QUOTE=BIGGUNDOCTOR;1568472
The large radiuses can make some nice spring tools to rough in the hollow grinds.
[/QUOTE]
Thanks for your post! The only part that I cannot wrap my head around is the above. If you can explain what "large radius" you are referring to, ....the side of the rounds? I can envision turning the rounds on their side and using that as a convex shaped anvil ?
Sorry, I do not understand "spring tools" in this context. Randolph Tuttle, a SRP Mentor for residents of Minnesota & western Wisconsin
-
11-23-2015, 09:25 PM #22Senior Member

- Join Date
- Feb 2010
- Location
- Yorkshire, UK
- Posts
- 204
Thanked: 61
Here's the one I use, it works well, within it's it's limitations. The anvil steel is en19.
 aka Michael Waterhouse
-
The Following User Says Thank You to mikew For This Useful Post:
Utopian (11-24-2015)
-
11-24-2015, 12:22 AM #23Tumbling down the rabbit hole...

- Join Date
- May 2011
- Location
- Calgary, AB
- Posts
- 445
Thanked: 27
I think he means that if you cut off slices at a tangent and held two opposing one another, you could make a gentle fuller similar to the hollow radius of a razor.
-
11-24-2015, 01:01 PM #24Junior Member
- Join Date
- Nov 2015
- Location
- Moapa Valley, Nevada
- Posts
- 11
Thanked: 3
Sorry about that, I forgot that this was not my blacksmithing forum.
Atchbo is correct, the two pieces are held together, and apart by a leaf spring that is doubled back on itself. That way all you do is place your item between them, and hit the top part so that it comes down onto the stationary lower pert. Google spring fuller to see what I am talking about, there are tons of styles of these tools.
I am just thinking that by doing this you can rough in the hollow grind to save some time, and also forge the grain structure closer to the finished item.
-
The Following User Says Thank You to BIGGUNDOCTOR For This Useful Post:
mikew (11-24-2015)
-
11-24-2015, 03:06 PM #25Senior Member


- Join Date
- Jul 2014
- Location
- Denver CO
- Posts
- 4,657
Thanked: 811
I borrowed this tool from a friend to try out. Originally Posted by BIGGUNDOCTOR

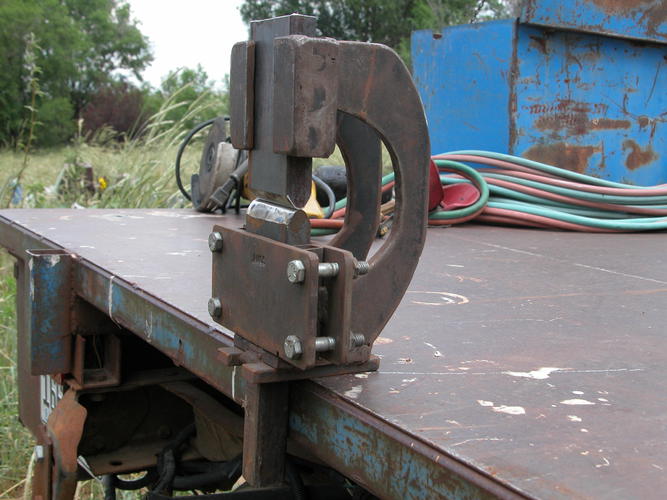
A more sophisticated approach to the same idea, but with small radius fullers. While it did produce a beautiful groove to start the hollow it was not worth the effort in the end IMO.
-
The Following User Says Thank You to bluesman7 For This Useful Post:
Utopian (11-24-2015)
-
11-24-2015, 03:10 PM #26
Going from triangle to hollow does not take a lot of time and allows you to make some alignment adjustments.
You also have to be much more careful in aligning things if you hollow it by hammering
Someone here did the test and you win some time grinding the hollows but lose it by requiring more care during forging. The pre ht hollow grinding is not where a lot of time is to be won.
an experienced smith might come out ahead but the gain would be fairly lowbluesman7 likes this.
-
11-24-2015, 06:23 PM #27Senior Member
- Join Date
- Jul 2014
- Location
- Denver CO
- Posts
- 4,657
Thanked: 811
+7.. That was my experience. Originally Posted by Bruno
-
11-24-2015, 07:50 PM #28illegitimum non carborundum

- Join Date
- Jan 2008
- Location
- Rochester, MN
- Posts
- 11,552
- Blog Entries
- 1
Thanked: 3795
Still, it looks like a fun toy!
Victor, did you try more than just hollowing with it? I wonder if you could draw out the steel in the direction of the edge with a series of properly placed whacks?
Also, do you know what its original intended purpose was? It seems that if it is mounted on a standard height work bench that it would be at an awkward height to hit with a hammer--which is how I assume that it is used.Last edited by Utopian; 11-24-2015 at 07:53 PM.
-
11-24-2015, 11:01 PM #29Senior Member
- Join Date
- Jul 2014
- Location
- Denver CO
- Posts
- 4,657
Thanked: 811
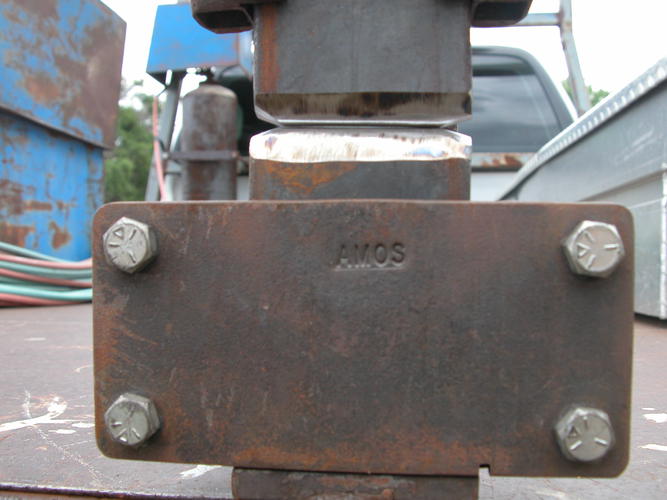
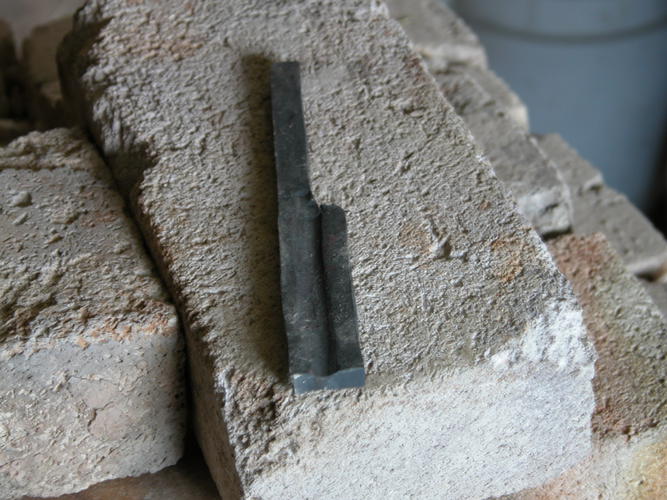
I just had it on my truck for pictures. The tang hanging down goes into the hardy hole in an anvil. I did not try more than the groove, but the tool is designed to be used with a number of different fullers of different shapes. I made the fullers shown and then returned the tool with them. My friend thought that he got a pretty good deal on the loan. Originally Posted by Utopian
-
The Following User Says Thank You to bluesman7 For This Useful Post:
Utopian (11-25-2015)
-
11-26-2015, 01:49 AM #30Hones & Honing
- Join Date
- May 2005
- Location
- Saint Paul, Minnesota, United States
- Posts
- 8,023
- Blog Entries
- 1
Thanked: 2209
Thanks you guys, that is very helpful.
Victor, I believe that tool is called a smithin magician or is close to it. I did look on YouTube and found some videos on spring swage's. From that I can envision what a spring fuller would look like and do.
Once I saw those vid's my imagination kicked in and I started thinking about hydraulic press with a fuller with an 8" radii and then I spoke with Mike Blue and he gave me some great advice ......beware the dreaded TAD! ( Tool acquisition disorder!)
and beware spending 90% of your time on making tools that you will only use 10% of the time.
Randolph Tuttle, a SRP Mentor for residents of Minnesota & western Wisconsin


 Reply With Quote
