
Results 1 to 10 of 22
 45Likes
Thread: Razor making how to for smiths
 LinkBack URL
 About LinkBacks
Threaded View
-
11-21-2015, 10:50 PM #4

Next bit is profiling it. I use a marker to draw the outline on the blank, working with the rough shape to make sure that whatever design I am making fits correctly. That means its not just a matter of making the outline, but the location of the shoulders has to match the shoulders on the blank to prevent wrong tapers. I also drill the pivot hole at this stage. In case you were wondering: no special method was used for the alignment of the hole perpendicular to the blade. I work with 2 mm drills for 1/16 holes. That is tight enough to not have slop in the pivot, while allowing enough room that the alignment of the razor in the scales depends only on the taper of the tang.
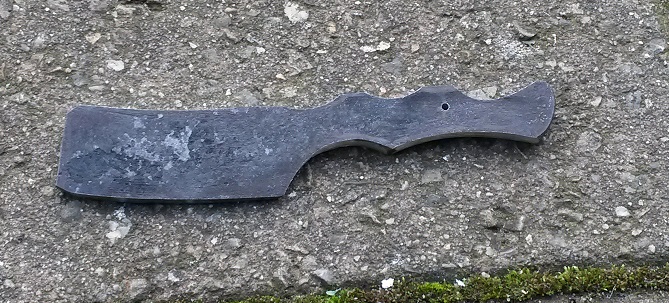
With that out of the way, I flatten the sides of the spine. This is a pretty important step, because the resulting flats are used to position the hollows of the blade. It is important that those sides are as close to vertical as you can make them. The spine is curved (pretty much always is with my designs) and if the sides of the spine are not ground perfectly vertical, the top view of the spine will look wonky. It will either look bellied or anorectic, depending on which way you did it wrong.
Note that at a future point, you will change that and it will no longer be vertical but kind of slanted. But at this point, they need to be vertical. Here you also see that the tang is tapered, because the flat ends about ½ into the tang.
Now, one thing that is absolutely crucial, and which is the number one mistake of knife makers venturing into the world of straight razors. The thickness of the spine needs to be at least ¼ of the width of the blade, and at most 1/3. This means that a razor that is 1 wide, the thickness of the spine needs to be at least ¼ and preferably a little bit thicker than that still. If the spine is too thin, a 3/16 thick spine on a 1 wide razor for example, that is what we would call a razor shaped object. It may look pretty, but it will be as useful as a bullet proof vest made from paper mache.
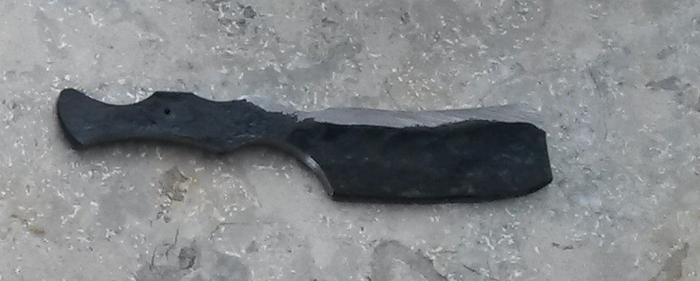
Now comes the first grind. I use a 8 diameter wheel with a 40 grit belt to make a first hollow in the sides of the blank. I do this to verify the geometry and to help me align the edge with the spine and the tang. This, like all the rest, is done freehand and eyeballed.

Youll notice that there are a still a couple of places that have some scale. That doesnt matter at this point. All I care about at this stage is that there are no defects, that the edge is parallel with the spine, and that when you look straight at the edge, it will be in the middle of the blade, and if you look at the edge from the front of the razor, it runs straight through the tang. This is perfectly demonstrated in the next picture by the red line.
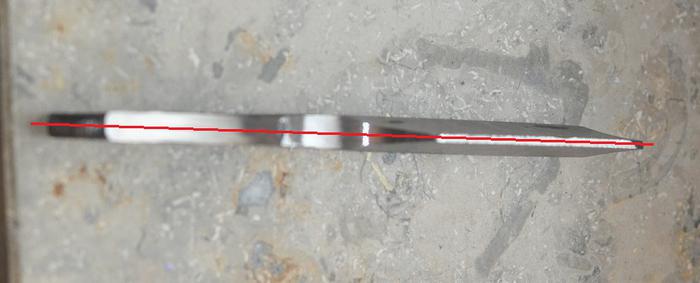
The alignment needs to be correct already. It doesnt matter if it is still a bit too thick at various points. But if at this point you would see that the edge does not align with the middle of the tang, you might as well throw it away because it is never going to be a razor. Its better to determine this as soon in the process as possible. This way, if you make a mistake, you can discover it before youve sunk a whole lot of time into the project.
And this is also why I dont bother with angles and calipers or other things to perform measurements. The human eye is very good at seeing if things are aligned or not. You may not be able to measure an exact angle this way, but you will very easily be able to determine if things are in line or not by looking.
Now that I know the alignment is sound, I start tapering the tang further. With tool steel I usually make things a bit closer to the final shape because there it makes sense to optimize the amount of steel that is used (money), and the amount of time I need to remove metal from the tang (time). As I explained earlier, with this Damascus, I can only get 2 razors out of a bar anyway, and if I cut it took close I might no longer be able to make the exact thing I wanted to make. If the razor is my own design, the latter is not a big problem because I can update the design, but for a commissioned razor, that would be more problematic.
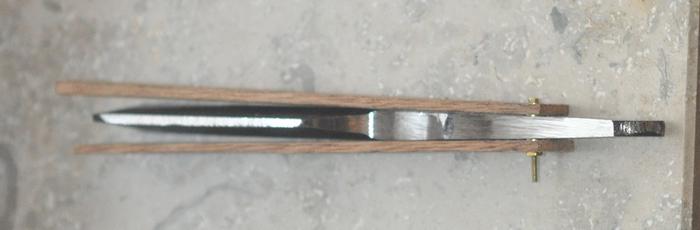
I work the sides of the tang against the flat platen of my belt grinder to clear up the forging scale until the area directly around the pivot hole is clean and then I take out my taper verification tool. In my razors, the alignment is done solely by the taper. This means that before I clean up further, I have to ensure that when the blade is put in scales, it will center in the middle.
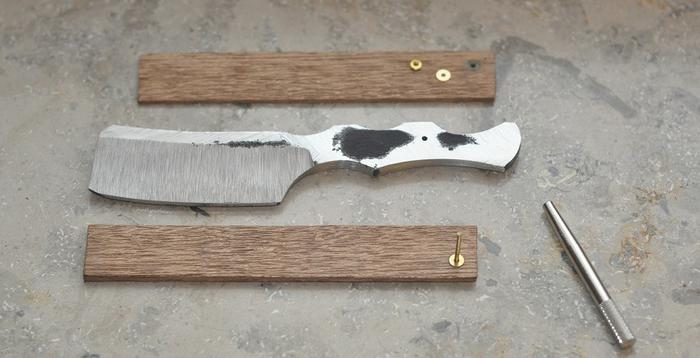
To do this verification, I use a 1/16 screw to mount 2 rectangular bits of wood to the blade as if they were scales. The thrust washers are important for the purpose of clearing the shoulders. With the mockup scales in place, I close the setup and verify 2 things. The first is easy. The blade has to align through the middle. If one of the scales is at a different angle, this is highly noticeable and you can correct this easily by grinding away some more material at a different angle.
The second thing you need to check is that if you look head on at this setup, the scales are symmetrical in relation to the blade. The scales have to be either vertical, or they can be angled a bit outward on the top side. Which it is, is not really important but they have to be symmetrical. One vertical and the other angled outward a bit, is asking for problems much later in the process. Like the first issue, this is fairly easily to compensate for by removing some metal.
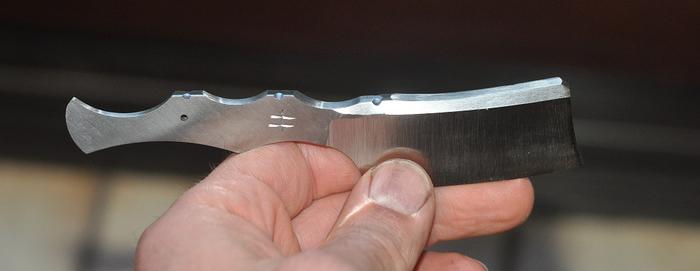
Once the taper is aligned properly in relation to the blade, I clean up the blade further, and deepen the hollows with a smaller radius wheel. All the geometry altering work is now done. I do the final part of the hollow grinding with a 80 grit belt. The rest of the blade gets ground to 240 grit to minimize the amount of post HT sanding needed. You'll also notice that I slanted the sides of the spine inward a bit by running it lengthwise against the wheel. I do this to make sure that if the blade is honed without using tape to protect the spine, the contact line will not develop into wide honewear.
The sides of the tang are cleaned up with 240 last, after I chisel in my makers mark. When everything is polished up, I do any file work I want to do. I do that after polishing, because polishing after filing can too easily ruin the file work.
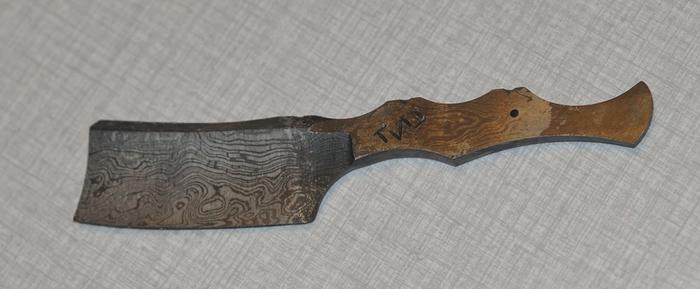
This is what I ended up with.
The thickness left at the edge is a matter of experience. You will want to keep as little as possible in place, because post HT grinding is a lot more time consuming. On the other hand: you have to leave enough that you avoid decarburization of the core steel, and you need enough thermal mass to get from the heat to the quench tank without dropping below critical temperature. The is also the risk of potato chipping the edge if the steel is too thin. For beginning razor makers, my rule of thumb is to leave 1/16 thickness, and figure out by experience just how thin you can go.
I heat treat by placing a flattened iron pipe in my fire, bringing that to orange heat, and then inserting the blade into the pipe. I wait until everything is at the right kind of orange, then I take out the blade and quench it in maize oil. When that is done, I let it air cool while I do the rest of the heat treatment. For tempering I clean up the blade with dishwasher detergent, wrap it in aluminium foil, and put it in a pre-heated oven on 200 degrees Celsius for an hour or 2.
That concludes the stage I call rough grinding.Til shade is gone, til water is gone, Into the shadow with teeth bared, screaming defiance with the last breath.
To spit in Sightblinders eye on the Last Day
-
The Following 5 Users Say Thank You to Bruno For This Useful Post:
hatzicho (01-03-2016), ScottGoodman (11-22-2015), spazola (11-22-2015), Substance (11-21-2015), Thug (01-11-2016)


 Reply With Quote