
Results 1 to 10 of 21
 34Likes
 LinkBack URL
 About LinkBacks
-
12-21-2015, 02:37 PM #1Senior Member


- Join Date
- Apr 2015
- Location
- New Hampshire, USA
- Posts
- 296
Thanked: 83 Working on a mini forge for my son - making progress
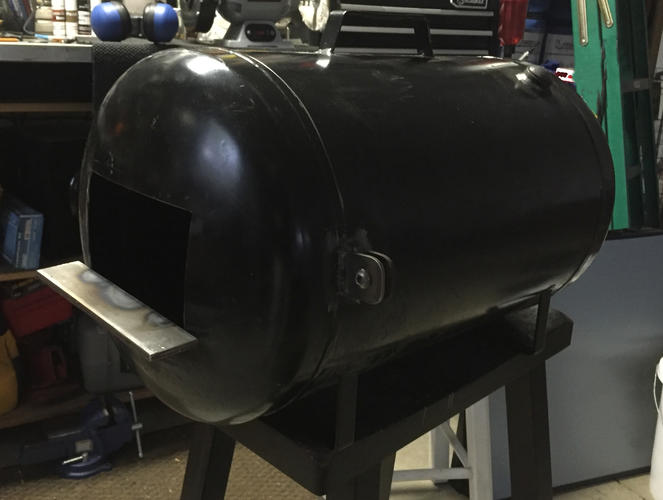
Working on, actually helping with, the construction of this mini-forge with my son. He got a 11 gallon air tank from Tractor Supply and went to work. We have 2inch isowool and ITC-100HT to finish the inside along with a firebrick. Waiting on the venturi burner and regulator to cut the hole for the burner. So far it looks good. Any suggestions on the angle for the burner? He's thinking 90 degrees or slightly less maybe 75 in from the side. You can't see it in the photo but the other side of the door has a hinge on it.
Adam
-
12-21-2015, 03:19 PM #2'with that said'


- Join Date
- Aug 2010
- Location
- Walla Walla in WA State USA
- Posts
- 11,260
Thanked: 4238
While I have yet taken the plunge to learn to forge your set up looks like it's workable. However I don't know if it is in the 'mini' forge category.

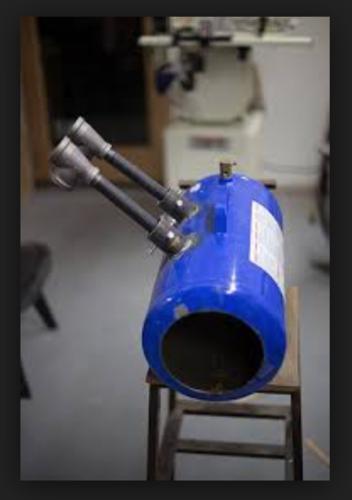
Now this is a 'mini forge'/check out the short video;
*Atlas Mini Forge
Good luck on your project! Our house is as Neil left it- an Aladdins cave of 'stuff'.
Kim X
-
12-21-2015, 03:44 PM #3"My words are of iron..."

- Join Date
- Oct 2006
- Posts
- 1,898
Thanked: 995
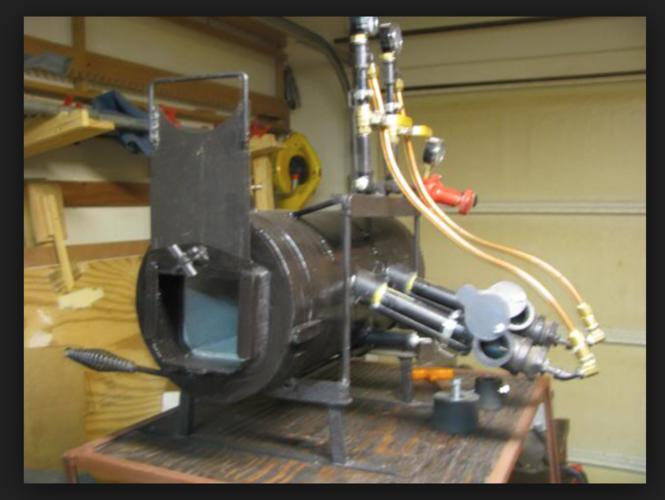
Or this one. Coffee Can Forge
You will see all sorts of entry angles for burners on the internet (you know everything is true out there, right?). All members of Engineers-R-Us have great ideas, not all ideas produce practical results. Seriously, if you have an idea, go ahead and try it. Practically, all blacksmiths I know are experts at repairing stuff that started out as great ideas. My intent here is to shorten the learning curve.
Caveat: With burnable gases, the learning curve can have a painful edge to it. Blacksmithing is a dangerous avocation. Be careful, very careful, please. I can't do other than wordsmith from this distance.
I recommend an angle not greater than 90 degrees where the Zero is at the bottom (e.g. 6 o'clock). Heat rises. When you shut down the forge heat will rise up a tube opening and into the working parts of the venturi. Over time that will cause all sorts of problems at the burner.
Not this:
Versus: Better but complicated...
Bring the gas flow in at a tangent to the inside diameter of the forge so the gas swirls around. You do not want a hot spot on the opposite side of the forge. Swirling gas will heat the inside evenly, any material you place in the forge will not suffer excess scaling from the direct impingement of the oxygen laden burn zone. Once the forge has come up to temperature the gas swirl is less critical unless you still have a big blue flame in the middle (and probably too much gas).
Like this:
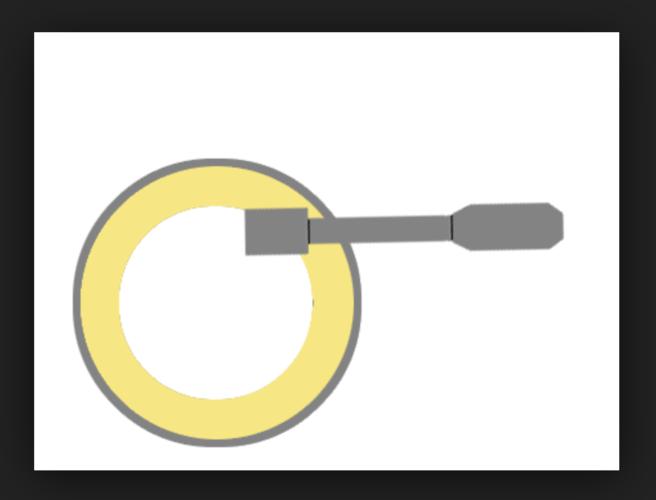
Forges work best by radiating heat into the workpiece, not by direct flame. There is a lot to know in this subject area...
-
The Following 7 Users Say Thank You to Mike Blue For This Useful Post:
bluesman7 (12-21-2015), Chevhead (12-21-2015), cudarunner (12-21-2015), eguilbault (04-09-2016), Geezer (01-05-2016), MattCB (12-21-2015), spazola (12-21-2015)
-
12-21-2015, 03:44 PM #4Senior Member
- Join Date
- Apr 2015
- Location
- New Hampshire, USA
- Posts
- 296
Thanked: 83
Yeah - you're probably right. The inside dimensions after 2 inches of isowool and refractory coating will probably be 5 x 8 or just over 600 cubic inches. Big enough to make a good size bowie knife and plenty big for a straight razor. I'm actually a little worried about being able to heat it with propane evenly - hence the question on burner angle.
Thanks for the comments - and that is a pretty cool mini forge. I've seen some guys make them out of coffee cans.
Adam
 Originally Posted by cudarunner

-
12-21-2015, 03:46 PM #5"My words are of iron..."
- Join Date
- Oct 2006
- Posts
- 1,898
Thanked: 995
You should not have any problems heating knife or razor shaped objects in propane using a forge that big.
-
12-21-2015, 03:49 PM #6Senior Member
- Join Date
- Apr 2015
- Location
- New Hampshire, USA
- Posts
- 296
Thanked: 83
Awesome - thanks Mike. My son is a 3rd year mechanical engineering student - he's much better versed in these types of things than I am. I'm just the cheap labor with a garage and tools! Thanks for the input - great advice.
We'll post photos when he's done.
Adam
Originally Posted by Mike Blue
Slawman likes this.
-
12-21-2015, 04:14 PM #7Senior Member
- Join Date
- Apr 2015
- Location
- New Hampshire, USA
- Posts
- 296
Thanked: 83
With only one burner Mike? Originally Posted by Mike Blue
Adam
-
12-21-2015, 05:18 PM #8"My words are of iron..."
- Join Date
- Oct 2006
- Posts
- 1,898
Thanked: 995
Yes. Some of the best forges I have run, have only have one burner. I generally use the rule of one (venturi) burner per 10-12 inches of forge length. For a type you propose to build using kaowool or the like. The venturi is a 0.028 orifice directed down a 3/4 inch pipe with three or four 1/2 inch holes for entrained air (depending on altitude). You may have to adjust the air/gas mixture depending on your local environment. My experience tells me that this general ratio is very tune-able and will hold a fire at 1500 degrees or run up to welding heat and all that off a typical 40 pound BBQ bottle for many hours.
-
The Following 3 Users Say Thank You to Mike Blue For This Useful Post:
aalbina (12-21-2015), eguilbault (04-09-2016), Geezer (01-05-2016)
-
12-21-2015, 07:52 PM #9Senior Member


- Join Date
- Jun 2013
- Location
- Gladstone QLD AUSTRALIA
- Posts
- 3,246
Thanked: 804
All great info so far mate
To get you on the right trackSaved,
to shave another day.
-
12-21-2015, 08:22 PM #10< Banned User >
- Join Date
- Jul 2015
- Location
- Central Oregon
- Posts
- 789
Thanked: 98
Glad to see you have the Isowool and ITC 100, I was going to offer them to you. Looks like you have the basics handled, have fun.


 Reply With Quote