
Results 1 to 10 of 15
 43Likes
Thread: Tempering question
 LinkBack URL
 About LinkBacks
Hybrid View
-
12-11-2017, 04:17 PM #1Senior Member


- Join Date
- Jul 2014
- Location
- Denver CO
- Posts
- 4,654
Thanked: 811 Also oil heated to 130-150 F is a bit faster of a quench because of the reduced viscosity.
 Originally Posted by Bruno

-
12-11-2017, 06:05 PM #2Senior Member

- Join Date
- Oct 2017
- Location
- cheyenne, wyoming, us
- Posts
- 140
Thanked: 38
the razor is looking great!!
the way I like to find the right tempering temp for a steel is to get a test piece quenched, then grind it to as close to the edge geometry that your finished blade will be, then start real low on the tempering in a toaster, then creep up in 15-25 degree increments {use at least a pair of thermometers as kitchen ovens and toasters are usually not very accurate or consistent with the dial, and then note the thermometer readings in your log books for the next time you need to make an educated guess}doing edge flex and edge deformation tests until you get the edge to fail the way you want it to, and then that is your temperature. with mystery steel you might only have enough to do one or two tests though, so then you do the educated guess along with the one or two tests and then hope for the best, or err on the side of softer or harder, whichever suits the finished blade best.
something I noticed on the last couple Damascus razors I made is to cut down on the time in the ferric for etching. I had one that I thought I did a horrible job of welding up, but then found that the ferric was eating through the edge where the 1095 was. they looked like flaws, but weren't. so my 10 minute etch time is way too much and next time ill go in 1-2 minute intervals and ease up on the etch I'm after.
-
The Following User Says Thank You to caltoncutlery For This Useful Post:
Cangooner (12-11-2017)
-
12-11-2017, 07:19 PM #3aka shooter74743


- Join Date
- Sep 2009
- Location
- SE Oklahoma/NE Texas
- Posts
- 7,285
- Blog Entries
- 4
Thanked: 1936
Cheap fingernail polish is great to protect the edge.
Cangooner and caltoncutlery like this.Southeastern Oklahoma/Northeastern Texas helper. Please don't hesitate to contact me.
Thank you and God Bless, Scott
-
12-11-2017, 07:29 PM #4Senior Member

- Join Date
- May 2017
- Location
- Kansas City , MO
- Posts
- 534
Thanked: 113
This project has been a treat to watch so far
sharptonn likes this.One man's opinion...
-
The Following User Says Thank You to Butzy For This Useful Post:
Cangooner (12-11-2017)
-
12-12-2017, 01:32 AM #5Incidere in dimidium


- Join Date
- Mar 2012
- Location
- Val des Monts, Quebec
- Posts
- 4,070
Thanked: 1440
OK... need some advice from you guys. I fear I may have screwed this up...
I tempered it in the oven last night. Two cycles of an hour each at 425. After the first cycle, it looked fantastic. Nice straw colour, consistent throughout.
After the second cycle though:
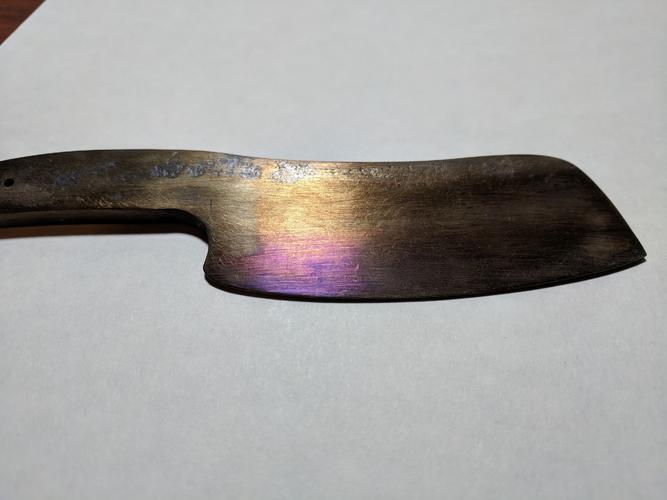
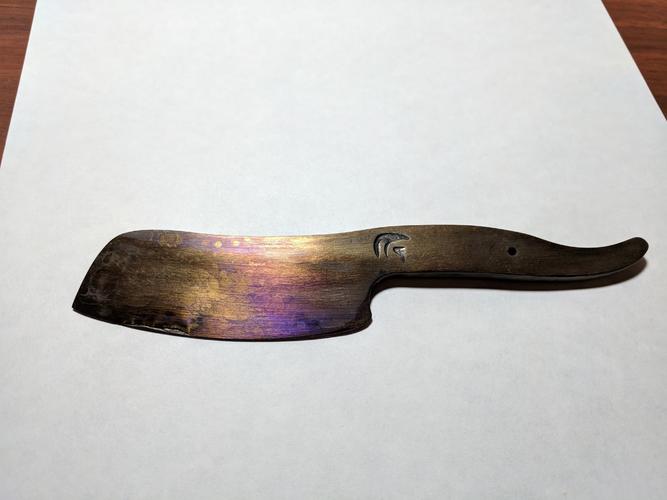
So now I'm afraid it went too far as that's more blue than I'd like to see. So, if this was you blade, would you:
1. Normalize, re-harden, re-temper at lower temp/shorter cycle?
2. Go ahead and finish it off as-is.
The dodgy weld made itself more pronounced as you can see in the 2nd pic, and I'm concerned the strain from putting it through the hardening/tempering cycle again may be too much for the billet. So right now I'm leaning towards just proceeding with it as-is.
Other suggestions welcome!
Thanksjmabuse likes this.
It was in original condition, faded red, well-worn, but nice.
This was and still is my favorite combination; beautiful, original, and worn.
-Neil Young
-
12-12-2017, 02:07 AM #6Senior Member
- Join Date
- Oct 2017
- Location
- cheyenne, wyoming, us
- Posts
- 140
Thanked: 38
I think I would just go with it.
for me, the coolest thing about this razor is that it is made from old razors. the performance would be secondary, so as long as it was a serviceable razor, then I would call it a success. for a high performance razor, I would expect it to be made from known clean materials that you could trace all the way back to the mill, and that you had made 50 razors from already and had everything all dialed in.
I just looked at some color tempering charts, and even if your oven cycled 100 degrees hotter than you planned to get that color difference, the hardness would only be 1-2 points lower, which in my mind is a non-issue in a razor like this.
one thing that is sort of wild is that the color isn't even. and I cant imagine having a hot spot that precise in a toaster. it the blade a lot thinner where the color is darker? did you maybe take the blade out of the toaster between cycles, and run your fingers on it or a rag or something that might have had oil or something on it?Cangooner likes this.
-
The Following User Says Thank You to caltoncutlery For This Useful Post:
Cangooner (12-12-2017)
-
12-12-2017, 02:13 AM #7Incidere in dimidium
- Join Date
- Mar 2012
- Location
- Val des Monts, Quebec
- Posts
- 4,070
Thanked: 1440
Thanks - I'm feeling a little better about the whole thing now.

I'm a bit confused by the colour differences too. While it's certainly thinner near the edge as one would expect (it's a pretty heavy grind, so it isn't *really* thin anywhere), the colours aren't evenly distributed as I would have expected. I.e. progressively moving towards blue/purple as you get closer to the edge.
I actually ended doing this one in my kitchen oven, reckoning its larger volume might make for fewer temp spikes and a more consistent temp. I think I'll maybe stick to my trusty toaster oven next time! A teat treat/tempering oven is on my "to make" list. But it's a long list...
It was in original condition, faded red, well-worn, but nice.
This was and still is my favorite combination; beautiful, original, and worn.
-Neil Young


 Reply With Quote