
Results 1 to 9 of 9
 36Likes

Thread: Electro-Etching
 LinkBack URL
 About LinkBacks
-
06-23-2020, 11:15 PM #1Senior Member

- Join Date
- Jun 2014
- Location
- Eastern Washington State USA
- Posts
- 406
Thanked: 59 Electro-Etching
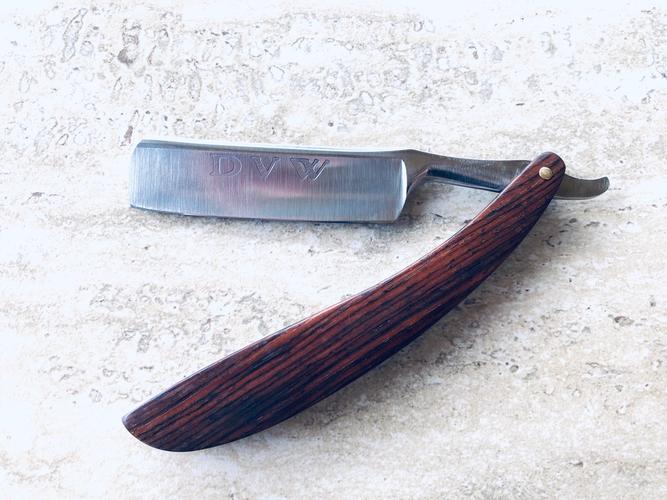
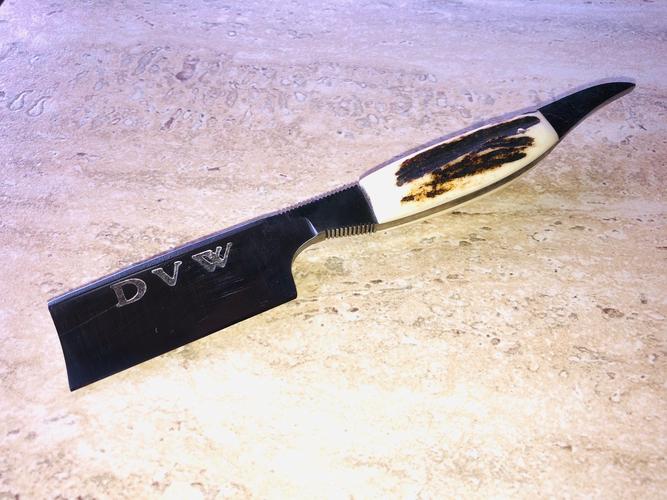
I've been playing with electro-etching. Most people that I have looked at use a battery charger. My trickle charger did not have enough gumption to make a mark, so I tried my little portable jump pack. That did the trick. The vinyl stencils are from a Cricut machine (Yes that is spelled correctly) that I borrowed. The letters are a little large, but it is as small as that machine can go. I need a newer machine to get smaller letters. For the most part like it, and think that it is worth saving up for a newer machine that I can make my own designs with.
-
The Following User Says Thank You to DVW For This Useful Post:
spazola (08-18-2020)
-
06-24-2020, 02:45 AM #2Senior Member


- Join Date
- Dec 2018
- Location
- Gainesville, FL
- Posts
- 6,542
Thanked: 663
Love that. Please tell us more
Iron by iron is sharpened, And a man sharpens the face of his friend. PR 27:17
-
06-24-2020, 04:08 AM #3Senior Member
- Join Date
- Jun 2014
- Location
- Eastern Washington State USA
- Posts
- 406
Thanked: 59
Sure, I just mix up a solution by taking a coffee mug and filling it two thirds of the way with water. Then in the microwave it goes for two minutes. After that I pour in one third of white vinegar, add one drop of Dawn dish soap and three tablespoons of salt. Then I stir it up well. I have a little rig that I made (I'll post a pic later) that takes the large battery clamps down to little alligator clips. The positive clip goes on the blade. I then clip the cotton end of a Q-Tip with the negative lead. Dip the Q-Tip into the solution and apply it to the blade. It will immediately bubble and start to etch the blade so be careful. The fumes are also nasty. Be sure that you tape off any part of the blade that you don't want to be etched. The splatters can stain the steel and so will any drips that run down onto any untapped areas. I use cheap electrical tape to cover the blade (which I also use for tapping the spine for honing). Hold the Q-tip for about 10 seconds in each area that you want to etch. Originally Posted by PaulFLUS

-
-
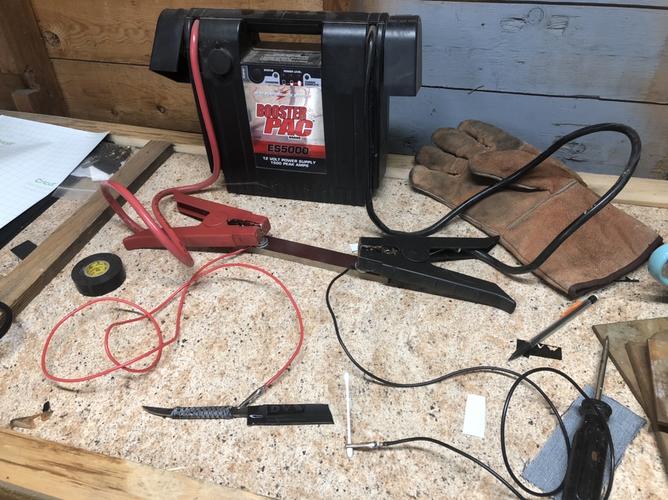
08-18-2020, 01:12 PM #4Senior Member
- Join Date
- Jun 2014
- Location
- Eastern Washington State USA
- Posts
- 406
Thanked: 59
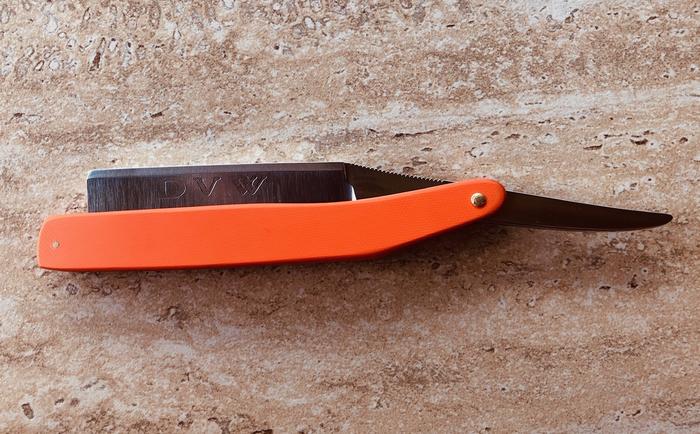
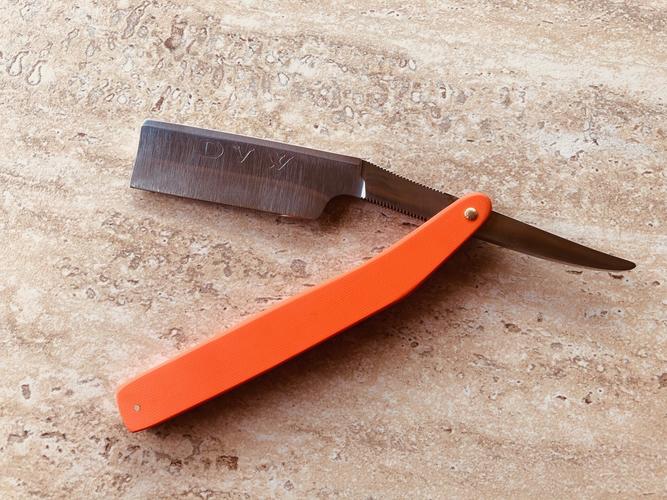
I finally got around to etching another blade. Here is my setup.
-
The Following User Says Thank You to DVW For This Useful Post:
spazola (08-18-2020)
-
08-18-2020, 03:06 PM #5Senior Member

- Join Date
- Jan 2015
- Location
- Pinole, ca
- Posts
- 1,526
Thanked: 339
Thanks for the thread, I’ve been going back and forth on hot stamps vs etching, seems like you are able to get a deep etch with your setup.
-
08-18-2020, 03:35 PM #6Senior Member
- Join Date
- Jun 2014
- Location
- Eastern Washington State USA
- Posts
- 406
Thanked: 59
You are welcome. This makes a very deep etch. I should also add how I finish up the etch. Originally Posted by jfk742
Once you are done, the etched metal will be very dark/dirty, and it will be prone to corrosion. I did a test piece of D2 and did not clean it off afterwards. The etched area rusted (as in standing red flakes) in a couple of days just sitting on the work bench. D2 typically does not rust that easily, so you need to be sure and clean it up when you are done. Here is the process that I use.
* Remove the tape and the stencil.
* Buff the blade with whatever your final buffing process was. Mine is a sisal wheel with a coarse rouge. This will remove the black scale from the etching process
* Wash the blade thoroughly with soap and water.
There are other commercial tools for electro etching, but this one didn't cost me anything since I already had all the supplies to make it. This is also very flexible and I can etch just about any design that I can think of.
-
-
08-18-2020, 08:39 PM #7Senior Member

- Join Date
- Jun 2013
- Location
- archbold ohio
- Posts
- 2,376
Thanked: 546
Wow! how come i never knew this before? are the two clamps connected?(looks like they are)
-
08-18-2020, 08:48 PM #8Senior Member
- Join Date
- Jun 2014
- Location
- Eastern Washington State USA
- Posts
- 406
Thanked: 59
They are not connected electrically. That is a piece of micarta with two bolts through it. The little leads are trapped between two washers on the bolts and the battery clamps are on the bolts as well. The micarta is an electrical insulator and just acts as a way to stabilize the whole set up. It just makes it easier to use the is all. Originally Posted by tintin
-
08-19-2020, 04:06 AM #9Home of the Mysterious Symbol


- Join Date
- Dec 2019
- Location
- New Orleans LA
- Posts
- 853
Thanked: 123
You can make smaller letters as well as artwork by making a negative B&W image in Gimp, Inkscape, or whatever, and printing it with a laser printer. Laser, not inkjet. Lay the printed art printed side down on the steel, held down with a sponge. Wet it through with a solution of acetone and everclear or other 90% alcohol, ethyl, methyl, whatever. Ratio should be about 3 to 7. Let it sit for a minute then peel the paper away and your negative image should be nicely transferred to the steel. You may need to do some repair with a sharpie. Tape all exposed steel and either dip etch or q-tip/sponge etch, either electric or chemical. You can practice the printing and transfer all you want, you aren't committed until you start to actually do the etch. For chem etching most guys use ferric chloride but me, I use Ospho, which is just phosphoric acid and is used for converting flash rust on ships between scaling and priming rusted areas. You can get it at most bigger hardware stores or any marine chandlery. For electro etching I just use a salt solution. I usually use a 28v doorbell transformer and a rectifier for DC then just AC to blacken the bottom of the etch lines if desired. Ospho leaves the etch naturally blackened with iron phosphate created by the reaction. Originally Posted by DVW
I will be doing a bunch of razors in a couple of months, when I get my horn scales and when I get time to regrind a batch of the blades I just bought. I may do a couple of test pieces before then, though, to try out the new laser printer. Some make better etch resist transfers than others. It's all about the toner and how heavily it is applied.
For the transfer, some guys just apply straight acetone to the back of the paper but it's tricky to get it right. Adding the alcohol makes it much more manageable. You may find another solvent that works better for you.
<EDIT>
Oh almost forgot. Don't use synthetic sponge without testing it first. Nothing that the acetone will dissolve into a goopy goo. I have done this without the sponge (or rag) just taping the print to the blade and trusting the toner to be in good contact with the steel. Sometimes it doesn't work but you can always clean the blade off and try again with a new print.Last edited by CrescentCityRazors; 08-19-2020 at 02:38 PM. Reason: forgot something important
DVW likes this.


 Reply With Quote