
Results 1 to 10 of 22
 5Likes
Thread: Grinding thoughts
 LinkBack URL
 About LinkBacks
Hybrid View
-
03-10-2010, 07:07 AM #1Comfortably Numb


- Join Date
- Jan 2009
- Location
- Charlotte, NC
- Posts
- 2,095
Thanked: 668 Grinding thoughts
So I put this together in order to share what I think I've learned (from my teacher ... the grinder)
Please forgive the rough graphics, did the best I could with just a little time.
*this is for hollow grinding btw*
OK, here goes:
1. the first thing I do when starting a grind is to put on my respirator and eye protection. Then I take the flat stock and scribe a line down the center of the the entire blank. I use this for designing the tang taper, and to guide my grinding.
2. next I start my grind on the corner of my stock at the heel/shoulder area
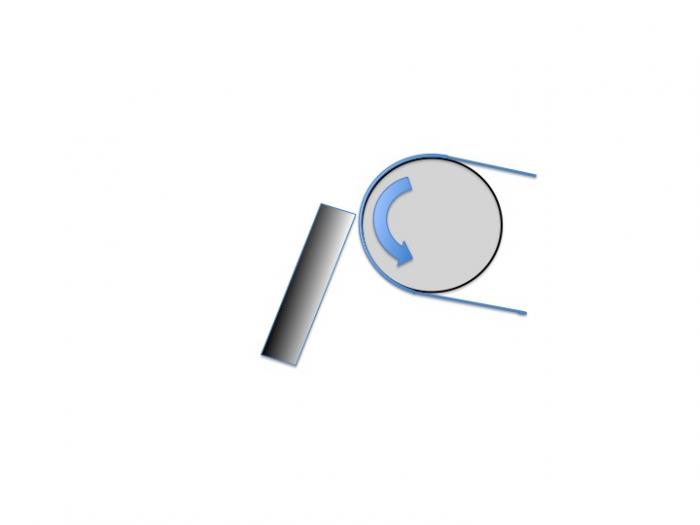
and I work the grind toward the toe of my blank
I stay with my first cut until a depression, or a hollow shape is established all across the blank.
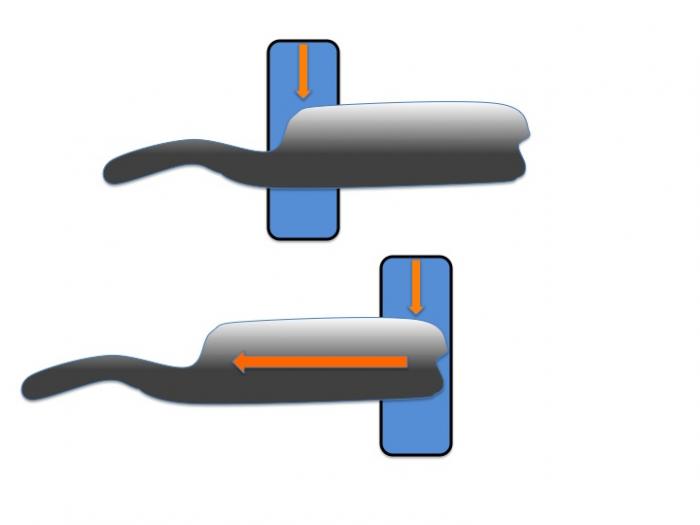
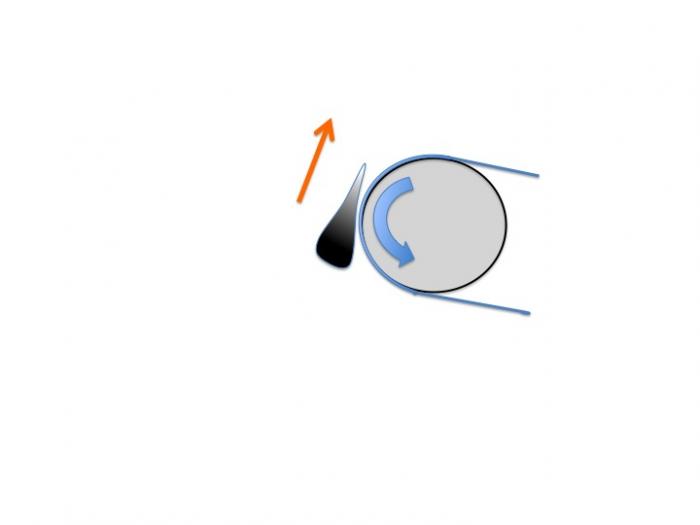
3. Once the initial hollow groove from the first cut is established, I follow the groove, and work the blank upward on the wheel (really just hint the razor upward with a bit of pressure on the spine area if that makes sense).
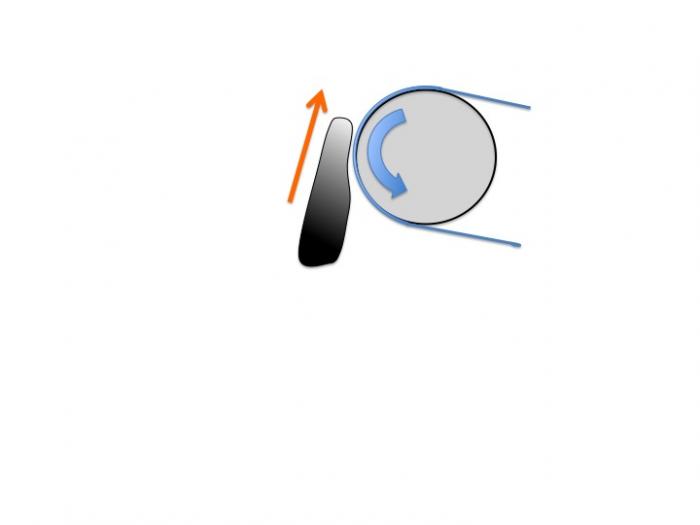
As I go, I'll follow the groove shoulder to toe, working the razor up the wheel with a hint of pressure on the spine in order to hollow out the blade as high up as I need.
4. repeat on the other side (off hand is tricky at first) until the shape is correct. **note, you need to leave extra at the edge so that it doesn't warp during heat treating...I leave about the thickness of a nickel or so, sometimes a dime's thickness **
**
Be sure while grinding freehand (that's how I roll) to keep your blade square, (unless grinding a smiling blade of course)
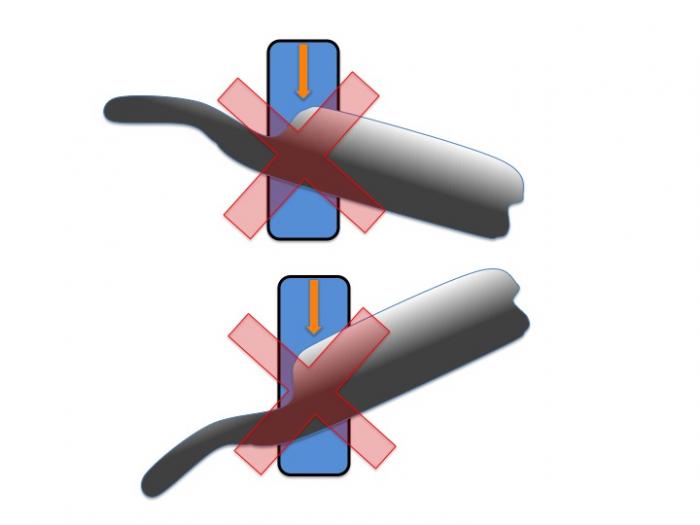
and to not let it travel up or down on the wheel position-wise while moving laterally. Sometimes it will try to wiggle on you... this leads to an uneven grind

I have the best results so far when I anchor my elbows to my sides and move laterally with my body. It's kind of like shifting weight from foot to foot.
Also, I've found that my first tendency was to kind of miss the toe and heel areas with my grind...
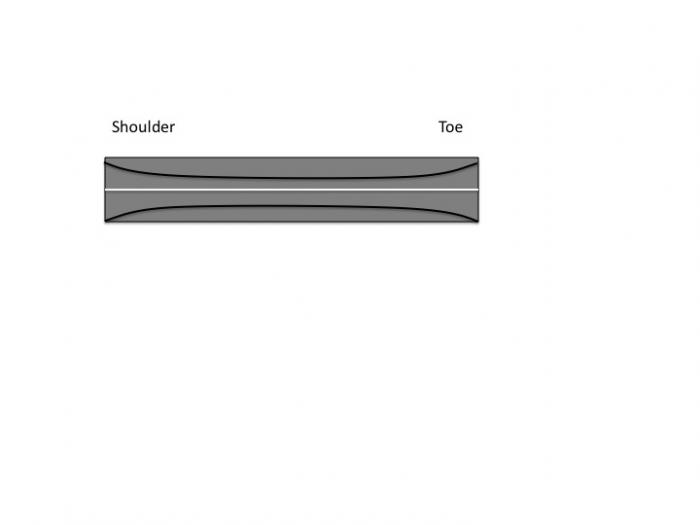
I try to always check my progress under a good light, looking for evenness, and making sure the work is following the center line.
I hope this is helpful in some way, if I have left out a detail that you still have questions about please let me know and I'll try to explain what I do. Again, I am NOT a pro at this, my only teacher so far has been the steel and my grinder, so any input/tips are welcome!
Cheers
Davedcraven and Dafonz6987 like this.
-
The Following 14 Users Say Thank You to Del1r1um For This Useful Post:
Birnando (03-10-2010), ChrisL (03-10-2010), Dafonz6987 (02-13-2016), dcraven (07-17-2013), DeathMetalDremel (03-12-2010), hi_bud_gl (03-12-2010), Joed (03-11-2010), Lynn (03-12-2010), Mike Blue (03-11-2010), randydance062449 (03-11-2010), ScottGoodman (03-10-2010), Stubear (03-10-2010), Substance (03-09-2015), willow2006 (03-10-2010)
-
03-10-2010, 06:40 PM #2aka shooter74743


- Join Date
- Sep 2009
- Location
- SE Oklahoma/NE Texas
- Posts
- 7,285
- Blog Entries
- 4
Thanked: 1936
Great info, winged it for my first grind. Should be getting it back from heat treat soon, shipped yesterday.
Southeastern Oklahoma/Northeastern Texas helper. Please don't hesitate to contact me.
Thank you and God Bless, Scott
-
03-10-2010, 09:40 PM #3Senior Member
- Join Date
- Jan 2008
- Posts
- 701
Thanked: 182
yep great post
i too haveot keep an eye on ethe heela dn to to keep everything even
so far as up adn dow on the wheel thats how i blend the 2 inch wheel grind holow grinds
you can also go edge down adn pulll the blade up and thin out any steps between wheel sizes
-
The Following User Says Thank You to L R Harner For This Useful Post:
Del1r1um (03-11-2010)
-
03-11-2010, 11:04 AM #4Hones & Honing


- Join Date
- May 2005
- Location
- Saint Paul, Minnesota, United States
- Posts
- 8,023
- Blog Entries
- 1
Thanked: 2209
Good post and very good graphics!
Just a couple of comments for others who may be reading this...
1. Make sure the steel is annealed before you start grinding. It goes much faster that way!
2. Mark the centerline all around the razor blank. Spine, toe, blade edge and the tang ( top and bottom). By having the center line along the toe end I can get a much better idea of the evenness of the grind. The tang centerline helps me keep track of the evenness of the taper on both sides of the tang.
I have found that it helps me if I first polish the edges of the blank and then mark the centerline. It is extra work but the centerline is much easier to see that way. I have yet to try using layout fluid then marking.
I also mark both face's of the blade in 1/8" increments from heel to toe.
3. To keep the grind even from heel to toe the stroke of your grind must cover the full width of the wheel. The heel must start on the far right of the wheel and travel all across the face of the wheel to the left and ending when the toe of the blade goes across the left side of the wheel. I have found that keeping an even depth of grind from heel to toe is the hardest part.
4. Alternate grinding each side of the blade frequently and be sure to check the centerline scribed on the toe. It can help a lot.
5. The grinding marks on the face of the blade, the scribed centerlines and your fingers can help determine the evenness of the grind. Check frequently.
6. Keep the width of the blade about 1/16 to 1/8" extra to compensate for any potential carbon loss and grinding oooppps! and also the thickness of the edge is between 1/16"-1/8" to help with warping and carbon loss. Normalizing the blade 3 time before HT will reduce the stress in the blade and thus the chance of warping and also refine the grain size.
BTW, I also leave extra length on the toe and heel for the same reasons.
7. Drill the tang, taper the tang, and fully finish the tang and top of the spine before heat treating. Trying to do any of the above after HT is much more work than is necessary.
8.It does take practice!
Randolph Tuttle, a SRP Mentor for residents of Minnesota & western Wisconsin
-
The Following 4 Users Say Thank You to randydance062449 For This Useful Post:
Deckard (03-14-2010), Del1r1um (03-11-2010), hi_bud_gl (03-12-2010), ScottGoodman (03-11-2010)
-
03-11-2010, 01:22 PM #5"My words are of iron..."

- Join Date
- Oct 2006
- Posts
- 1,898
Thanked: 995
Good observations! There are a good many things in your recitation that will stand you well over the test of time. It's a pretty good tutorial.
Also remember that despite all your attention to making the left side and right side the same, your hands still are influenced to some degree by your nervous system. That will be left or right handed despite all you try to do, except after a few thousand blades and your brain begins to obey your commands a little better.
The only other thing I try to do differently is to start grinding in the middle of the blade rather than either toe or heel. Then I sneak up on the ends of the blade. It helps keep the grind line straight and the hollow even. If you make a mistake in the toe or heel area then you're stuck with that for the basis of everything else. It seems that you're naturally grinding out the middle first anyway with your results.Nothing discloses real character like the use of power. Most people can bear adversity. But if you wish to know what a man really is, give him power. R.G.Ingersoll
-
The Following 2 Users Say Thank You to Mike Blue For This Useful Post:
Del1r1um (03-11-2010), ScottGoodman (03-11-2010)
-
03-11-2010, 01:35 PM #6Hones & Honing
- Join Date
- May 2005
- Location
- Saint Paul, Minnesota, United States
- Posts
- 8,023
- Blog Entries
- 1
Thanked: 2209
You never told me that! and I did not notice how Terry Knipshield did it Originally Posted by Mike Blue


Ok, I will give that a try.Randolph Tuttle, a SRP Mentor for residents of Minnesota & western Wisconsin
-
The Following User Says Thank You to randydance062449 For This Useful Post:
Del1r1um (03-11-2010)
-
03-11-2010, 01:36 PM #7Senior Member


- Join Date
- Jun 2008
- Location
- Upstate NY
- Posts
- 5,003
Thanked: 1827
Well done Dave!
 and thanks to everyone else for their contributions.
If you always do what you always did, you will always get what you always got. (A. Einstein)
and thanks to everyone else for their contributions.
If you always do what you always did, you will always get what you always got. (A. Einstein)
-
The Following User Says Thank You to Joed For This Useful Post:
Del1r1um (03-11-2010)


 Reply With Quote