
Results 11 to 17 of 17
 6Likes
Thread: Help me forge a razor
 LinkBack URL
 About LinkBacks
-
11-16-2011, 07:15 AM #11Member


- Join Date
- Apr 2011
- Location
- Brisbane, Australia
- Posts
- 1,434
Thanked: 642
Excellent info here from all who posted. Thanks.
-
11-16-2011, 02:26 PM #12
Don't be too paranoid either.
 Originally Posted by KristianSestoft

Temper termperatures are way beyond what you could hold in your hand without blistering.
Thinner surfaces heat up quicker, but on the whole, as long as you can touch the razor with your fingers and not burn then, the steel will be just fine.spazola and KristianSestoft like this.Til shade is gone, til water is gone, Into the shadow with teeth bared, screaming defiance with the last breath.
To spit in Sightblinders eye on the Last Day
-
11-16-2011, 08:44 PM #13Knifemaker

- Join Date
- Feb 2011
- Location
- Aarhus, Denmark
- Posts
- 51
Thanked: 13
Yeah
 I guess you are right about the mirror finish. Now I just have to learn how to make it.
I can get belts up to grit 600 on my new grinder, and by using the frequency converter I'll be able to finish at the grinder at a quite high polish. The rest can be done by hand. But how high should I go on the fine sandpaper / polishing paper? The finest I have easy and cheap access to is grit 1200.
How should I polish a blade? I think I want a mirror / near mirror finish.
-
11-16-2011, 10:37 PM #14aka shooter74743


- Join Date
- Sep 2009
- Location
- SE Oklahoma/NE Texas
- Posts
- 7,285
- Blog Entries
- 4
Thanked: 1936
I usually finish up to 2000 grit by hand, followed by a buffer and jewelers rouge. I personally feel that the buffer is the most dangerous tool in the shop, over the bandsaw, table saw, or miter saw. Don't let it snatch whatever you are working on out of your hands.
When doing the hand work, I found a piece of radiator hose that was about 1 1/2" in diameter. I cut it to about 6" long & cut a tree limb that would fit in it tightly. I use this to help sanding the hollow by hand. Works great when working with 1/4 sheets of sandpaper.Mike Blue likes this.Southeastern Oklahoma/Northeastern Texas helper. Please don't hesitate to contact me.
Thank you and God Bless, Scott
-
The Following User Says Thank You to ScottGoodman For This Useful Post:
KristianSestoft (11-17-2011)
-
11-17-2011, 03:55 PM #15Knifemaker
- Join Date
- Feb 2011
- Location
- Aarhus, Denmark
- Posts
- 51
Thanked: 13
That's a nice idea, using a limb and a radiator hose.
But isn't the hose much smaller than the wheel of your grinder? My contact wheel is 18 cm in diameter (7.1 inch)... you mentioned the hose to be 1 1/2" in diameter... I would guess that by using a smaller guide for the paper, you are able to make sure where you sand instead of using a paper 'holder' in the same diameter as the concact wheel?
And how hard is the buffer? like this:
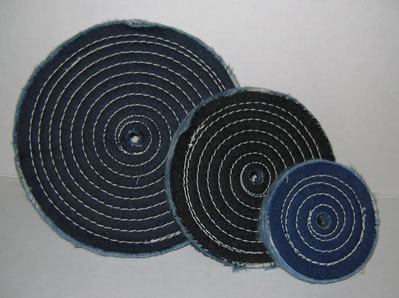
Or like this:
Or maybe like this: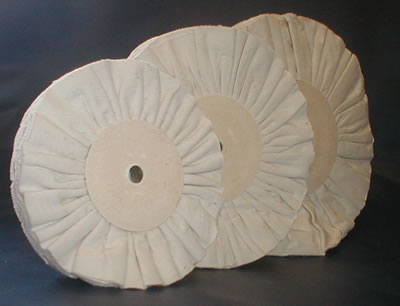
-
11-17-2011, 05:57 PM #16"My words are of iron..."

- Join Date
- Oct 2006
- Posts
- 1,898
Thanked: 995
In very general terms, of the wheels shown, in order, the first black ones have more stitching and will be stiffer = more resistance to pressure against the wheel. This provides for more cutting. These are best used for larger grit compounds to remove larger scratches. The yellow wheels have less stitching = medium to soft, less resistance. With a finer grit these are very good for blending contours. The white wheels have very little stitching and are good for the final grades of polishing to a very fine surface. I'd recommend, as others do, keep one set of wheels for each compound you use. Trying to remove a heavy cutting compound like black from a wheel and then attempting a high polish will leave heartbreaking scratches and more work.
And, because the buffer is the most dangerous tool in the shop, the looser the wheel, the more likely it will catch something and fling it somewhere. Preferably not into soft biological bits.
Nothing discloses real character like the use of power. Most people can bear adversity. But if you wish to know what a man really is, give him power. R.G.Ingersoll
-
11-25-2011, 03:38 AM #17Hones & Honing


- Join Date
- May 2005
- Location
- Saint Paul, Minnesota, United States
- Posts
- 8,023
- Blog Entries
- 1
Thanked: 2209
2 things that are done for razors is that the grinding is done in 2 stages, before HT & after HT.
Before HT the grind is left approx 1/16" thick at the edge and 1/8" wider than the desired end result so that any decarb can be ground off. After HT the final shaping and grinding/polishing is performed.
Hope this helps, Randolph Tuttle, a SRP Mentor for residents of Minnesota & western Wisconsin


 Reply With Quote
