
Results 1 to 6 of 6
 3Likes
Thread: Knife project documentation
 LinkBack URL
 About LinkBacks
-
04-26-2013, 08:09 PM #1Senior Member

- Join Date
- Jan 2012
- Posts
- 388
Thanked: 51 Knife project documentation
About a week ago I found some information on building slipjoint folding knives, and the idea of giving building one a try got stuck in my head. Yesterday I ordered some O1 bar stock along with some brass for liners and some brass rods for pinning, and hopefully everything will be in sometime early next week. I decided that I wanted to document my learning process, so I've started this thread.
I was having difficulties figuring out where to start with design. I contemplated purchasing a folding knife kit and keeping the blanks in the kit as templates for future projects. I also thought about buying some plans, but they were more than I wanted to spend and my final goal is to be somewhat proficient in both building and designing, so I decided to see what I could come up with on my own. Enter Google Sketchup... This being the first time that I've used a modeling program, I was a little worried about it taking more time to figure out than it was worth. I was wrong, Skethcup is a really easy program to use, and after about an hour of work I had it completed. Below are two pictures of screen grabs from Sketchup.
Closed (this pic has the outline of the liners included)
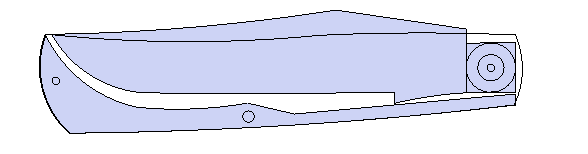
Opened

I'll be posting back here once my supplies arrive and I get started. I'd love to hear and comments regarding the design if there's something I've missed.ScottGoodman likes this.
-
04-26-2013, 08:27 PM #2Sinner Saved by Grace

- Join Date
- Jul 2012
- Location
- Corning, CA
- Posts
- 598
Thanked: 133
Looks like a good start on a fun project.
Do remember that every thing is a spring, and you will need tension on the mechanism to both hold the blade open and closed. I would keep all of the frame pins the same size for strength and ease of construction.
Jonathan
-
04-26-2013, 09:52 PM #3Senior Member

- Join Date
- Mar 2013
- Location
- N.E. PA
- Posts
- 289
Thanked: 20
Sounds interesting. Will be following the thread...
-
04-26-2013, 10:26 PM #4Senior Member
- Join Date
- Jan 2012
- Posts
- 388
Thanked: 51
Yeah, the under-tension part of the equation still has me scratching my head a little. I'd really like for the profile to be what's shown in the pic, but that'll mean one of two things. 1) I'll have to cut the part out the way I have it drawn, then once I've fitten the tang and the spring, I'll bend the spring slightly before heat treating. Or, 2) I'll have to make another drawing of the spring with a slight curvature and shoot for the under-tension shape to be that in the drawing. Initially, I thought that the first option would work out alright, but since it's going to be a spring, I'd hate to add any undue stresses to the metal by bending it before heat treatment. Hopefully this will be the biggest issue that I face during the fabrication. Originally Posted by Datsots

-
04-27-2013, 01:32 AM #5Senior Member
- Join Date
- Mar 2011
- Location
- Corcoran, Minnesota
- Posts
- 665
Thanked: 170
I've only made one folder - in a class. The instructor said we'd take our knives apart 100 times before we put them together the final time. He was about right! I'd suggest rounding off the square edges of the tang section just a tad - operates smoother that way. Also, use a screw to hold it together during the fitting process. As I recall (and I decided I'd never build another damn folder!) you make the spring a tad oversized, and then carefully grind where it touches the tang, after heat treating, until the spring action is just right. You can always close the knife after you are done (almost) and grind a bit off the outside to take off a bit of spring tension. If you want, I'll try to find the handout we got at the class and make you a copy - no guarantees I can find it - PM me if you want me to look.
-
04-27-2013, 06:41 AM #6
I'm closing this thread pending moderator review.
There are several knifemaking forums for general purpose knifemaking.
The workshop forum at SRP should remain dedicated to shaving related things (or metallurgy etc). If we don't do that, eventually all razor related topics will drown in a sea of general knifemaking threads.Til shade is gone, til water is gone, Into the shadow with teeth bared, screaming defiance with the last breath.
To spit in Sightblinders eye on the Last Day


