
Results 51 to 60 of 62
 35Likes
Thread: Newbie honing journal
 LinkBack URL
 About LinkBacks
-
10-20-2013, 04:03 PM #51Senior Member

- Join Date
- Jul 2013
- Location
- Liverpool, UK
- Posts
- 160
Thanked: 14
C.V. Heljestrand MK2
Seeing as I was in a honing mood, and there was a little Heljestrand sitting there awaiting attention (and isn't it funny the way, when your queue of razors waiting to be honed gets a bit short, the postman brings more?) ...
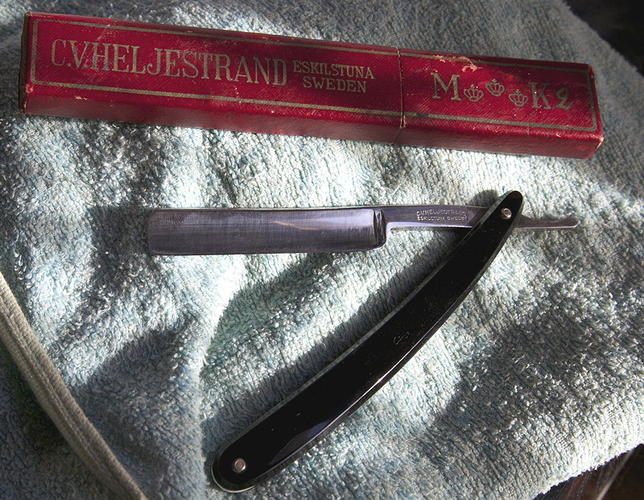
(See how skillfully I've angled the light so as to perfectly capture my fingerprints on the blade!)
The edge was really dull, and I wanted to have another go with my little coticule, but I don't feel confident enough yet to try taking it all the way from bevel-setting to shaving on one stone. So I gave it a gentle session on my Shapton 1k to get the shape of the bevel, and then followed a dilucot progression. This time I followed the approach more strictly rather than just generally diluting, and did the finger-drop or two of water dilution thing. I can't remember how many stages there were, but I did quite a lot of short ones before ending with a plain water pass.
The feel is very interesting, and a lot different to the feel of Naniwa stones! In the early stages with thicker slurry, it felt quite gritty, but the grittiness slowly smoothed out. And where I tend to get an "aha" moment with each Naniwa stone where I can just feel it's right, that didn't really happen with the coticule. But it did slowly feel more "sticky" to the stone, and by the end I realised it had smoothed out and was undercutting nicely without my having noticed any specific transition.
Anyway, the end result looks quite scruffy under the loupe - not pronounced scratches, but rougher-looking than the two JNAT edges I have, and not remotely shiny. But how did it feel? Well, it was actually tree-topping quite well, and I'm very impressed that a stone can take an edge that far from the bevel-set stage (and the Shapton seems a fair bit coarser than 1k would suggest). It'll go into my next shave test.
Wade & Butcher
I left my W&B having done a dilucot (though without following instructions carefully) and followed with a lather stage on the coticule, and I got very smooth shaving from it but it was lacking sharpness.
I've been reading about unicot, so I put a single layer of tape on it, did 20 laps on very light slurry (just misty, from three light strokes with the slurry stone), and then 30 on plain water. Loupe inspection didn't show any obvious micro-bevel, so maybe it's smoothed off the apparently convex bevel right to the edge as it is claimed to do?
We shall see, as I compare these two razors in my next shave - but it was tree-topping better than the CVH, and better than I remember it from last time.
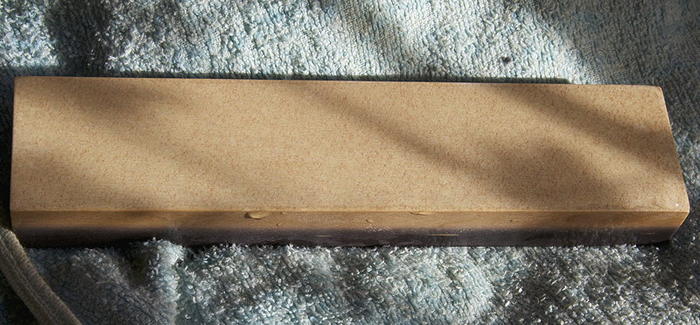
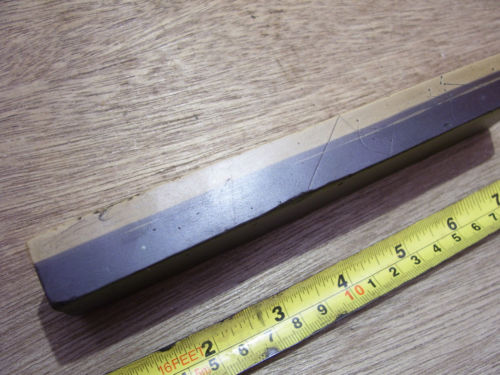
The coticule
Meanwhile, here's what the little (175 x 40mm natural combo) coticule that I got from Piet looks like...
And here's a closer look at the surface...
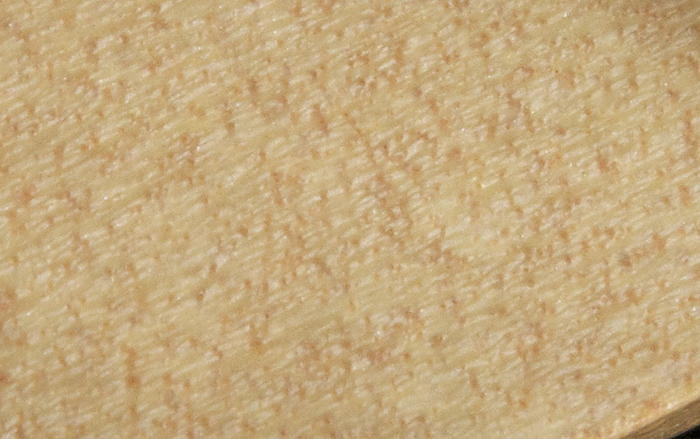
It has a wood end-grain appearance (though it's very smooth), and the specks are a little more pink than they appear in the photos. So, I wonder if any experts would care to have a guess at its identity?
Anyway, that's it for now. I'm off to meditate and will my whiskers to grow quicker...
AlanLast edited by Oscroft; 10-20-2013 at 08:21 PM.
-
10-21-2013, 03:31 PM #52Senior Member
- Join Date
- Jul 2013
- Location
- Liverpool, UK
- Posts
- 160
Thanked: 14
Wade & Butcher vs Heljestrand
W&B - sort of dilucot, unicot finish
Heljestrand - dilucot
The easy winner in my coticule test shave was the W&B. The unicot finish has made it noticeably sharper than last time I tested it, and definitely sharper than the Heljestrand. As well as just gauging how the two felt on my skin, I shaved parallel tracks WTG and inspected, and the W&B shaved closer with fewer stragglers.
I couldn't really compare smoothness because I'd need a full multi-pass shave to really tell, and my face seems to have erupted in zits overnight and that really restricted what I could do with a straight - I stopped after the first gusher and reached for a Schick injector to finish.
It's an interesting feeling being back at the complete-beginner stage, with the coticule this time, and having a new learning curve ahead of me - but that's part of the fun.
Oh, and I couldn't resist this "Unusual Natural Oil Wet Sharpening Stone" that I saw on the famous auction site...
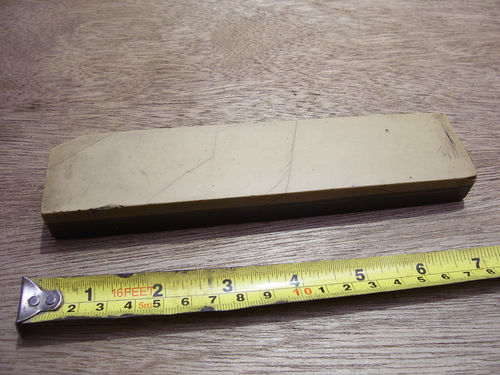
For £29.70 (~$48), did I do OK?
-
10-22-2013, 04:44 PM #53Senior Member
- Join Date
- Jul 2013
- Location
- Liverpool, UK
- Posts
- 160
Thanked: 14
I got me one of those USB microscopes, so here's a few shots. The JNAT one was done for me, and the other two I did myself...
Kobar, JNAT...
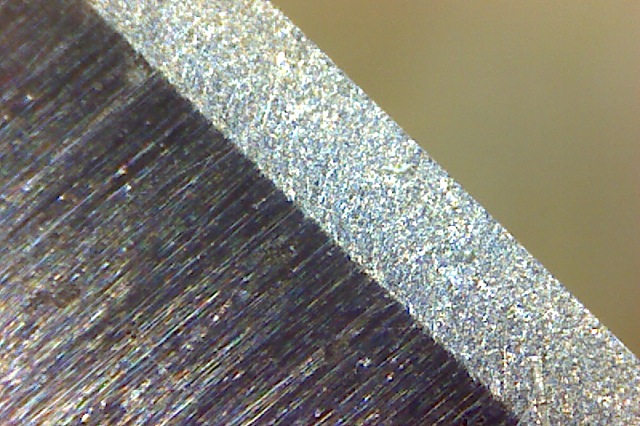
Wade & Butcher, unicot...

Filarmonica, Naniwa 12k...

(The Filarmonica edge is very shiny, so it's hard to get a good shot)
-
10-22-2013, 05:00 PM #54< Banned User >
- Join Date
- Dec 2012
- Location
- Long Island NY
- Posts
- 1,378
Thanked: 177
Scope pictures are cool. But I find little value to the photos as the scope cant tell you how the blade feels on the face! I stopped using mine after but will say it did help me in that I was able to see a defined bevel and finer scratch pattern when I was breaking down slurry.
-
10-22-2013, 07:17 PM #55Senior Member


- Join Date
- Sep 2013
- Location
- Collingswood, NJ
- Posts
- 273
Thanked: 36
Thanks so much for posting this, Oscroft! I'll be following closely to learn what I can for when my own blades need a spell on the stone.
-
10-22-2013, 10:28 PM #56Senior Member

- Join Date
- Sep 2013
- Location
- SoCal
- Posts
- 248
Thanked: 48
Oscroft +1 appreciate your journey. I'm interested in the Naniwa super stones.
-
10-23-2013, 05:54 AM #5750 year str. shaver

- Join Date
- Aug 2008
- Location
- Pothole County, PA
- Posts
- 2,258
- Blog Entries
- 2
Thanked: 522
Naniwa sstones are great. Give Shapton Glass stones a look too. Just as great. Originally Posted by rmagnus
 JERRY
JERRY
OOOPS! Pass the styptic please.
-
10-23-2013, 07:30 PM #58Senior Member
- Join Date
- Jul 2013
- Location
- Liverpool, UK
- Posts
- 160
Thanked: 14
Thanks folks, glad you're finding it useful.
-
10-24-2013, 04:25 PM #59Senior Member
- Join Date
- Jul 2013
- Location
- Liverpool, UK
- Posts
- 160
Thanked: 14
Le Hyalin
Now to turn my attention to the "Le Hyalin" frameback I got a little while ago...
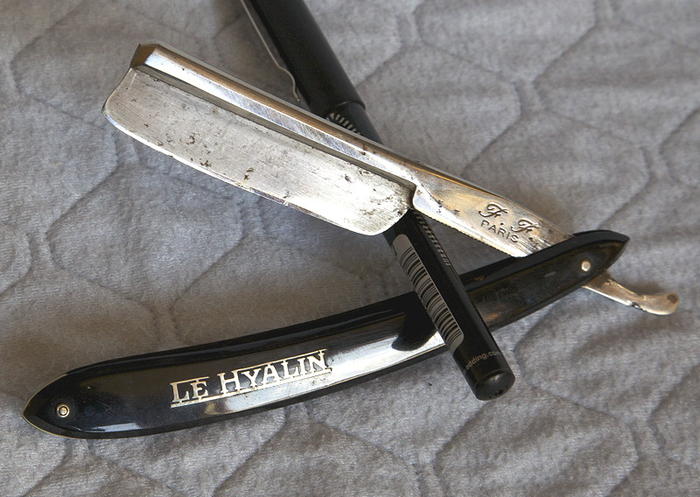
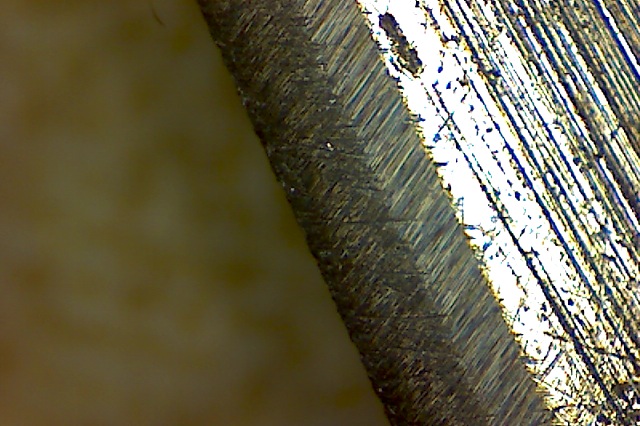
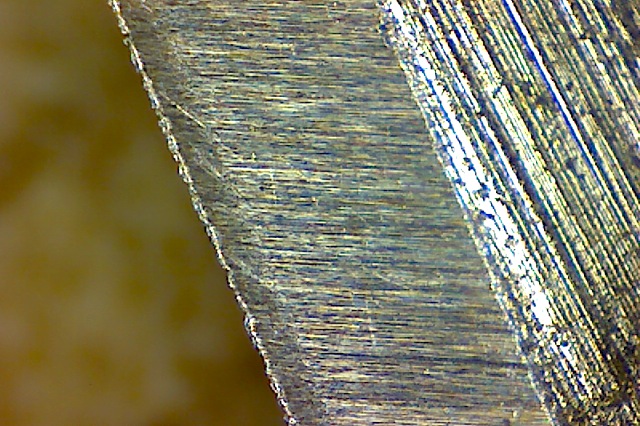
Looking at the edge with a loupe showed chips and pitting, and I decided I needed to take it back a bit and then set a new bevel - which I thought was a great opportunity to follow the honing process with my new USB microscope.
I started free-hand with a Naniwa 220 grit stone with the spine lifted a little, and quickly cut the problematic edge back a bit. The result...
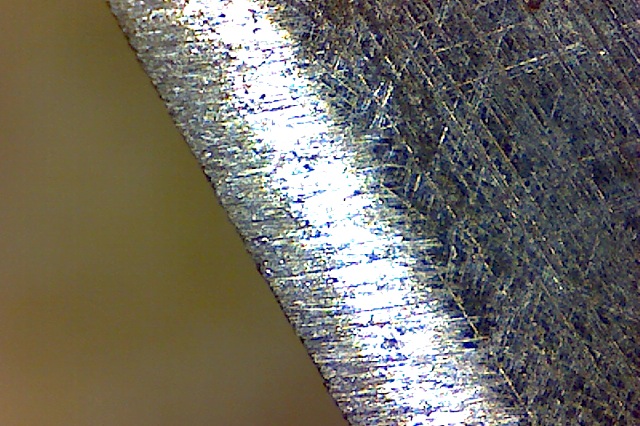
Serious bevel-setting needed now, so I got out my Shapton 1k ceramic. In this next shot, you can see the new bevel forming...
Getting closer...
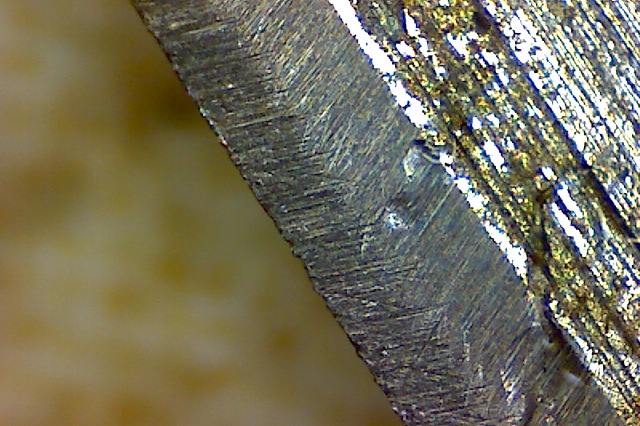
Closer still...
You might notice the direction of the cutting has changed. That's because I'd decided to alternate the direction of my strokes so I could show each stone progression more clearly, and I was honing with a toe-leading stroke at first. But my muscle memory cut in and I just found myself honing heel-leading. Oh well.
(continued in next post...)
-
The Following User Says Thank You to Oscroft For This Useful Post:
DarthLord (10-25-2013)
-
10-24-2013, 04:27 PM #60Senior Member
- Join Date
- Jul 2013
- Location
- Liverpool, UK
- Posts
- 160
Thanked: 14
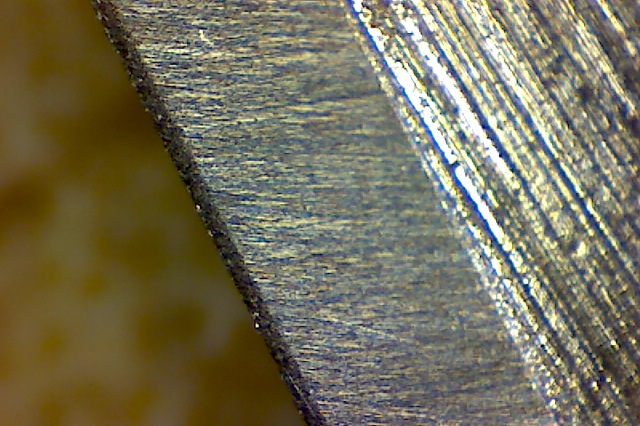
Here we are nearly done...
And this looks slightly over-done, but it's an illustration of what looks to me like a burr/wire edge forming...
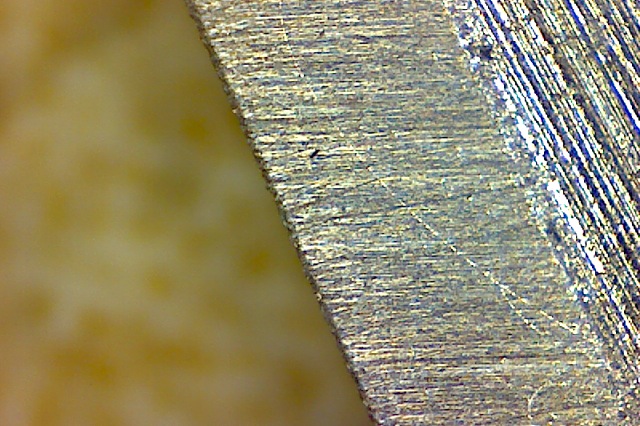
If I needed a sure sign I was finished with the Shapton 1k, that was it. I did a short session on my Naniwa 1k, which is noticeably finer (and a lot slower) than the Shapton. And here's what I got...
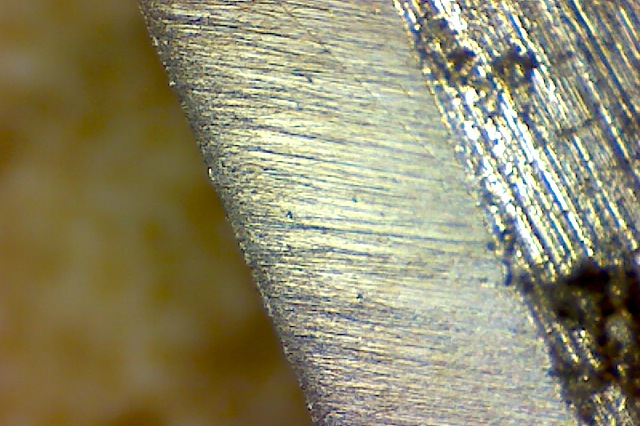
I reckon that bevel is set!
I've run out of honing time for today, so that's where I'll leave it for now. When I come back tomorrow, we'll see some shots of the rest of the progression.
Alan
-
The Following User Says Thank You to Oscroft For This Useful Post:
DarthLord (10-25-2013)


 Reply With Quote