
Results 21 to 30 of 35
 18Likes
Thread: Trying to get a smooth edge.
 LinkBack URL
 About LinkBacks
-
07-11-2014, 05:44 PM #21Senior Member


- Join Date
- Jul 2012
- Location
- Chicagoland - SW suburbs
- Posts
- 3,811
- Blog Entries
- 1
Thanked: 734
Good. I'm sure he will get it straightened out for you. Ask him how best to maintain it. As for the TNT, that's a decent test for establishing a bevel but not only is it destructive to perform it but its limited in its ability to tell you much more. After a bevel is set, you'll need to understand what you want to accomplish with finer grits and know that each step has done its work. It takes a lot of learning to understand it and we are all still learning every time we try. I personally recommend a hand held microscope. I prefer a cheap $4 one that is 200x. I suggest you get one and when your razor comes back, look closely at the edge and bevel. You'll probably see a very clean, straight cutting edge. Depending on how it is finished, the bevel may have some scratches but they won't be deep. Visual inspection is one clue. Physical tests and intuition are others. Good luck and I hope the shaves improve.
-
The Following User Says Thank You to OCDshaver For This Useful Post:
ssg1 (07-11-2014)
-
07-12-2014, 11:46 AM #22Senior Member

- Join Date
- Jul 2013
- Location
- Malvern, PA
- Posts
- 279
Thanked: 30
+1 on inspecting the edge with magnification - I learned to hone with a microscope and it taught me a lot fast. I realize not everyone has access to a good microscope but there are cheap alternatives - I use a $4 30X loupe for inspecting bevels and my microscope mainly for final inspection after finishing - if there's even one microchip I will step down to remove it - guess I'm anal. Originally Posted by OCDshaver

-john******************************************
"The early bird gets the worm but the second mouse gets the cheese." -Steven Wright
-
The Following User Says Thank You to ocelot27 For This Useful Post:
ssg1 (07-12-2014)
-
07-12-2014, 08:34 PM #23Member
- Join Date
- Sep 2009
- Posts
- 38
Thanked: 1
Hi,
I'd bought a USB 20x-200x microscope in order to start inspecting my edges.
I'm afraid that I don't know to interpret the images.
Could you please send me a few images? It would be really helpful.
I'm interested in a "well honed" image, a "dull edge" image, a "rough edge" image, a "well stropped" image and an "in need of stropping" image.
I'll be very happy if I learn to check my edges with a microscope.
Thanks.
-
07-12-2014, 08:43 PM #24Senior Member
- Join Date
- Jul 2012
- Location
- Chicagoland - SW suburbs
- Posts
- 3,811
- Blog Entries
- 1
Thanked: 734
I wish I could. The scope I use is not a USB but a cheap Chinese battery powered scope. No pics. Just inspect your razors edge when it comes back. Look closely at the bevel and the very edge, the cutting edge. Then as you hone, keep it mind that your edge will need to look similar when your done. If you begin to set a bevel on another razor, you will quickly see the difference between the two. And there will be a lot of variation in between. Originally Posted by ssg1
-
The Following User Says Thank You to OCDshaver For This Useful Post:
ssg1 (07-13-2014)
-
07-12-2014, 08:45 PM #25Senior Member


- Join Date
- Jun 2013
- Location
- Clayton, NC USA
- Posts
- 3,341
Thanked: 866
Here's a thread that answers part of your question: http://straightrazorpalace.com/advan...ed-images.html
Just call me Harold
---------------------------
A bad day at the beach is better than a good day at work!
-
The Following User Says Thank You to Haroldg48 For This Useful Post:
ssg1 (07-13-2014)
-
07-12-2014, 09:56 PM #26Senior Member
- Join Date
- Jul 2013
- Location
- Malvern, PA
- Posts
- 279
Thanked: 30
I will take some fresh images tomorrow with my scope - they will be 2k, 4k, 8k, post Zulu Grey, post 0.25 diamond on balsa and post stropping...
JohnHaroldg48 likes this.******************************************
"The early bird gets the worm but the second mouse gets the cheese." -Steven Wright
-
-
07-13-2014, 09:02 PM #27Senior Member
- Join Date
- Jul 2013
- Location
- Malvern, PA
- Posts
- 279
Thanked: 30
Here are some pics...
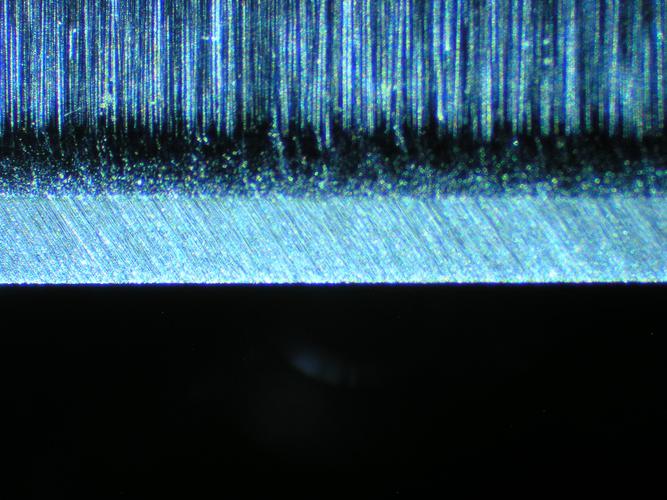
This is Shapton 1K
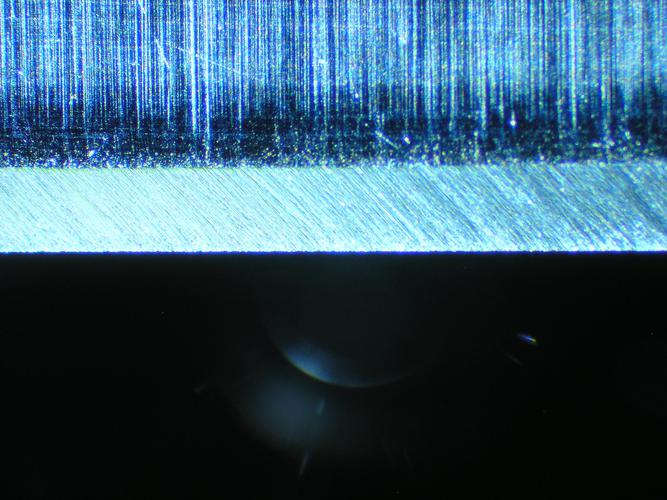
Shapton 2K
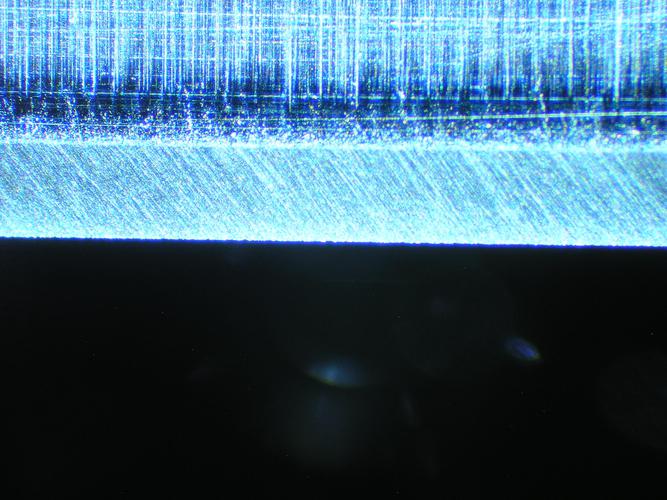
Shapton 4K
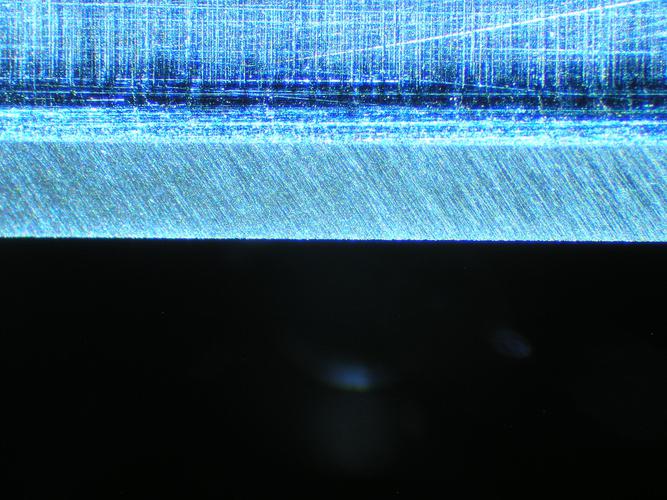
Shapton 8K
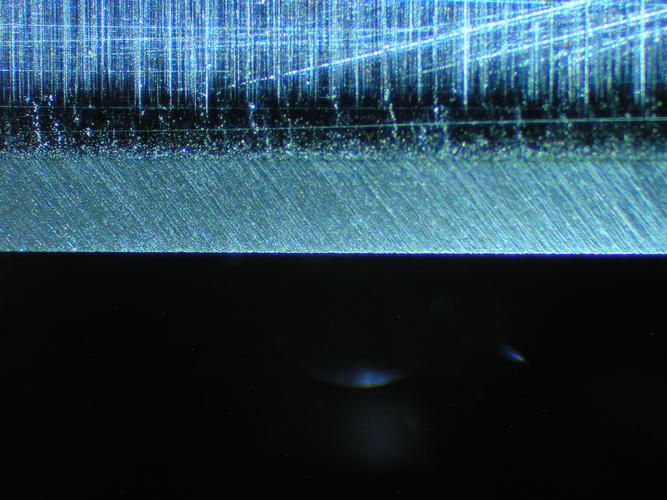
Zulu Grey
My apologies for the weak images - my microscope camera belongs in a museum. The zulu grey image appears more coarse than when viewed through the eyepieces for some reason... not sure why?
-john******************************************
"The early bird gets the worm but the second mouse gets the cheese." -Steven Wright
-
The Following User Says Thank You to ocelot27 For This Useful Post:
ssg1 (07-14-2014)
-
07-14-2014, 01:59 AM #28Member

- Join Date
- Jul 2014
- Posts
- 45
Thanked: 5
More than likely a trick of perception with the way the light hits it.
Neil Miller likes this."Try something the old way every once in a while. The only reason you are on this planet is because someone struggled and strived to do something you take for granted."
-
07-14-2014, 01:28 PM #29Senior Member
- Join Date
- Jul 2013
- Location
- Malvern, PA
- Posts
- 279
Thanked: 30
It's hard trying to hold a light to get the same lighting each time, focus, release the shutter all at once! Originally Posted by Sic4531
-john******************************************
"The early bird gets the worm but the second mouse gets the cheese." -Steven Wright
-
07-14-2014, 02:32 PM #30Senior Member

- Join Date
- Apr 2008
- Location
- Essex, UK
- Posts
- 3,816
Thanked: 3164
That's part of the reason I dislike USB scopes - way too much information. Originally Posted by Sic4531
You have a hard light source hitting insignificantly shallow scratches (for the most part) and making them look 10 times worse than they are. Move that light source just a fraction and the apparent state of the bevel changes, either for the better or the worse, just by moving the light. It makes the shallow scratches appear even more shallow or, conversely, deeper. Without you having done anything else at all. How are you supposed to draw any meaningful conclusion from that?
To do it properly you need a cradle to hold the razor in the same place so the same bit of bevel is examined, a holder for the light so that it cannot move and a holder for the USB scope so that it stays the same distance from the bit of bevel you are examining. A focus lock and dual, off-axis fixed lighting would be good. The ambient light should either be controlled or eliminated altogether, too. All gets a bit anally retentive though, doesn't it?!
As far as I am concerned, a medium power (around 20x) loupe is more than adequate, and gives a much better, 'cleaner' image - usually due to having superior optics, especially if the loupe is of the triplet design and all glass elements.
TNT up to bevel set (say 1k) followed by TPT and loupe and test shave - saves you obsessing about USB artefacts that don't really matter in the real world.
Each to his own of course, the above is only my opinion. Mind you, it is based on honing many thousands of razors...
Regards,
NeilLast edited by Neil Miller; 07-14-2014 at 02:40 PM.


 Reply With Quote