Page 1 of 2 12 LastLast
Results 1 to 10 of 12
Like Tree14Likes

Thread: Removing chips

  1. #1
    Senior Member Wirm's Avatar
    Join Date
    Feb 2014
    Location
    West Virginia
    Posts
    605
    Thanked: 284

    Default Removing chips

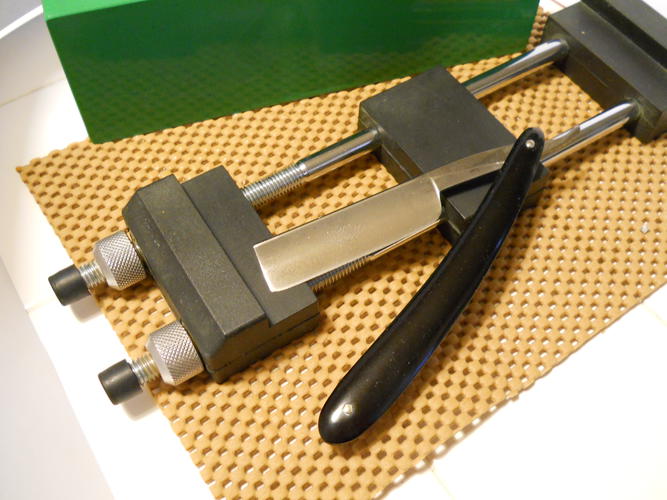
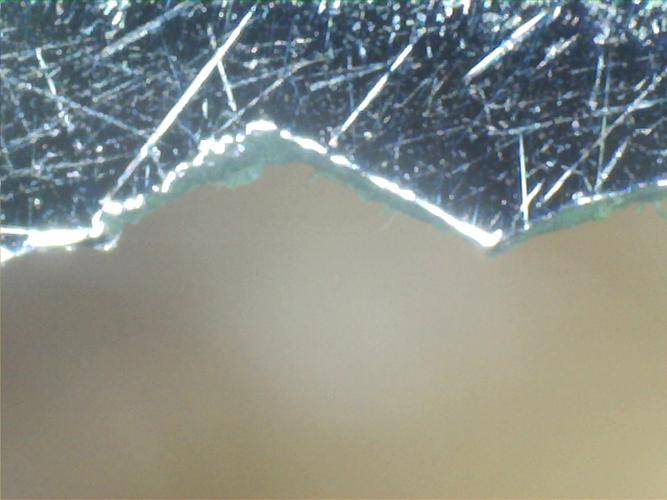
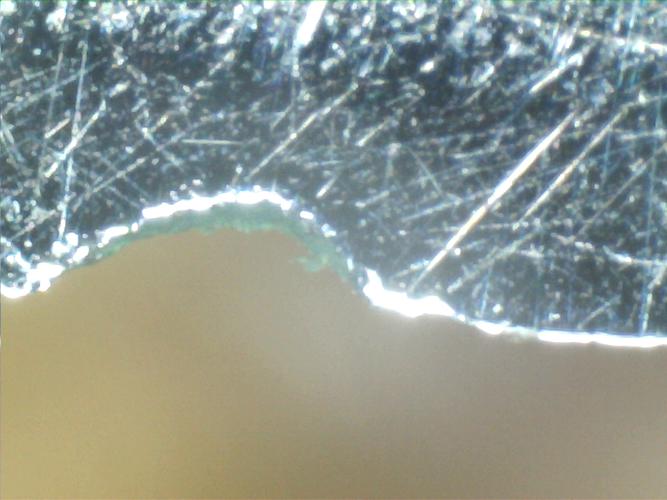
    This J.R.Torrey came in the mail today via ebay. It is fairly good condition overall with the exception of the edge. It looks like someone did the "hanging wire test" on it. Should I breadknife the entire edge and then set a new bevel, or just treat it as a normal bevel set and hone it until the entire edge see's new metal ?

    Name:  DSCN0133.jpg
Views: 308
Size:  58.5 KBName:  1 edge.jpg
Views: 296
Size:  36.3 KBName:  2 edge.jpg
Views: 300
Size:  39.6 KB

  2. #2
    Senior Member blabbermouth Chevhead's Avatar
    Join Date
    Feb 2013
    Location
    Upstate, New York
    Posts
    2,751
    Thanked: 708
    Blog Entries
    4

    Default

    From what I can see on my phone it doesn't seem that bad. Glen had a thread about how he gets rid of chips. Basically go at a 45 and hone, keep moving closer to the "regular" way we hone as the chip gets smaller.

    Have you tried the search function on the top right of this page? Give it a go. Lot's of info can be found there. Just have to read some older threads.

    Good luck brother.....
    onimaru55 and Substance like this.

    Ed

  3. The Following User Says Thank You to Chevhead For This Useful Post:

    Wirm (10-31-2014)

  4. #3
    Senior Member JSmith1983's Avatar
    Join Date
    Feb 2012
    Location
    Menominee,MI
    Posts
    1,624
    Thanked: 325

    Default

    How big are the chips? If they are big I would go with 45 degree honing before breadknifing. I think it makes it alittle easier to set the bevel later. If they are small some circles usually works for me. I usually never breadknife unless I want to reprofile the entire edge and that is only if it would take longer any other way.

  5. The Following User Says Thank You to JSmith1983 For This Useful Post:

    Wirm (10-31-2014)

  6. #4
    Senior Member blabbermouth
    Join Date
    Mar 2012
    Location
    Thunder Bay, Ontario, Canada
    Posts
    17,250
    Thanked: 3221

    Default

    Just what the others have said. If they are bad do the 45 degree angle idea for a bit before going back to regular bevel setting. If they are not bad I would put 2 layers of tape on at first to get most of the chipping out and then go to one layer to finish the bevel set. If you don't use tape normally you could still go 2 layers initially and then bare spine for the final bevel set. Good luck.

    Bob
    Life is a terminal illness in the end

  7. The Following User Says Thank You to BobH For This Useful Post:

    Wirm (10-31-2014)

  8. #5
    Senior Member Wirm's Avatar
    Join Date
    Feb 2014
    Location
    West Virginia
    Posts
    605
    Thanked: 284

    Default

    No the chips are not very deep.What is unusual is the amount of them . I think I will double up on the tape and give that method a try first. Thanks to all who replied.

  9. #6
    At this point in time... gssixgun's Avatar
    Join Date
    Jun 2007
    Location
    North Idaho Redoubt
    Posts
    26,948
    Thanked: 13221
    Blog Entries
    1

    Cool Chips

    This razor is what I am honing right now, I was reading SRP before I head to the hones and saw your thread

    This razor has both kinds of chips very near each other so I took out the USB thingy and popped a pic for you


    Name:  Hand Forged.jpg
Views: 248
Size:  30.5 KB

    The chips on the right are quite common to find on razor edges they are smaller then the bevel and really not dangerous or difficult to remove they just take care, attention, and time if there are many of them I also like the extra layer of tape technique..

    The chip on the left is a different animal, and can easily destroy the entire razor by being dumb and flexing the edge by using normal techniques and pressure.. The chip can pop into a crack by simply flexing the blade while honing... I try and take that out BEFORE I start "Honing" how high I raise the spine off the hone while doing it is in direct relation to how big and how many chips there are.. There is no doubt that you have to remove enough steel to get behind that chip how you do that is up to you...
    The real trick is to lose the least amount of steel possible

    If you want I will take another pic when it is done
    Last edited by gssixgun; 11-01-2014 at 02:48 AM.
    Chevhead and Substance like this.

  10. The Following User Says Thank You to gssixgun For This Useful Post:

    Wirm (11-01-2014)

  11. #7
    Senior Member blabbermouth
    Join Date
    Apr 2012
    Location
    Diamond Bar, CA
    Posts
    6,553
    Thanked: 3215

    Default

    If the chips are not too deep, set the bevel on the 1K with 2 layers of tape. If, that does not work quickly, because they are too deep or chipping continues, breadknife it.

    It does not matter which method you use, you have to remove exactly the same amount of steel either way, to get to the bottom of the deepest chip. Bread knifing gets you to solid, steel quicker.

    If you breadknife, use a diamond plate and do not completely remove the deepest chip, leave just enough that you can feel it on a thumb nail or sharpie. Before you start, mark the deepest chips with a sharpie from the edge up half way to the spine, so you can find them easily and quickly.

    Then free hand cut a 45 degree bevel, on both sides and leave a thin sliver of steel on the edge, the bevels do not meet. As you get close, lighten up on the pressure and let the diamonds do the work.

    With a 1k knock off the corners of the 45 degree bevels and fully remove the chip and set the bevel with 2 layers of tape.

    Once you have a solid bevel, remove one layer of tape and reset the bevel.

  12. The Following User Says Thank You to Euclid440 For This Useful Post:

    Wirm (11-01-2014)

  13. #8
    Senior Member Wirm's Avatar
    Join Date
    Feb 2014
    Location
    West Virginia
    Posts
    605
    Thanked: 284

    Default

    None of the chips extend beyond the bevel,not nearly as deep as the far left chip on gssixgun's image. In fact, they are not as deep as the chips on the right side. It looks like they will hone out. Will post pics regardless .Thanks Euclid440 for the tip. This is exactly why I love this community , everyone is willing to help and few show a ego. I sincerely thank all of you !
    Euclid440 likes this.

  14. #9
    Senior Member Wirm's Avatar
    Join Date
    Feb 2014
    Location
    West Virginia
    Posts
    605
    Thanked: 284

    Default

    I honed at 45 deg on the dmt 1200 until the deepest chip was nearly gone. Then 2 layers of tape on chosera 1k until all chips were gone then finished the bevel set with 1 layer of tape. It worked splendidly ! Thanks again to all who responded.
    Name:  n edge.jpg
Views: 191
Size:  219.2 KB

  15. #10
    Senior Member blabbermouth
    Join Date
    Mar 2012
    Location
    Thunder Bay, Ontario, Canada
    Posts
    17,250
    Thanked: 3221

    Default

    Good to hear it worked out well for you. Thanks for letting us know how it turned out.

    Bob
    Euclid440 likes this.
    Life is a terminal illness in the end

Page 1 of 2 12 LastLast

Posting Permissions

  • You may not post new threads
  • You may not post replies
  • You may not post attachments
  • You may not edit your posts
  •