Page 1 of 3 123 LastLast
Results 1 to 10 of 21
Like Tree17Likes

Thread: "The Survivor" Suggestions Please

  1. #1
    Senior Member 57vert's Avatar
    Join Date
    Sep 2014
    Location
    Connecticut
    Posts
    173
    Thanked: 43

    Default "The Survivor" Suggestions Please

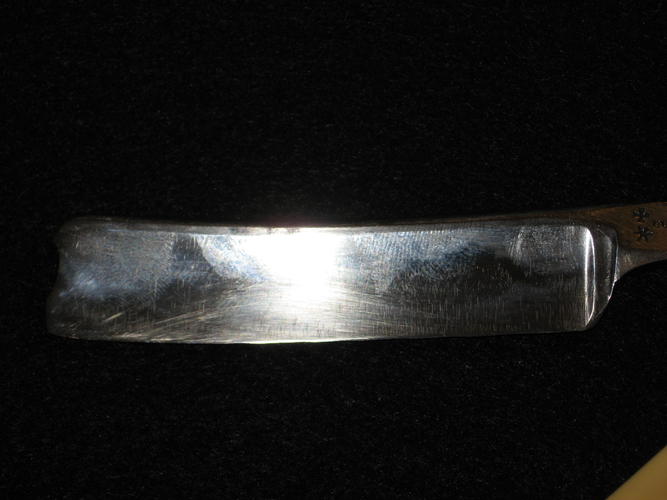
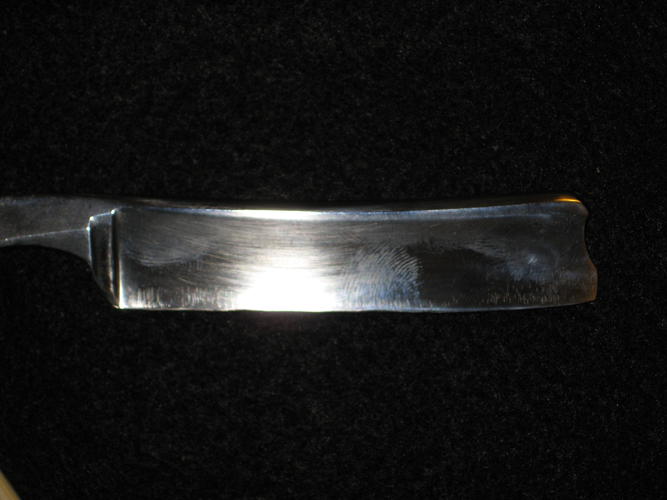
    So here is my latest project, I call her The Survivor. I picked it up at an antique store this last weekend. It was in rough shape, rusty, and the worst of it was that someone had used a grinder to probably try and sharpen it. But, It is a Joseph Rodgers & Sons with ivory scales (cracked at the pivot but serviceable) so I thought I'd see what I could do. It was cheap enough at $25. So with wet/dry paper I took it up through the progression of grits, 0000 steel wool with MAAS polish, then just MAAS on a cotton ball. As you can see in the photos, from the grinder the edge is VERY wavey. The heel 13/16 and increases to 14/16 at the toe. Another consideration is that the blade is a near wedge, maybe quarter hollow. So how would you shape the edge? Straighten the edge and keep it increasing in width to the toe so it is uneven? Straighten with even width?

    Name:  IMG_5361.jpg
Views: 268
Size:  30.4 KBName:  IMG_5363.jpg
Views: 255
Size:  31.2 KB

  2. #2
    Senior Member blabbermouth 10Pups's Avatar
    Join Date
    Nov 2012
    Location
    Across the street from Mickey Mouse in Calif.
    Posts
    5,320
    Thanked: 1184

    Default

    It's definitely got some geometry problems. The edge looks straight from the center back and then what's left of the smile is going to suffer with the hone wear at the toe. And then the stabilizer looks like it is going to have to be raised in order to hone it.

    I would match the edge to the spine. Jack the stabilizer up and put a test bevel on it. Start the bevel with 4 layers of tape and see where it at.
    Looks more like a regrind project than a simple restore.
    Good judgment comes from experience, and experience....well that comes from poor judgment.

  3. The Following User Says Thank You to 10Pups For This Useful Post:

    57vert (01-01-2015)

  4. #3
    Senior Member 57vert's Avatar
    Join Date
    Sep 2014
    Location
    Connecticut
    Posts
    173
    Thanked: 43

    Default

    Quote Originally Posted by 10Pups View Post
    It's definitely got some geometry problems. The edge looks straight from the center back and then what's left of the smile is going to suffer with the hone wear at the toe. And then the stabilizer looks like it is going to have to be raised in order to hone it.

    I would match the edge to the spine. Jack the stabilizer up and put a test bevel on it. Start the bevel with 4 layers of tape and see where it at.
    Looks more like a regrind project than a simple restore.
    When you say raise the stabilizer and jack the stabilizer up, do you mean grind it down near the edge so it starts further up the blade width?

  5. #4
    Senior Member blabbermouth 10Pups's Avatar
    Join Date
    Nov 2012
    Location
    Across the street from Mickey Mouse in Calif.
    Posts
    5,320
    Thanked: 1184

    Default

    yep, reshape it out of the way. It will ride on the hone and cause all kinds of honing problems. I am just guessing from what I see in pictures but if you set the bevel and it hits the stabilizer then it will have to be ground up out of the way. It looks to me like the bevel stops short of reaching the heel by about a 1/4 " now.
    JimmyHAD likes this.
    Good judgment comes from experience, and experience....well that comes from poor judgment.

  6. #5
    Senior Member blabbermouth 10Pups's Avatar
    Join Date
    Nov 2012
    Location
    Across the street from Mickey Mouse in Calif.
    Posts
    5,320
    Thanked: 1184
    ScottGoodman likes this.
    Good judgment comes from experience, and experience....well that comes from poor judgment.

  7. The Following User Says Thank You to 10Pups For This Useful Post:

    57vert (01-01-2015)

  8. #6
    Senior Member 57vert's Avatar
    Join Date
    Sep 2014
    Location
    Connecticut
    Posts
    173
    Thanked: 43

    Default

    Quote Originally Posted by 10Pups View Post
    It's definitely got some geometry problems. The edge looks straight from the center back and then what's left of the smile is going to suffer with the hone wear at the toe. And then the stabilizer looks like it is going to have to be raised in order to hone it.

    I would match the edge to the spine. Jack the stabilizer up and put a test bevel on it. Start the bevel with 4 layers of tape and see where it at.
    Looks more like a regrind project than a simple restore.
    Newbie question: Shape the edge or correct the stabilizer first?

  9. #7
    Senior Member blabbermouth bluesman7's Avatar
    Join Date
    Jul 2014
    Location
    Denver CO
    Posts
    4,569
    Thanked: 810

    Default

    Just to reiterate what 10Pups said. Be sure to do a test bevel to see that the razor will hold an edge. If there is evidence that a belt grinder was used, the possibility that the temper was ruined is worrisome enough to test it before doing all of the restore work.

  10. The Following User Says Thank You to bluesman7 For This Useful Post:

    57vert (01-02-2015)

  11. #8
    Senior Member blabbermouth JimmyHAD's Avatar
    Join Date
    Feb 2008
    Posts
    32,564
    Thanked: 11042

    Default

    Here is a tutorial out of the SRP library on honing and stropping. It is a PDF file with text and illustrations showing how to avoid a frown, and develop, or maintain a slight smile. IME those old Sheffields, more often than not, were smiling. You'll usually see them being a different blade depth/width from point to heel.

    Note the profile of the spine. Like 10 pups said, the smile of the edge probably corresponded with the smile of the spine originally.

    http://straightrazorpalace.com/srpwi...t_-_Honing.pdf
    Be careful how you treat people on your way up, you may meet them again on your way back down.

  12. The Following User Says Thank You to JimmyHAD For This Useful Post:

    57vert (01-02-2015)

  13. #9
    Senior Member blabbermouth 10Pups's Avatar
    Join Date
    Nov 2012
    Location
    Across the street from Mickey Mouse in Calif.
    Posts
    5,320
    Thanked: 1184

    Default

    This is the order I would do it.
    ""I would match the edge to the spine. Jack the stabilizer up and put a test bevel on it. ""

    Now, when it gets to the test bevel your going to have a tall bevel on the toe end. This is because as you grind the edge up towards the spine the blade is going to be thicker. In order to get a small bevel your going to have to thin the blade so it is the same at the top of the bevel , all the way down the edge.

    All that can be decided once you get a test bevel and see what your up against.
    Good judgment comes from experience, and experience....well that comes from poor judgment.

  14. The Following User Says Thank You to 10Pups For This Useful Post:

    57vert (01-02-2015)

  15. #10
    Senior Member blabbermouth
    Join Date
    Apr 2012
    Location
    Diamond Bar, CA
    Posts
    6,553
    Thanked: 3215

    Default

    I would trace the shape of the spine with a pencil on a piece of cardboard.

    Cut out the cardboard and trace the curve onto the spine with a sharpie, so you remove the minimal amount of steel, mostly at the heel and a little off of the toe.
    The curve does not have to match exactly, but get the general shape.

    Hold the razor spine on the bench, edge up, (a 9X11, piece of 4mm craft foam from a craft store will keep it steady and prevent scratching it up more. It is a great working surface for straight razors.)

    With a Diamond hone or diamond plate and short strokes shape the edge to the ink. These EZ lap diamond files are great for this work. Do not use a Dremel, the metal is thin and will go quickly, a Dremel will remove too much too quickly, chances of error are great, do it by hand.

    Once you have shaped the edge, ink the edge and stabilizer and put it on a high grit hone. You will see if and where the stabilizer is hitting.

    Now re shape the heel, if needed with file or plate and remove enough of the stabilizer, to hone the bevel.

    Buff and hone.

    When working on a edge like this I run then diamond file on the edge a couple of passes removing the sharp edge for safety.

  16. The Following User Says Thank You to Euclid440 For This Useful Post:

    57vert (01-02-2015)

Page 1 of 3 123 LastLast

Posting Permissions

  • You may not post new threads
  • You may not post replies
  • You may not post attachments
  • You may not edit your posts
  •