
Results 1 to 9 of 9
 13Likes

Thread: First edge restore
 LinkBack URL
 About LinkBacks
Hybrid View
-
07-29-2015, 10:24 PM #1Senior Member


- Join Date
- Jul 2015
- Location
- Helmetta, NJ
- Posts
- 439
Thanked: 56 First edge restore
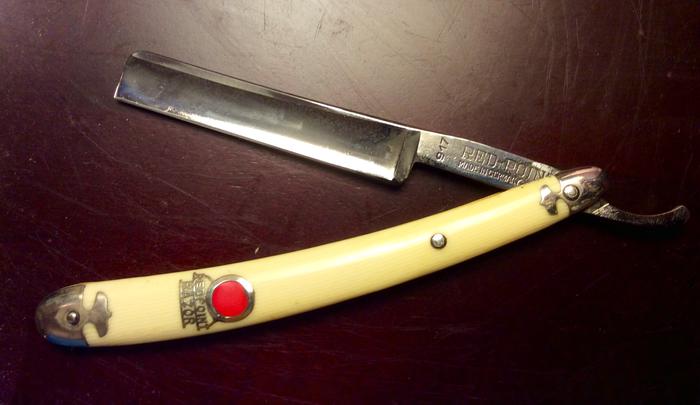
Got a razor on eBay that probably wouldn't have cut butter. Maybe that's an exaggeration, but a refresh starting at 4k did nothing. A lot of uneven hone wear, really noticeable on the spine, and the tip was well into a smile. So I breadknifed it straight on a 325 and brought the bevel up from there, eventually switching to a 1k, then 4k, and 8k and 12k for polishing, followed by .5 micron diamond on felt, then a regular stropping. Cuts my arm hair like butter now, so am going to shave with it tomorrow.
Not pretty to look at, since I didn't sand and polish the blade, but it's still cool looking to me. It has...character.
 ChopperDave likes this.
-
07-30-2015, 01:30 AM #2The Great & Powerful Oz


- Join Date
- May 2008
- Location
- Bodalla, NSW
- Posts
- 15,638
Thanked: 3751
Take this as a critique rather than criticism. Looks like a challenge for a first edge restore.
You have a problem at the heel. Looks like a spur is forming in your attempt to avoid honing on the stabiliser.
If the toe was smiling I would have reflected that at the heel. It's how old worn razors should look any way, not straight across.
The idea is to hone more at heel & toe to prevent frowns. Breadknifing was maybe unnecesarry but hard to say without pre pics.
Take a look at this for ideas re heel work. http://straightrazorpalace.com/advan...ing-heels.htmlThe white gleam of swords, not the black ink of books, clears doubts and uncertainties and bleak outlooks.
-
07-30-2015, 02:02 AM #3Senior Member
- Join Date
- Jul 2015
- Location
- Helmetta, NJ
- Posts
- 439
Thanked: 56
I'm always open to learning, especially from my mistakes, although I prefer learning from the mistakes of others.
I think what looks like a spur is just the glare/no glare from the picture...it's quite straight across. I did, unfortunately, do some honing on the stabilizer.
I suppose I did a lot of work for nothing then, working out the smiling toe. Ah, well. In general, it was a good experience, starting from no edge and getting it to a shave ready state.
-
07-30-2015, 04:23 AM #4Silky Smooth
- Join Date
- Sep 2008
- Location
- Southern California
- Posts
- 802
Thanked: 154
Not at all was your work for nothing. You did a good job - especially for you first restoration!
de gustibus non est disputandum
-
07-30-2015, 04:44 AM #5illegitimum non carborundum


- Join Date
- Jan 2008
- Location
- Rochester, MN
- Posts
- 11,552
- Blog Entries
- 1
Thanked: 3795
Do you have a photo of the razor before you fixed it?
You certainly did not need to remove a smile from the toe. Many barbers deliberately put a smile into the toe. If you removed steel along the entire length of the blade to remove that smile, then you took a lot of life out of the razor and also are honing up into a wider part of the belly of the blade. This will result in a much wider bevel than the razor had before this repair.
Oh well, as mentioned, this is a learning process.
-
The Following User Says Thank You to Utopian For This Useful Post:
Moonshae (08-01-2015)
-
08-01-2015, 12:35 AM #6Senior Member
- Join Date
- Jul 2015
- Location
- Helmetta, NJ
- Posts
- 439
Thanked: 56
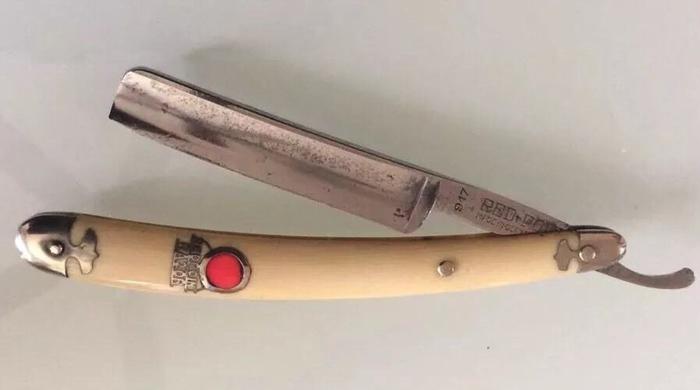
Sorry for the delay. I can only post pics through my PC, and I tend to be on this forum through my iPad. Here's a similar pic from the eBay listing, obviously before I touched it. Comparing the pics, it's very obvious to me how much metal I removed. Still a learning experience. When I shaved with it, it tended to grab hairs, so I'm guessing I still don't have it sharp enough, or because I took of so much metal, I need to adjust my angle. However, I have another 917 that I honed successfully that has more metal and is a great shaver, as well as my Pearlex Dovo, which is my first and favorite. I have a W&B with Maximillian for restoring right now, so that will, I'm sure, obtain a prominent place in my rotation.
Last edited by Moonshae; 08-01-2015 at 12:39 AM.


 Reply With Quote