Results 1 to 9 of 9
 13Likes
Thread: First edge restore
-
07-29-2015, 10:24 PM #1Senior Member


- Join Date
- Jul 2015
- Location
- Helmetta, NJ
- Posts
- 439
Thanked: 56 First edge restore
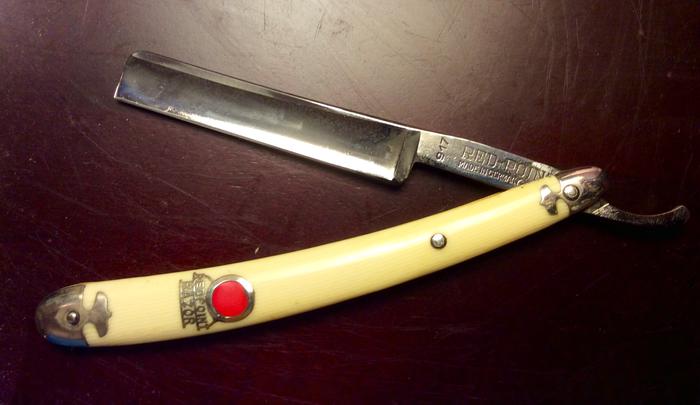
Got a razor on eBay that probably wouldn't have cut butter. Maybe that's an exaggeration, but a refresh starting at 4k did nothing. A lot of uneven hone wear, really noticeable on the spine, and the tip was well into a smile. So I breadknifed it straight on a 325 and brought the bevel up from there, eventually switching to a 1k, then 4k, and 8k and 12k for polishing, followed by .5 micron diamond on felt, then a regular stropping. Cuts my arm hair like butter now, so am going to shave with it tomorrow.
Not pretty to look at, since I didn't sand and polish the blade, but it's still cool looking to me. It has...character.

-
07-30-2015, 01:30 AM #2

Take this as a critique rather than criticism. Looks like a challenge for a first edge restore.
You have a problem at the heel. Looks like a spur is forming in your attempt to avoid honing on the stabiliser.
If the toe was smiling I would have reflected that at the heel. It's how old worn razors should look any way, not straight across.
The idea is to hone more at heel & toe to prevent frowns. Breadknifing was maybe unnecesarry but hard to say without pre pics.
Take a look at this for ideas re heel work. http://straightrazorpalace.com/advan...ing-heels.htmlThe white gleam of swords, not the black ink of books, clears doubts and uncertainties and bleak outlooks.
-
07-30-2015, 02:02 AM #3Senior Member


- Join Date
- Jul 2015
- Location
- Helmetta, NJ
- Posts
- 439
Thanked: 56
I'm always open to learning, especially from my mistakes, although I prefer learning from the mistakes of others.
 I think what looks like a spur is just the glare/no glare from the picture...it's quite straight across. I did, unfortunately, do some honing on the stabilizer.
I suppose I did a lot of work for nothing then, working out the smiling toe. Ah, well. In general, it was a good experience, starting from no edge and getting it to a shave ready state.
-
07-30-2015, 04:23 AM #4Silky Smooth

- Join Date
- Sep 2008
- Location
- Southern California
- Posts
- 802
Thanked: 154
Not at all was your work for nothing. You did a good job - especially for you first restoration!
de gustibus non est disputandum
-
07-30-2015, 04:44 AM #5illegitimum non carborundum


- Join Date
- Jan 2008
- Location
- Rochester, MN
- Posts
- 11,552
- Blog Entries
- 1
Thanked: 3795
Do you have a photo of the razor before you fixed it?
You certainly did not need to remove a smile from the toe. Many barbers deliberately put a smile into the toe. If you removed steel along the entire length of the blade to remove that smile, then you took a lot of life out of the razor and also are honing up into a wider part of the belly of the blade. This will result in a much wider bevel than the razor had before this repair.
Oh well, as mentioned, this is a learning process.
-
The Following User Says Thank You to Utopian For This Useful Post:
Moonshae (08-01-2015)
-
08-01-2015, 12:35 AM #6Senior Member


- Join Date
- Jul 2015
- Location
- Helmetta, NJ
- Posts
- 439
Thanked: 56
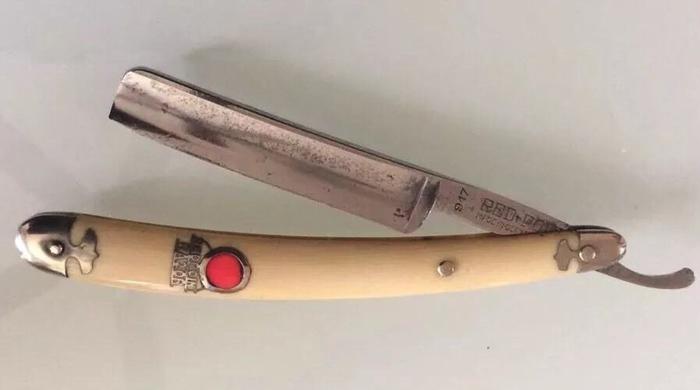
Sorry for the delay. I can only post pics through my PC, and I tend to be on this forum through my iPad. Here's a similar pic from the eBay listing, obviously before I touched it. Comparing the pics, it's very obvious to me how much metal I removed. Still a learning experience. When I shaved with it, it tended to grab hairs, so I'm guessing I still don't have it sharp enough, or because I took of so much metal, I need to adjust my angle. However, I have another 917 that I honed successfully that has more metal and is a great shaver, as well as my Pearlex Dovo, which is my first and favorite. I have a W&B with Maximillian for restoring right now, so that will, I'm sure, obtain a prominent place in my rotation.


Last edited by Moonshae; 08-01-2015 at 12:39 AM.
-
08-01-2015, 01:34 AM #7

Oh , wow . You took some metal off there

Never mind. Next time you could bring the heel a little forward like this.The white gleam of swords, not the black ink of books, clears doubts and uncertainties and bleak outlooks.
-
08-01-2015, 04:40 AM #8Senior Member


- Join Date
- Apr 2012
- Location
- Diamond Bar, CA
- Posts
- 6,553
Thanked: 3215
Next time, do your design work on cardboard, by tracing the blade and experimenting with the shape, removing as little metal as possible. Then cut out the profile and trace it on to the blade, black marker will give you a good idea of what it will look like. If you don’t like it, WD40 will remove it and start again.
A smile is not a bad thing, it is actually good and allows a sything cut with a straight stroke. That heel does need some work, profile it with a sharpie and a coin or washer, till you get the shape you like.
Be careful with pressure on a hollow ground blades like yours, too much and the edge comes off the stone. Look at the edge with magnification and re set the bevel with circles, you are probably close, but not fully set.
-
08-03-2015, 11:15 AM #9


 LinkBack URL
 About LinkBacks


 Reply With Quote

 Can you just use Ed