Page 2 of 4 FirstFirst 1234 LastLast
Results 11 to 20 of 34
Like Tree24Likes

Thread: A littel quality time touching up the rotation on the 12K
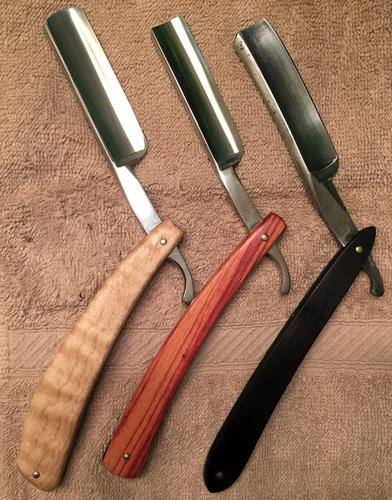
  1. #11
    Senior Member
    Join Date
    Mar 2012
    Posts
    273
    Thanked: 43

    Default

    Alan, If I understand your post correctly your complaint is not in sharpness but in the comfort area of the shave.
    I think you are shaving with a toothy edge.
    I will share with you my method of resolving this issue.
    I use a small, highly polished, flat piece of Montana agate to assist my honing efforts.
    When I get close to the bevel set I use the polished flat of the agate to rub down the edge using a single pass withvery light pressure at a 90 degree angle to the blade to flatten out and polish any roughness on the edge.
    Its like breadknifing, except the ever so slightly flattened edge will now be very shiny due to the use of the polished rubbing stone.
    Then I use a bright light and maneuver the edge until you can see the reflection of the flattened edge. The first rub will likely produce an intermittent reflection because of the toothy edge and the fact that the bevel hasn't been fully and evenly set along its length.
    I rub/polish the edge and hone the polished edge off until the bevel has been fully any evenly set and switch to a finishing type of stroke on the hone.
    For finishing I use a light pressure and a stroke that resembles the digit 6 on the end of the hone nearest you and reverse this stroke on the other end of the hone. (start on the inside of the 6, make a circle, and finish the "tail" with a sort of swoop)
    For me this stroke keeps deep parallel groves from forming on the bevel which can cause a rough edge.
    My eyesight has deteriorated through the years and now I need reading glasses for up close work and find that with some practice and the reading glasses I can see even the finest reflection on an edge and keep honing just until that is gone.
    When the reflection is totally gone from the edge it is time to move on to the next hone.
    Each hone past bevel set receives this light pressure using the figure 6 stroke and repeat until the reflection is gone and evidence of the coarse marks on the bevel from the previous hone has been removed.
    Each honing using the next finer hone starts with light pressure and end using a very light pressure.
    When stopping very soon after the reflection is gone the wire edge or over honing is prevented.
    I think Glenn referred to not over honing as "sneaking up on the edge"
    Trust that with nothing more than my reading glasses if I very, very, carefully turn and twist the razor looking for the slightest trace of a reflection on the edge and find absolutely none after coming off the Naniwa 12,000, the resulting invisible edge will be incredibly sharp and be as free from teeth as I can get it.
    I don't use a thumpad test, arm hair, hanging hair, or any other test for sharpness as this method works very well for me.
    Personally I have been going from the Naniwa 12,000 directly to the linen and then to the leather strop but a few careful strokes on the CO would possibly be beneficial as well.
    I am very careful when stropping this edge as it is delicate.
    A rough and fast technique on the strops will cause issues that could be avoided.
    As is the case with any razor that I have honed, the first shave is done with extra caution. After a couple shaves with 30 careful passes on linen followed by 50 gentle passes on leather the edge breaks in giving an incredibly satisfying shave.
    This technique has worked very well for me and I hope that if you choose to try it, that you will be as successful with it as I have been.

    This technique has worked well for me on very hard steel that has a tendency to microchip.
    Steel and outback like this.

  2. The Following 4 Users Say Thank You to Galaxy51 For This Useful Post:

    aalbina (12-10-2015), outback (02-05-2016), Steel (02-19-2016), Uzi (02-05-2016)

  3. #12
    Senior Member blabbermouth
    Join Date
    Apr 2012
    Location
    Diamond Bar, CA
    Posts
    6,553
    Thanked: 3215

    Default

    That is not uncommon for an edge to break down, after repair, if it was not fully set.

    Not enough time was spent on the 1k to fully set the bevel. What you did was not a regular honing or a touch up, it was a repair with a full bevel set and is completely different from a regular honing where the bevels already exist.

    This is not uncommon for new honers, and when you do this kind of honing the importance of a full bevel set cannot be overlooked. Especially if you are in a hurry to get an edge on it.

    So with all the finish honing you have done on this razor the bevels are probably now pretty flat and in the proper angle/alignment, you just need to get them to meet fully.

    It should not take too much to get there, look at the edge and then set it on the 4k, you will have to do less polishing on the 8k.

    USB scopes are nice for teaching or taking photos but useless for honing. I never use them except to teach, So we are looking at the same thing. I use a 60X $2 lighted loupe, mostly for honing.
    outback likes this.

  4. The Following 2 Users Say Thank You to Euclid440 For This Useful Post:

    aalbina (12-10-2015), Uzi (02-05-2016)

  5. #13
    Senior Member aalbina's Avatar
    Join Date
    Apr 2015
    Location
    New Hampshire, USA
    Posts
    296
    Thanked: 83

    Default

    Thank you for the great description of your technique! That took a lot of your time and I am grateful for the time spent.

    Thanks so much.

    Adam


    Quote Originally Posted by Galaxy51 View Post
    Alan, If I understand your post correctly your complaint is not in sharpness but in the comfort area of the shave.
    I think you are shaving with a toothy edge.
    I will share with you my method of resolving this issue.
    I use a small, highly polished, flat piece of Montana agate to assist my honing efforts.
    When I get close to the bevel set I use the polished flat of the agate to rub down the edge using a single pass withvery light pressure at a 90 degree angle to the blade to flatten out and polish any roughness on the edge.
    Its like breadknifing, except the ever so slightly flattened edge will now be very shiny due to the use of the polished rubbing stone.
    Then I use a bright light and maneuver the edge until you can see the reflection of the flattened edge. The first rub will likely produce an intermittent reflection because of the toothy edge and the fact that the bevel hasn't been fully and evenly set along its length.
    I rub/polish the edge and hone the polished edge off until the bevel has been fully any evenly set and switch to a finishing type of stroke on the hone.
    For finishing I use a light pressure and a stroke that resembles the digit 6 on the end of the hone nearest you and reverse this stroke on the other end of the hone. (start on the inside of the 6, make a circle, and finish the "tail" with a sort of swoop)
    For me this stroke keeps deep parallel groves from forming on the bevel which can cause a rough edge.
    My eyesight has deteriorated through the years and now I need reading glasses for up close work and find that with some practice and the reading glasses I can see even the finest reflection on an edge and keep honing just until that is gone.
    When the reflection is totally gone from the edge it is time to move on to the next hone.
    Each hone past bevel set receives this light pressure using the figure 6 stroke and repeat until the reflection is gone and evidence of the coarse marks on the bevel from the previous hone has been removed.
    Each honing using the next finer hone starts with light pressure and end using a very light pressure.
    When stopping very soon after the reflection is gone the wire edge or over honing is prevented.
    I think Glenn referred to not over honing as "sneaking up on the edge"
    Trust that with nothing more than my reading glasses if I very, very, carefully turn and twist the razor looking for the slightest trace of a reflection on the edge and find absolutely none after coming off the Naniwa 12,000, the resulting invisible edge will be incredibly sharp and be as free from teeth as I can get it.
    I don't use a thumpad test, arm hair, hanging hair, or any other test for sharpness as this method works very well for me.
    Personally I have been going from the Naniwa 12,000 directly to the linen and then to the leather strop but a few careful strokes on the CO would possibly be beneficial as well.
    I am very careful when stropping this edge as it is delicate.
    A rough and fast technique on the strops will cause issues that could be avoided.
    As is the case with any razor that I have honed, the first shave is done with extra caution. After a couple shaves with 30 careful passes on linen followed by 50 gentle passes on leather the edge breaks in giving an incredibly satisfying shave.
    This technique has worked very well for me and I hope that if you choose to try it, that you will be as successful with it as I have been.

    This technique has worked well for me on very hard steel that has a tendency to microchip.
    Steel likes this.

  6. #14
    Senior Member aalbina's Avatar
    Join Date
    Apr 2015
    Location
    New Hampshire, USA
    Posts
    296
    Thanked: 83

    Default

    I've watched a lot of videos on bevel resetting - wish I had a local mentor. I think my biggest problem is knowing when the bevel is set. After re-reading through the thread you mentioned again - I will try looking down at the blade under the lighted loop - I use basically the same thing as you but it supposedly goes to 60X - to see that the edge meets all the way down the blade.

    It took a lot of work on the 1K to get the Dovo chip ground out - it was a pretty good chip. In retrospect, I should have taped the spine. Didn't even think of it until I had ground away far too much. Not sure that the potentially uneven pressure on the spine may have now put the geometry in question.

    Would you suggest taping this go around?

    Adam


    Quote Originally Posted by Euclid440 View Post
    That is not uncommon for an edge to break down, after repair, if it was not fully set.

    Not enough time was spent on the 1k to fully set the bevel. What you did was not a regular honing or a touch up, it was a repair with a full bevel set and is completely different from a regular honing where the bevels already exist.

    This is not uncommon for new honers, and when you do this kind of honing the importance of a full bevel set cannot be overlooked. Especially if you are in a hurry to get an edge on it.

    So with all the finish honing you have done on this razor the bevels are probably now pretty flat and in the proper angle/alignment, you just need to get them to meet fully.

    It should not take too much to get there, look at the edge and then set it on the 4k, you will have to do less polishing on the 8k.

    USB scopes are nice for teaching or taking photos but useless for honing. I never use them except to teach, So we are looking at the same thing. I use a 60X $2 lighted loupe, mostly for honing.

  7. #15
    Senior Member blabbermouth
    Join Date
    Apr 2012
    Location
    Diamond Bar, CA
    Posts
    6,553
    Thanked: 3215

    Default

    Yes, use 2 layers if you think there is a lot of hone wear. You may end up with a double bevel, but it will not hurt anything and make a thicker bevel.

    After a few honing’s the double bevel will wear away and you will have a single narrower bevel.

    At the slightest feel of dragging on the stone change the top layer of tape, you have burned through it.

  8. #16
    Senior Member aalbina's Avatar
    Join Date
    Apr 2015
    Location
    New Hampshire, USA
    Posts
    296
    Thanked: 83

    Default

    I know it's been a while but I've had a lot going on and just got back to re-honing the Dovo 5/8. I followed your advice Euclid440 and taped the spine with 2 layers of tape (actually the spine wear wasn't so bad when I compared it to other razors that weren't new - it just looked bad because it basically had no wear prior to the bevel set.)

    I started back on the 1K, freshly lapped, with Lynn's circle method then 20 straight down and back laps. Wouldn't cut arm hair. Repeated this routine 3 times checking with my thumb and arm hair - it got better but still not cutting arm hair like my others. Looked through my loop at 60x and saw the double bevel you were talking about. Noticed a bit of jagged edge all the way up and down the edge at 60x. Moved onto the 4K - tested - shaving a little better on arm hair but not up to the others. When all the 1K striations where gone I moved up to the 8 and then the 12. CO pasted strop and set her aside to for the next morning shave. Still not cutting arm hair very well at the skin level. I knew I wasn't where I needed to be but didn't understand why.

    Next morning shave was pretty bad. Just not shave ready. Spent some more time here reading and came across a thread specifically asking about pressure when setting a bevel. The OP was seeing chipping on his blades at bevel set. The solution suggested was ease up on the pressure you may be flexing the blade - let the stone do it's job. Thought this could be my problem. I'm not getting the edge to cut arm hair on the 1K so I think the bevel isn't set so I'm consciously or unconsciously increasing the pressure, flexing the blade and chipping the edge. Less is more.

    Last night I soaked up the stones, lapped them and started again. I went down to one strip of tape and started again with circles on the 1K, 20 laps straight up and back - very light pressure. 3 rotations of this later and still not cutting arm hair like my other razors do. Looking at the loop I see the jagged edge which I interpret now as chipping. WTF?

    Thinking the hone wear is minimal I decide to skip the tape altogether. This feels better. Go through it again and - same result.

    So I know that bread knifing you razor is a pretty drastic thing to do but I take a deep breath and calmly and ever so lightly run the edge over the corner of the 1K - 3 times until I see a straight line at 60x under the lighted loop. Now I start again with the gentlest of touch on the 1K, circles and 20 straight down and back, under the loop it looks good no jagged edges. Not shaving arm hair but feels grabby on the thumb. 2 more very light cycles - look down the edge under 60X and everything seems to meet all along the edge and there are no shinny spots. Shaving arm hair now but not great.

    On to the lapped 4K - weight of the blade - getting into Zen mode now. Moved up to 8K when the 4K striations are gone and then to the 12K when the 8K striations are gone and finally a few light laps - CO pasted strop. Checked against arm hair again and still not shaving arm like my other razors. Plucked a goatee hair out and tried the HHT - and it cut multiple times along the same hair like a boss. WTF? Set it aside for a shave test.

    Strop on leather and shave test this morning was much better than yesterday morning - smooth not grabbing and pulling, no irritation and an OK close shave. I'll have to shave a few more days with it because every razor is different and it takes me a few days to adjust my technique to get a razor shaving at its best as I go through my rotation.

    So:

    1. Less is more - like all the experts here say.
    2. Not sure why my other razors can tree top hair on my arm and this one doesn't.
    3. Not sure why this one passes the HHT equal to my other razors given 2. above.
    4. Concerned that my Norton 4K lapped, feels grittier than my Naniwa 1K

    -- and wondering if maybe I need to do something to the Norton 4K side. The 8K side is so smooth.

    Any advice is, as always, greatly appreciated.

    Adam


    Quote Originally Posted by Euclid440 View Post
    Yes, use 2 layers if you think there is a lot of hone wear. You may end up with a double bevel, but it will not hurt anything and make a thicker bevel.

    After a few honing’s the double bevel will wear away and you will have a single narrower bevel.

    At the slightest feel of dragging on the stone change the top layer of tape, you have burned through it.

  9. #17
    Senior Member blabbermouth
    Join Date
    Apr 2012
    Location
    Diamond Bar, CA
    Posts
    6,553
    Thanked: 3215

    Default

    Look at the edge, straight down, make sure you do not have any shiny reflections. Look at the bevel and the edge, for chips and deep stria. If you have deep stria, you will have to drop down in stone to remove the stria, if chipped, joint the edge lightly 1-2 strokes and re set the bevel on the 12k.

    Strop the razor on linen after jointing and before honing on the 12k to remove some of the ragged edge then finish on the 12k.

  10. #18
    Senior Member aalbina's Avatar
    Join Date
    Apr 2015
    Location
    New Hampshire, USA
    Posts
    296
    Thanked: 83

    Default

    OK - thanks for the help! I appreciate it. I have looked at the edge straight down and I don't see and shiny reflections that would indicate that the bevel is not set all across the edge. At least my beginners eye doesn't see any. I've also carefully laid the led lighted loop (really a handheld mini-scope) on the edge and looked at it straight down under magnification (after the 1K rounds) to see if I can see anything there - and I don't.

    I have checked for the chips and stria at each stage and I haven't progressed until the previous stone stria are gone.

    After I have so carefully worked the edge up to the 12K -- jointing the edge lightly on the 12K seems drastic. I assume by jointing you mean run the edge lightly over the corner of the 12K stone? I have read about people doing this to remove the wire edge (actually read a paper by a materials scientist a while ago on the wire edge problem looking at edges with an SEM). So after I joint the edge on the corner of the stone - 20 rounds or so on the linen and then work it about 20 laps on the 12K? I'll give it a try tonight.

    BTW, shaved with it again this morning and it didn't perform as well as I had hoped - so back to the stones. I'll do as you suggest Euclid440 and report back.

    Thanks again

    Adam


    Quote Originally Posted by Euclid440 View Post
    Look at the edge, straight down, make sure you do not have any shiny reflections. Look at the bevel and the edge, for chips and deep stria. If you have deep stria, you will have to drop down in stone to remove the stria, if chipped, joint the edge lightly 1-2 strokes and re set the bevel on the 12k.

    Strop the razor on linen after jointing and before honing on the 12k to remove some of the ragged edge then finish on the 12k.

  11. #19
    Senior Member
    Join Date
    Feb 2008
    Posts
    1,588
    Thanked: 286

    Default

    My only advice would be to try setting the bevel on the 4 k . Then see if you get any chipping. I use the 3 k to 4 k and only use the 1 k if I realy need to .

    just lightly dull the edge and reset bevel with 4 k it should,nt take much at all.
    Euclid440 and Steel like this.

  12. #20
    Senior Member aalbina's Avatar
    Join Date
    Apr 2015
    Location
    New Hampshire, USA
    Posts
    296
    Thanked: 83

    Default

    I haven't sat down again yet with the Dovo - but here's some pictures I was able to get with a microscope. These are at about 400x or maybe 500x (the drop in ocular camera is probably 10x or 15x) and the objective lens I'm using is a 40x. There are labels on the bottom left corner but the magnification number isn't right - I just forgot to change it. The second is the Ralf Aust which I've done nothing but touch up on a 12K, CO paste a few times since I got it. The first is the Dovo, on which I've reset the bevel like three times.

    Name:  Dovo_400x_1.jpg
Views: 165
Size:  32.7 KBName:  RalfAust_400x_1.jpg
Views: 150
Size:  24.4 KB

    Such a difference in the edge - and I can certainly feel it on my face.

    Back to the stones. This time I will photograph the edge on the Dovo throughout the process and post them.

    Adam

Page 2 of 4 FirstFirst 1234 LastLast

Posting Permissions

  • You may not post new threads
  • You may not post replies
  • You may not post attachments
  • You may not edit your posts
  •