
Results 1 to 10 of 13
 21Likes
 LinkBack URL
 About LinkBacks
-
06-14-2016, 10:28 PM #1Senior Member


- Join Date
- Sep 2015
- Location
- israel
- Posts
- 133
Thanked: 14 Wade and Butcher under the microscope
so i have been honing around lately and taking pictures with a microscope after each process , i think it is an amazing learning tool .
so i thought i would start by posting the progression on this blade ,a nice wade and butcher.
my normal progression is 1k ,3k ,8k ,12k all nanniwa , and finish on Jnat .
after the 1K
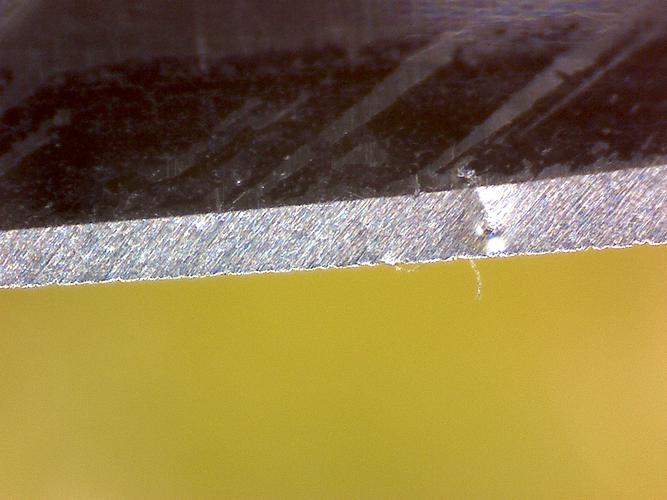
same 1k but after a joining maneuver .
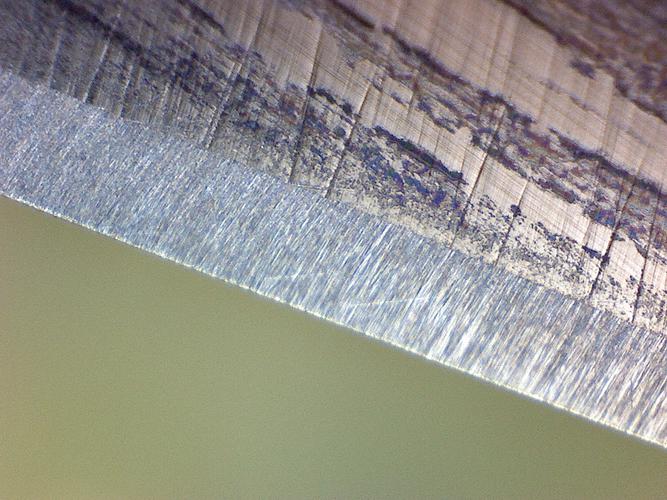
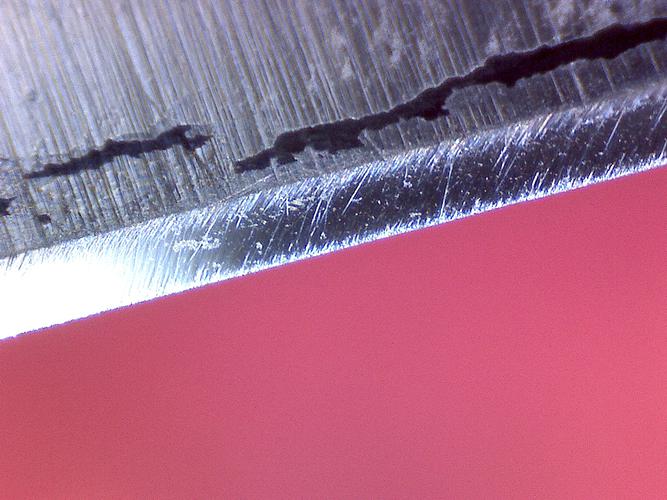
after the 1k i moved to the 3k and then to the 8k , and as you can see the photo at the 8k showed a problem , care to comment?
so i stopped there and thought to return to the 3K ,what do you think?
thank you all , hope you enjoy this
-
06-15-2016, 12:11 AM #2illegitimum non carborundum


- Join Date
- Jan 2008
- Location
- Rochester, MN
- Posts
- 11,552
- Blog Entries
- 1
Thanked: 3795
You are not reaching the edge. Are you taping the spine? If so, this effect can happen if you do not replace the tape, because as the tape wears away the spine is lowering and the blade angle reduces causing the edge to not reach the hone.
Alternatively, this can be due to not reducing pressure. If you are honing with any significant pressure, you need to do the finishing strokes on each hone with much less pressure and then down to no pressure.
Since you're got a scope, take advantage of it. Drop back down to the 3k and hone until you have a uniform scratch pattern on the bevels again. Follow the suggestions above and then move up to the 8k.
-
The Following User Says Thank You to Utopian For This Useful Post:
Hirlau (06-15-2016)
-
06-15-2016, 12:22 AM #3illegitimum non carborundum
- Join Date
- Jan 2008
- Location
- Rochester, MN
- Posts
- 11,552
- Blog Entries
- 1
Thanked: 3795
You photos are very good, but here are some suggestions for how to make them a little easier for us to understand:
1. Use the same magnification.
2. Try to use the same angle for the blade relative to both the objective and light source. This one can be difficult but it makes a huge difference in perception of what is going on from one photo to the next.
3. If possible, try to photograph the same section of the blade each time. This is easily done if you draw a marker line perpendicular to the edge from the spine side of the bevel toward the spine. That way it won't be removed during honing.
-
The Following User Says Thank You to Utopian For This Useful Post:
Marshal (06-16-2016)
-
06-15-2016, 12:32 AM #4Senior Member
- Join Date
- May 2016
- Location
- Sydney, oz
- Posts
- 245
Thanked: 18
What magnification is this?
-
06-15-2016, 01:00 AM #5The Great & Powerful Oz


- Join Date
- May 2008
- Location
- Bodalla, NSW
- Posts
- 15,638
Thanked: 3751
+1 ................. Originally Posted by Utopian
 The white gleam of swords, not the black ink of books, clears doubts and uncertainties and bleak outlooks.
-
06-15-2016, 08:39 AM #6Senior Member
- Join Date
- Sep 2015
- Location
- israel
- Posts
- 133
Thanked: 14
Utopian awesome tips thank you very much, will do
and i am using the Veho VMS-001 that goes up to x200 and i have mounted it on a custom stand so that i can better control the focus
-
06-15-2016, 09:17 AM #7Senior Member

- Join Date
- Feb 2012
- Location
- West Midlands, UK
- Posts
- 1,263
Thanked: 360
Photo 2 is quite a revelation in terms of what jointing achieves - have to say I'd never considered it before.
I'm not so sure that you need to drop down again - mainly because picture 3 is not so good as 2. You have to consider that moving from 3k to 8k will take more time to remove the 3k scratches than using an intermediate hone. The picture appears to show that the centre of the bevel is being polished but not either side of it - which would be very strange and makes me think that the photo is not accurate. Certainly the suggestion to change tape will help, but if that photo is right then surely tape wear would result in a polished area from the top of the bevel but stopping short of the edge.Euclid440 and Brent375HH like this.My service is good, fast and cheap. Select any two and discount the third.
-
06-15-2016, 03:37 PM #8illegitimum non carborundum
- Join Date
- Jan 2008
- Location
- Rochester, MN
- Posts
- 11,552
- Blog Entries
- 1
Thanked: 3795
I considered just the 8k, but given that the same effect may have been happening on the 3k, I thought it best to get that sorted out at the lower grit just to be sure he is starting out with fully flat bevels. Actually, I had considered suggesting that he drop back to the 1k for 10 strokes but figured the 3k would sort it out fast enough.
Regarding the jointing, I know who will disagree, but it is not necessary. Correct honing with lighter pressure at the 1k and 3k would have produced the same edge. Either way it is done, you have to hone past the bottom of all of the chips while preventing the creation of more of them. This is done with the lighter strokes on a clean hone.
-
06-15-2016, 05:01 PM #9Senior Member

- Join Date
- Apr 2012
- Location
- Diamond Bar, CA
- Posts
- 6,553
Thanked: 3215
Yup, the bevels are not flat. That is 1k stria, on the edge and back of the bevel.
If it was just the tape that burned through, the 1k stria would be removed from the back of the bevel and not the edge.
It could also be technique, not keeping the bevel flat on the stone.
Jointing works well, very well as the OP’s photos show. 2 layers of tape and a little time on the 3k will get it done.
Which stand are you using for the scope?
Nice photos and work, by the OP, good thread.
-
06-15-2016, 06:00 PM #10Senior Member
- Join Date
- Feb 2012
- Location
- West Midlands, UK
- Posts
- 1,263
Thanked: 360
Whilst not wanting to contradict these two esteemed gentlemen Utopian and Euclid - I'm still at a loss to understand what's going on here. I agree that they appear to be 1k scratches - but looking at both photo 1 and 2, the scratch pattern indicates a flat bevel in that you can follow individual scratch marks from top to bottom. Photo 3 - if it does indicate a polished inner area but with residual 1k scratches - well how could that be if the bevel was flat after the 1 k hone?
My service is good, fast and cheap. Select any two and discount the third.


 Reply With Quote