
Results 1 to 10 of 16
 25Likes
Thread: First Honing and The Results
 LinkBack URL
 About LinkBacks
-
05-24-2017, 04:06 PM #1Member


- Join Date
- Feb 2017
- Location
- Southern Maryland
- Posts
- 61
Thanked: 8 First Honing and The Results
I was able to get this razor from a local Mennonite tool sharpener. Another customer had brought it in over a year ago to have it sharpened and never picked it back up. It has no name stamped on the tang, so I was wanting it to be my first honed razor guinea pig.
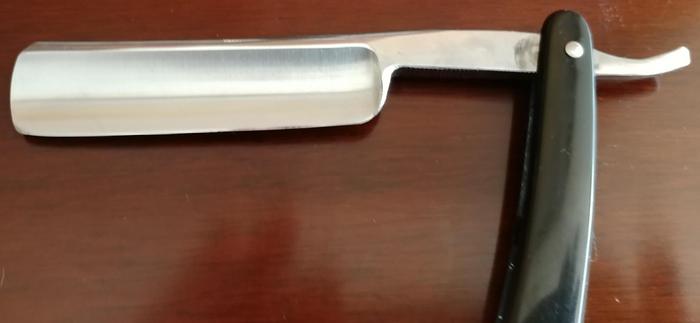
I have as set of Naniwa Sharping Stones 1,000, 3,000, 8,000 and 12,000 grit. I also have a 10,000 Naniwa Specialty Stone. I started out on the 1k stone trying to get rid of the marks on the bevel from the tool sharpener using an Amazon purchased loupe. Once happy with that after about 15-20 minutes(I was not in a hurry) moved on to the next stone. Stopping every so often to check with the loupe on the progress of the removal of the last stones etch marks. I don't know if you can see it in the photo or not but the shoulder on the razor sticks out/higher then the plan of the blade which made getting the heel honed properly difficult. I just skipped it to be honest and did the best I could with the heel trying to keep the blade flat on the stones.
I shaved with it the next morning. The shave was not bad. It wasn't great, but it wasn't bad either. Especially how it was my first self honed razor. I was able to get my usual two pass shave(WTG & ATG) out of it.
Now I am going to take it back to the stones starting at the 3k stone. There is a spot or two that looks bad under magnification that I would like to try and get out of the blade now that I know I can hone a razor to the point where I can shave with it. If I hose it up I don't really care as I bought it to learn how to hone.
After I honed the razor I stropped it on my leather strop about 75 times. The one question I do have is, I have Whipped Dog Balsa Wood Strop w/ green 0.3mic chromium oxide & red 0.1mic iron oxide. Should I use that after honing verses the leather strop?Longhaultanker likes this."Insanity: doing the same thing over and over again and expecting different results."
Albert Einstein
-
05-24-2017, 04:38 PM #2Senior Member

- Join Date
- Apr 2008
- Location
- Saint Paul, Minnesota, United States
- Posts
- 2,944
Thanked: 433
I usually use a CrOx paddle plus linen/leather after honing, I go after the best edge possible and that gets it for me Originally Posted by GarnerPW

-
The Following User Says Thank You to rodb For This Useful Post:
Steel (05-25-2017)
-
05-24-2017, 08:21 PM #3Junior Member
- Join Date
- Feb 2016
- Posts
- 17
Thanked: 1
It depends on the edge that you want. Some like an extremely keen edge that pastes give. I prefer more comfortable edges that I usually get from natural stones. Although I survived with a naniwa 10k as my finisher for a long time.
Sent from my SM-G950F using TapatalkMarshal likes this.
-
05-24-2017, 10:06 PM #4KN4HJP

- Join Date
- Feb 2015
- Location
- Chesapeake, Virginia
- Posts
- 932
Thanked: 261
A 45-degree x-stroke will help you hone the heel:
http://straightrazorpalace.com/srpwi...honing_a_razorLonghaultanker likes this."Every normal man must be tempted at times to spit on his hands, hoist the black flag, and begin to slit throats." -H. L. Mencken
-
05-24-2017, 10:44 PM #5Senior Member


- Join Date
- Dec 2014
- Location
- Virginia, USA
- Posts
- 2,224
Thanked: 481
Well, if you've used your 1/3/8/12 setup and you know it isn't quite shaving right, I would say going further isn't going to close the gap. Get it up to par on the 12K first, then try out the pastes and see how you feel about them.
-
05-24-2017, 11:21 PM #6Senior Member
- Join Date
- Apr 2014
- Location
- Minnesota
- Posts
- 240
Thanked: 18
You don't want to move up until you have your bevel set at the 1k level. If that ain't right all the way along your edge then your not done setting it and there is no sense moving to the next level.
niftyshaving likes this.
-
05-24-2017, 11:23 PM #7Senior Member

- Join Date
- Apr 2012
- Location
- Diamond Bar, CA
- Posts
- 6,553
Thanked: 3215
Is the bevel set?
Does not sound like it…
You cannot polish an edge, that does not exist…
-
05-25-2017, 12:01 AM #8Member
- Join Date
- Feb 2017
- Location
- Southern Maryland
- Posts
- 61
Thanked: 8
So I'm trying it again. This time I have added a layer of tape and am trying to hone out a chip that is only visible under magnification with the loupe. After marking the bevel with a sharpie I can see how far down the edge I'm getting.
Sent from my phone using some app"Insanity: doing the same thing over and over again and expecting different results."
Albert Einstein
-
05-25-2017, 12:24 AM #9Senior Member
- Join Date
- Apr 2012
- Location
- Diamond Bar, CA
- Posts
- 6,553
Thanked: 3215
First you must, set the bevel, get the two bevels to meet fully at the edge.
Here is a post with good micrographs of what to look for, Second Try at Honing.
Also, reading the first 3 post in the Honing forum may help you.niftyshaving likes this.
-
The Following User Says Thank You to Euclid440 For This Useful Post:
niftyshaving (05-26-2017)
-
05-25-2017, 12:46 AM #10Senior Member

- Join Date
- Feb 2013
- Location
- Haida Gwaii, British Columbia, Canada
- Posts
- 14,443
Thanked: 4828
The bevel set is the foundation of your edge. To ensure it is everything it can be you need to look at the edge, not the side of the bevel. Looking almost straight down on the bevel you should see no lines or sparkles all along its length. Once the bevel is complete from one end to the other, you look at the side of the bevel to watch the previous grits stria disappear. As you progress it will look more polished and more straight.
That being said, you got it to shave, not as well as you wanted it to, but it shaved. I would mark this one down as a success. I doubt many of us can say that our first hone job was perfect. I know mine passed, but like yours left room for improvement. As you hone more you will get better results and it will take less time. Good job.
Ps
The linked thread above is a good read.It's not what you know, it's who you take fishing!
-
The Following User Says Thank You to RezDog For This Useful Post:
GarnerPW (05-25-2017)


 Reply With Quote