
Results 11 to 19 of 19
 6Likes
Thread: USB Microscope for honing
 LinkBack URL
 About LinkBacks
-
11-22-2017, 11:30 AM #11Junior Member

- Join Date
- Sep 2017
- Location
- Santa Clara CA
- Posts
- 14
Thanked: 2 I have not used that model but I suspect from the descriptions that their performance would be quite similar.
 Originally Posted by Gasman

-
The Following User Says Thank You to treadstone For This Useful Post:
Gasman (11-22-2017)
-
11-22-2017, 03:03 PM #12Skeptical Member


- Join Date
- Nov 2016
- Location
- Colorado Springs
- Posts
- 10,548
Thanked: 2194
Thanks for the reply. The one you linked to looks cooler being polished aluminun. Im not looking to replace mine. Was just wondering if you had tried it. Thanks again.
It's just Sharpening, right?
Jerry...
-
11-23-2017, 12:14 AM #13Senior Member
- Join Date
- Sep 2013
- Location
- NW Indiana
- Posts
- 1,060
Thanked: 246
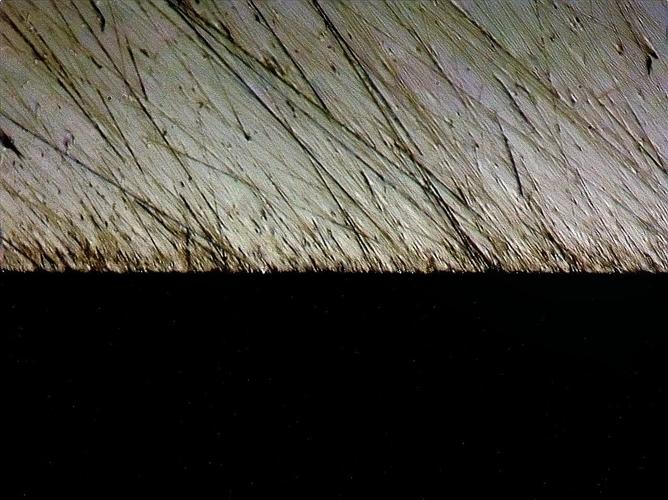
Good quality microscopy is more involved than just sticking your razor under the scope and hitting a button. You'll need to work with the lighting intensity and source location as well as the location and angle of the subject if you want to get good quality images. I own one of the 5MP Celestron scopes linked previously and it can make good images as long as the guy running it does his part. Here is an image of a razor honed on a Carborundum barber hone.
 Midway likes this.
-
11-23-2017, 12:51 AM #14Senior Member
- Join Date
- Jun 2017
- Location
- Glen Ellyn, IL
- Posts
- 128
Thanked: 37
I fully agree with your assertion. Still, I found my USB microscope wanting. Lighting and angle had to be perfect. The holder was next to useless as it moved too easily. The grid surface had too little contrast with the blade, so my best option was to freehand the scope, holding it at an angle. The working depth of field was tiny, so let's say using it was a pain in the rear and interrupted the honing session needlessly. Originally Posted by eKretz
My Belomo loupe was a seamless way to verify what I was doing without being needlessly cumbersome.
I believe a quality optical compound microscope would be the best way to view razors. I've seen a homemade jig which quickly allowed the user to view the "edge of the edge" and continue honing after a quick inspection.Last edited by Midway; 11-23-2017 at 01:47 PM.
-
11-26-2017, 05:29 AM #15Junior Member
- Join Date
- Sep 2017
- Location
- Santa Clara CA
- Posts
- 14
Thanked: 2
Great image, Kretz! Originally Posted by eKretz
Staging and illumination are indeed key. In fact, it's easy to reach very-wrong conclusions from microscopy by getting these factors wrong.
I'm not there yet but I aspire to achieve images like the one that you present.
-
11-26-2017, 08:34 PM #16Senior Member
- Join Date
- Sep 2013
- Location
- NW Indiana
- Posts
- 1,060
Thanked: 246
Thanks. It is a good idea to focus on certain parts of the blade for good images too. The one above is mainly to show the scratch pattern and depth. To look at the actual edge I use a different setup.
-
11-26-2017, 09:36 PM #17Junior Member
- Join Date
- Sep 2017
- Location
- Santa Clara CA
- Posts
- 14
Thanked: 2
@Kretz: Could you please briefly outline what you do for each setup? Best practices or dos/don'ts?
(New thread, maybe...)
-
11-27-2017, 05:40 AM #18Senior Member
- Join Date
- Sep 2013
- Location
- NW Indiana
- Posts
- 1,060
Thanked: 246
For the scratch depth shots on my particular setup, I like to set the blade so the bevel is as close to parallel to the scope lens as possible. From there I use a variable intensity focusable LED light from almost perpendicular to the bevel (off to the side) - adjusting the height of the light source as necessary to find the "just right" spot. A focusable light source is important because it basically collimates the light - or gets all the light directed in a parallel direction. The distance of the light source from the subject has an effect on this also, so experiment with that too. Sometimes frame stacking is necessary for bevels with deeper scratches to get everything in proper focus - this overcomes that lack of depth of field issue.
For the edge, I use a similar setup, but with the edge slightly higher up relative to the spine. Light source nearly in the same place, but it needs a little tweaking to get to the "just right" place again. For this I like to adjust the light so that the apex is lit but not the bevel. These are originally around 240x when viewed pixel to pixel on my laptop screen BTW. Approximately 1mm of actual edge is portrayed in these frames.

Last edited by eKretz; 11-27-2017 at 05:43 AM.
-
The Following User Says Thank You to eKretz For This Useful Post:
treadstone (11-27-2017)
-
11-27-2017, 05:52 AM #19Junior Member
- Join Date
- Sep 2017
- Location
- Santa Clara CA
- Posts
- 14
Thanked: 2
Nice. Makes sense. Thanks!


 Reply With Quote