
Results 11 to 20 of 22
 55Likes
Thread: 2nd Attempt at Honing
 LinkBack URL
 About LinkBacks
-
03-20-2018, 11:35 PM #11Senior Member


- Join Date
- Jan 2018
- Location
- Illinois
- Posts
- 277
Thanked: 47
BobH, that's exactly what happened. Sounds like I might have some work ahead of me then.
Utopian, I'll try to get some pics of it later.
-
03-21-2018, 02:08 AM #12Senior Member


- Join Date
- Mar 2012
- Location
- Thunder Bay, Ontario, Canada
- Posts
- 17,322
Thanked: 3228
Well, then just use one layer of tape and be patient on the 1K till you get a true bevel set. Be sure and put a new layer of tape on when you see the old one showing signs of wear. Don't try to hurry things along using too much weight on the blade either. Good luck. Originally Posted by sonnythehooligan

BobLife is a terminal illness in the end
-
03-21-2018, 02:25 AM #13Senior Member

- Join Date
- Feb 2013
- Location
- Haida Gwaii, British Columbia, Canada
- Posts
- 14,443
Thanked: 4828
One layer of tape is very important to new honers. It prevents hamfisted honing that wears the spine faster than the edge. The spine needs to be in contact with the hone but not pressed to the hone. The pressure should be emphasized on the edge. Meets are great places to get the subtle techniques of honing.
It's not what you know, it's who you take fishing!
-
03-21-2018, 02:50 AM #14Senior Member

- Join Date
- Apr 2008
- Location
- Saint Paul, Minnesota, United States
- Posts
- 2,944
Thanked: 433
If you have to kill an edge for chips, don't bread-knife unless absolutely necessary. Instead of 90 degrees off the spine try 30-45 degrees off the spine, that way there is less bevel reset needed and less metal to remove
-
03-21-2018, 03:02 AM #15The Great & Powerful Oz


- Join Date
- May 2008
- Location
- Bodalla, NSW
- Posts
- 15,636
Thanked: 3751
The more tape the less steel to remove to form an apex. You would get there with no tape or one layer but it would take more time & depending on the razor may give you large looking bevels. Did someone say pics would be helpful ? Originally Posted by sonnythehooligan
 The white gleam of swords, not the black ink of books, clears doubts and uncertainties and bleak outlooks.
-
03-21-2018, 12:02 PM #16Senior Member
- Join Date
- Jan 2018
- Location
- Illinois
- Posts
- 277
Thanked: 47

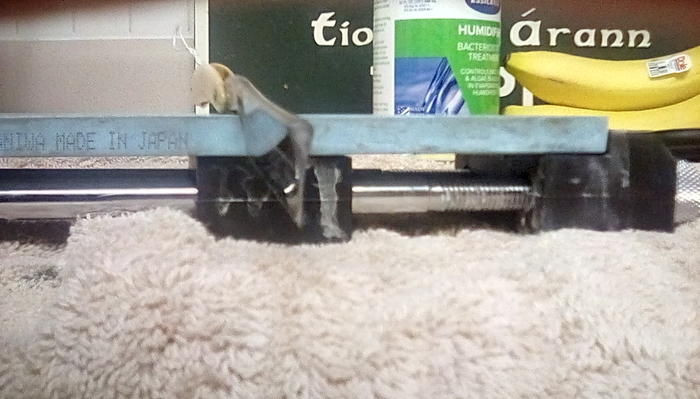

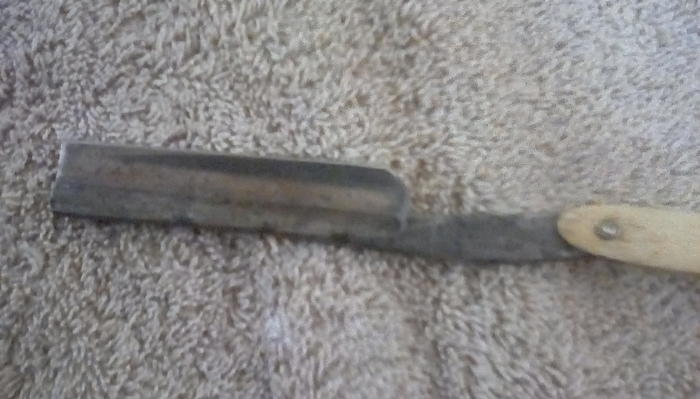
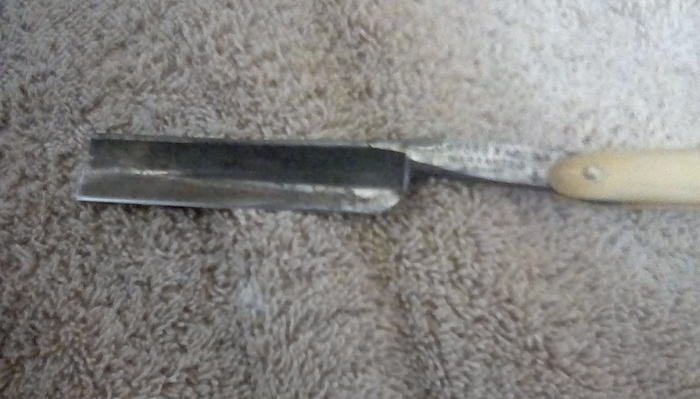
Ok, hopefully these will help. I've taken it back to one layer of tape. I do believe it is making a bit of progress. I'll work on it tonight, but I'll keep an eye on this thread in case you guys see something I should try differently for this razor.
FYI, Someone asked earlier if I was us a loupe. I am, but all I really know to look for so far are the little chips an edge can have. This one has a edge free of chips for now.Last edited by sonnythehooligan; 03-21-2018 at 12:09 PM.
-
03-21-2018, 12:05 PM #17Senior Member
- Join Date
- Jan 2018
- Location
- Illinois
- Posts
- 277
Thanked: 47
The more tape the less steel to remove to form an apex.
Interesting. I figured there must be a reason for why the razor reacted the way it did to the tape. Thanks!onimaru55 likes this.
-
03-21-2018, 03:31 PM #18illegitimum non carborundum

- Join Date
- Jan 2008
- Location
- Rochester, MN
- Posts
- 11,552
- Blog Entries
- 1
Thanked: 3795
The loupe will show you exactly what parts of the bevel are and are not being cut by the honing stroke. This allows you to see the progress that you are, or are not, making in refining the bevels and the edge. Seeing this allows you to make adjustments. Originally Posted by sonnythehooligan
The hone wear shown in the photo suggests that you do only need one layer of tape.
-
03-21-2018, 04:03 PM #19Senior Member
- Join Date
- Feb 2013
- Location
- Haida Gwaii, British Columbia, Canada
- Posts
- 14,443
Thanked: 4828
https://straightrazorpalace.com/honi...ggestions.html
There are some good pictures in this thread. The method I use to see the bevel set is to look almost straight down on the apex. Any shiny spots, white lines or obvious thickness in the apex and it is not set. Once the apex is very difficult to see and all of the error messages disappear it is time to move up. Then I judge by how the side of the bevel looks.It's not what you know, it's who you take fishing!
-
03-21-2018, 11:31 PM #20Senior Member

- Join Date
- Jun 2013
- Location
- archbold ohio
- Posts
- 2,378
Thanked: 546
A sharpy marker is a handy tool to have as well. darken the edge and take a couple laps then check to see if you are making even contact along the edge. If not then find out why and adjust accordingly. If you use a loupe getting the light to hit it just right can help you see when the apex is made. A set bevel should shave along the whole edge. Setting the bevel is %99 percent of the work.


 Reply With Quote