
Results 11 to 20 of 51
 126Likes
 LinkBack URL
 About LinkBacks
-
09-23-2018, 11:03 PM #11Senior Member


- Join Date
- May 2010
- Location
- Upstate South Carolina
- Posts
- 3,308
Thanked: 987
Hmmmm....I've got some .5 diamond spray I use on a fire-hose strop for tuning up knives mostly. I wonder what would happen if I did a spritz and a few dilutions on my surgical black on the next razor I finish.
 I would think you would still want to wash it off entirely and do your true arkie finish without it for a couple hundred strokes or so.
When I burnished the 8x3 SB Ark, one of the last steps I did was to spritz the diamond spray on a 2k 2x72 polishing belt on the grinder and do light circles with the ark surface against the flat platen (of course it wanted to lock up like our finest stones want to do with our DMT plates, so that didn't last long). So it may in fact be too burnished lol.
-
09-24-2018, 03:46 PM #12Senior Member

- Join Date
- Apr 2012
- Location
- Diamond Bar, CA
- Posts
- 6,553
Thanked: 3215
Paul, it is all about smaller stria to get a straighter edge. With naturals the grit is unknow, so the only way is trial and error, looking at the bevels to see if you are going in the right direction.
The low grits are always a tradeoff between speed removing material and leaving deep scratches, which sometimes take more time to remove and can cause other issues, as with low grit diamonds.
Yes, chrome Oxide or any other slurry from a natural stone will or can improve an edge, but again an experiment. You are then using a Jnat type system that works for Jnats, with various Nagura slurry. A Jnat nagura progression is well established with know slurry stones, but with Tomo stones somewhat more of an experiment, unless the honer is experienced with the base and nagura stones.
There are old Ark posts where guy have experimented with natural and Nano grit slurry’s with good results that may make good reading.
High grit Ark stones are unique because of the blend of grits and abrasives that give the unique hazy finish. I have had mixed results with many pastes and slurry on Arks and prefer to use paste separately for much better control and repeatability. What does make a difference with Arks is pressure, stone face finish, number of laps and lubrication. Thicker lubes, like oil do much the same as pressure and face finish by decreasing the contact with the stone grit.
You don’t need a big stone to finish a razor, so you can experiment with stone “polish” rather inexpensively and with little effort.
Get the bevels as flat and edge as straight as your finish stone will allow then paste a strop or piece of cardboard and strop on it to further refine the bevel and edge. This is a more repeatable edge. Nano grit finishes are hard to beat, but then does the finish stone matter that much?
Experimentation is fun, though. Enjoy.
-
The Following 2 Users Say Thank You to Euclid440 For This Useful Post:
Paulbuck (09-24-2018), ScoutHikerDad (09-24-2018)
-
09-24-2018, 05:04 PM #13Senior Member
- Join Date
- Nov 2014
- Location
- Sacramento
- Posts
- 309
Thanked: 135
Excellent information Marty! Thank you. Yeah, I'm probably chasing an edge that is not really necessary for a comfortable shave but it is fun and I'm having a bit more time now to play with my hones and razors (did I mention I'm retiring this week? I am, Thursday is my last day in the office, today I'm off). Originally Posted by Euclid440

So, the wife is back to the bay area and I've got a couple of days to usurp the kitchen table. Today I'll work on this Easy Cutter from Ontario Cutlery Co. I worked on it last week and got the stria as uniform as I could and the edge looks straight as can be. Shaved with it yesterday and it was a comfortable, three pass shave. Going to make a little CrOx slurry and see what it does.
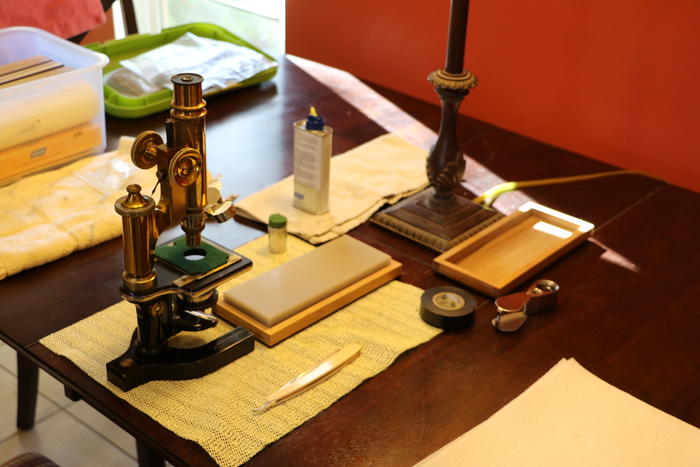
Old microscope, ancient stone (that you can shine a light through, how cool is that), and a straight razor. Pretty giddy right now.
-
The Following 2 Users Say Thank You to Paulbuck For This Useful Post:
earcutter (09-24-2018), ScoutHikerDad (09-24-2018)
-
09-24-2018, 05:14 PM #14lobeless

- Join Date
- Feb 2012
- Location
- Kansas
- Posts
- 4,864
Thanked: 762
It's been ten minutes!! What you find so far!?!?
LOL!
I'll be interested to see where this takes you. All I know is my shave was smoooooth.ScoutHikerDad and Paulbuck like this.David
-
09-24-2018, 06:16 PM #15Senior Member
- Join Date
- Apr 2012
- Location
- Diamond Bar, CA
- Posts
- 6,553
Thanked: 3215
Nice microscope and stone. You can make an angled mount with a piece of ¼ in foam sheet,( a buck at wall mart) and a magnet sheet, (cheap advertising), once you get the angle right it saves a lot of hassle.
-
The Following User Says Thank You to Euclid440 For This Useful Post:
Paulbuck (09-24-2018)
-
09-24-2018, 08:20 PM #16Senior Member

- Join Date
- Jul 2014
- Location
- Denver CO
- Posts
- 4,577
Thanked: 810
Really cool microscope!
Yeah, if you build a blade mount out of foam board to hold the bevel perpendicular to the scope and light from the top or side (I prefer to shine the light from the side straight on to the edge) you will be able to see much better. I use a book light.
-
The Following User Says Thank You to bluesman7 For This Useful Post:
Paulbuck (09-24-2018)
-
09-24-2018, 09:38 PM #17Senior Member
- Join Date
- Nov 2014
- Location
- Sacramento
- Posts
- 309
Thanked: 135
Results! But first the painful details.
Before I started I looked over the bevel that I had just worked on a week before and had two acceptable shaves with. This razor, prior to last week, had not seen a stone since I originally honed it about a year and half ago and was always a 'great' shaver. It took an easy edge. Under the scope last week the edge looked horrendous. I lightly jointed the chippy edge and did the whole previously described honing sequence. Thought it looked so much better and the shaves reflected that. Today it looked unacceptable for what I wanted to do with the CrOx slurry experiment.
So I started from scratch, of course, and heavily jointed the edge. This time I only dressed the Washita once with the fine side of the crystolon and went at it. 35 minutes later I had a proper bevel set and checked under the scope. Pictures here would help but lets just say it looked extremely uniform with no heavy striations and a straight edge. It was grabbing hairs so easily and tpt'ed so well, I did not dress the hard Ark but used it burnished. 10 minutes on the hard Ark and checked with the scope; better!
Went to the translucent dry for only a few laps, maybe 40-50, and looked again. The edge actually looked degraded, but without pictures its hard to really compare this (photographic memory would come in handy here). My thought is the dry stone is more aggressive than the carefully prepared bevel needed at that point; I could detect micro-chipping. Then continued honing with water, dish soap, and oil. Looked again and it was definitely better than after the dry treatment. Uniform, tight stria, super straight edge but at 87 magnification not laser straight; I can still make out micro-chipping.
Now to the reason behind all this; the CrOx slurry experiment. I rubbed the crayon lightly on the translucent Ark and mixed in oil; a pretty green slurry it was! I did about 20 laps and there was resistance immediately; not the effortless glide one normally gets with a finishing Ark. Checked under the scope; dramatic difference. Recharged the slurry slightly and did another 20 laps and looked again; nearly stria free and polished. It did not remove the micro-chipping. I think the next step would be to very lightly joint the edge, bring it back with the burnished Hard Ark then sequence up to the slurry again. Hopefully without the previous stria the micro-chipping will disappear.
Guess I shouldn't be surprised at the results of using a CrOx slurry, it did what it should do.
So now I've got a very expensive translucent finisher that is basically a platform for chromium oxide. Hmmm.....
Tomorrow I'll give her a shave with leather only stropping. Can't wait!
This post could also read as a cautionary tale for those thinking about going the natural stone route; there is a learning curve and for some like me, it can be long.
-
The Following User Says Thank You to Paulbuck For This Useful Post:
earcutter (09-24-2018)
-
09-24-2018, 09:59 PM #18lobeless
- Join Date
- Feb 2012
- Location
- Kansas
- Posts
- 4,864
Thanked: 762
I love your close lol! But seriously, I think calling your stone nothing more than a platform for CrOx is a mistake. CrOx for me is golden, but you need something to get you there or it’s pearls before swine.
I’m surprised that the micro chipping didn’t dissipate though. Can’t wait to hear what your shave feels like. Like I said, mine wasn’t the keenest, but it sure was smooth.
But yeah, that micro chipping thing really bugs me! Oh and, I’ve always found blacks finer than translucent. That’s me though.
Great report! Can’t wait to hear tomorrow’s!ScoutHikerDad and Paulbuck like this.David
-
09-24-2018, 10:23 PM #19Skeptical Member


- Join Date
- Nov 2016
- Location
- Colorado Springs
- Posts
- 10,486
Thanked: 2186
Nice write up, Paul! Thanks for that. I plan on holding off on the naturals myself until I get a little more perfect edges with my synthetics.
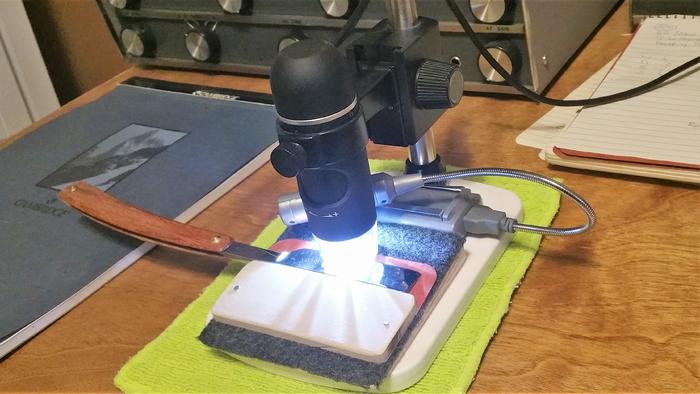
But, I wanted to show you the Jig I made today for my scope. 3/4" plywood sanded to about a 9-degree angle (the way I figure it, my blades are honed to 16 to 18 degrees. So with the blade sitting on it, it should show thru the scope as flat or next to flat). Added some felt (don't really know why) then made a backer for the spine out of thin Pine. I inset a couple old magnets to the wedge-shaped board. Not the real strong magnets as I wanted the blade to stay on but not have to pry the blade off. Stole them from the wife's collection of Fridge magnets. Then I found the felt was showing to many little hairs on the scope, so I put a piece of hard, thin cardboard under the blade. This gives a nicer look in the scope. Took me about an hour to make and I made it out of stuff I had laying around in the garage. And as you can see, I like to use a Book Light with my scope too. I can change the angle of the light and get it in close...
 It's just Sharpening, right?
Jerry...
-
The Following 3 Users Say Thank You to Gasman For This Useful Post:
JBHoren (09-24-2018), Paulbuck (09-24-2018), ScoutHikerDad (09-24-2018)
-
09-24-2018, 11:02 PM #20Senior Member
- Join Date
- Nov 2014
- Location
- Sacramento
- Posts
- 309
Thanked: 135
I like that Jerry, clever. I need to do something here soon before I have a major 'oops!'.
Gasman likes this.
-
The Following User Says Thank You to Paulbuck For This Useful Post:
Gasman (09-25-2018)


 Reply With Quote