
Results 11 to 20 of 33
 55Likes
Thread: How to sharprin this thing
 LinkBack URL
 About LinkBacks
-
03-02-2019, 03:28 AM #11Skeptical Member


- Join Date
- Nov 2016
- Location
- Colorado Springs
- Posts
- 10,548
Thanked: 2194
Very good info given.
When it comes time to realy honning it, after getting the edge sorted out and repaired, Then tape and a 1k and see what happens. It may never come back. Its lost a lot and then you are going to take more by making it smile.jfk742 likes this.It's just Sharpening, right?
Jerry...
-
03-02-2019, 01:57 PM #12Senior Member


- Join Date
- Nov 2013
- Posts
- 2,321
Thanked: 498
I think it is interesting and probably spot on that you traced the curve of the spine and transferred it to the edge. Can you show us the after picture of the razor after you had cut the smile on it? I think some may have missed that you said this picture is BEFORE the cut. Originally Posted by Afoshie
 What a curse be a dull razor; what a prideful comfort a sharp one
-
03-02-2019, 08:01 PM #13Senior Member

- Join Date
- Jan 2015
- Location
- Pinole, ca
- Posts
- 1,526
Thanked: 339
I wouldnt over think it, like the guys said before, some high angle honing on a low grit stone to get some bevels started once you get close toss a piece of tape on the spine and set the bevel on a 1k hone. If it wont hold an edge its toast if it does youll have a fine shaver.
Substance likes this.
-
03-03-2019, 04:56 PM #14Skeptical Member
- Join Date
- Nov 2016
- Location
- Colorado Springs
- Posts
- 10,548
Thanked: 2194
Did the OP get lost in a snow storm?
Hope he comes back and gives us an update.It's just Sharpening, right?
Jerry...
-
03-03-2019, 07:55 PM #15Member
- Join Date
- Feb 2019
- Location
- Greeneville TN
- Posts
- 75
Thanked: 7
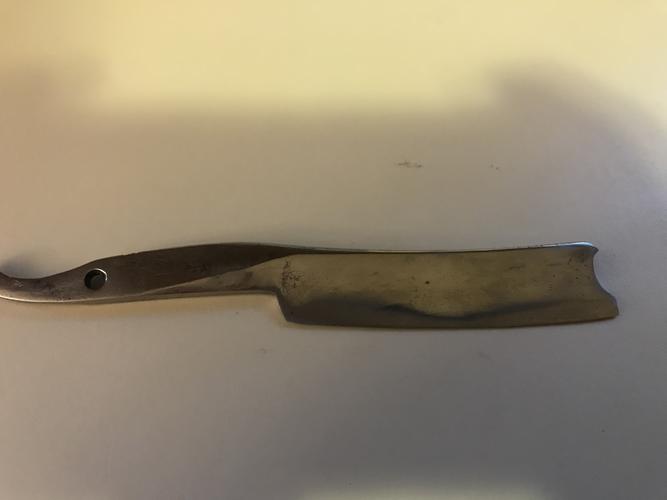
Thus is aftrer the cut and start of sharpening both the heel and toe are nowhere near a edge middle has just made one.
-
The Following User Says Thank You to Afoshie For This Useful Post:
Steel (03-04-2019)
-
03-04-2019, 12:22 AM #16Skeptical Member
- Join Date
- Nov 2016
- Location
- Colorado Springs
- Posts
- 10,548
Thanked: 2194
Nice job on following the spine shape. Be sure your doing rolling x strokes on the stones.
One more thing that comes to mind is to measure (you can look it up on the web) to see what kind of bevel angle you will be at when done. Too thick of a blade could cause more of a tool edge than a razor edge. I find 17 - 18 degrees to be perfect, but 19 -20 is still usable. Some will go even higher. Without a lot of experiance shaving with many straights you wont know what you like just yet. So its nice to know.It's just Sharpening, right?
Jerry...
-
03-04-2019, 02:11 AM #17Member
- Join Date
- Feb 2019
- Location
- Greeneville TN
- Posts
- 75
Thanked: 7
I have a few straights that i have shaved with. This will prob be try once and store. I seem to do better and get closer shaves from full hollow ground. My boker 346 gets me closer and cleaner than any i have. I just get scared ill drop it and break it. Hate to lose a 115 year old beauty.
-
03-04-2019, 03:25 AM #18Senior Member
- Join Date
- Nov 2013
- Posts
- 2,321
Thanked: 498
That looks just like it should to my eye. Good job. It takes a little while to get the bevel set on something fresh off the restore. It will depend on your bevel setting stone and technique. Maybe break it up into two or three sessions. Just don’t fall into the trap of “it’s close enough, I’ll just move on now”. Stay there until the whole bevel is totally set. The rest will be quick and painless with great results. Move on too quick and it’s hours of frustration, IME. Originally Posted by Afoshie
What a curse be a dull razor; what a prideful comfort a sharp one
-
03-04-2019, 04:17 AM #19Senior Member

- Join Date
- Mar 2015
- Location
- Akron, Ohio
- Posts
- 12,107
Thanked: 4313
Looking good. Sounds like you need to spend more time on the heel and toe, if its getting sharp in the middle of the blade. Just Thinkin.
 Steel likes this.Mike
-
03-04-2019, 07:07 PM #20Senior Member
- Join Date
- Apr 2012
- Location
- Diamond Bar, CA
- Posts
- 6,553
Thanked: 3215
The big part of reshaping is making it look right. The heel and toe have to go with the shape of the edge and the blade.
Use a coin for the heel and toe to round it off and blend with the edge, remember a lot of the edge/width, is missing and it is far from its original shape now. Use a quarter, nickel or washer as a template, from the corner of the tang to just above the edge and a dime at the toe. Then blend the two arcs with a cardboard tracing of the spine so that no more comes off the width in the middle.
Use a black sharpie and keep drawing and re-drawing until you get a shape that looks right. Take a look at old smiling blades to find a shape and gradual, graceful tapers that will work with your blade.
Sharpie comes off with WD40 and is easy to re-do. You cannot re-do, once you remove steel. So be happy with the look before removing any metal.
This is re-shaping not honing, do not worry about making a bevel until you get the shape you want, you can take a little more off when honing so leave it a little long. Once fully shaped, then hone it, take your time.


 Reply With Quote