
Results 1 to 10 of 25
 81Likes
Thread: Want to get my edges correct.
 LinkBack URL
 About LinkBacks
Hybrid View
-
08-28-2020, 03:34 PM #1Senior Member


- Join Date
- Oct 2019
- Location
- Kingsville On, Canada
- Posts
- 2,435
Thanked: 207 My edge below doesn't have the scratches all in the same direction as the one in your pic. Mine was honed toward a smile with the blade turning and swooping so the scatches are not all in the same direction.
 Originally Posted by Euclid440

I hope that it isn't a problem that my scratches are not all the same direction because I will remove them on the 4K anyway.
I was under the impression that simple x strokes aren't all I should do but I can if that pattern is what I need. I will lose more steel again of course.- - Steve
You never realize what you have until it's gone -- Toilet paper is a good example
-
08-28-2020, 04:29 PM #2Senior Member

- Join Date
- Apr 2012
- Location
- Diamond Bar, CA
- Posts
- 6,553
Thanked: 3215
You do not need to Kill the edge, just joint it to cut off the burr, one lite stroke on the edge of the stone, TNT does not cut off the burr it tears it or just straightens it.
Big difference, the goal is to cut it off clean and get a straight edge. Then you just need to get the bevels to meet the already straight edge.
Once you get experience you can hone to a straight edge, but why? I joint the edge repeatedly through the honing process, the goal is to get a straight edge, is it not? You are removing microns of steel and usually just the burr.
Hair test are not definitive, look at the edge, look straight down on the edge with magnification and light, any-any shiny reflections are where the bevels are not meeting, (the bevel is not fully set), It is definitive, there are shiny spots or not.
A corner of a dull razor or burr will cut hair. You must calibrate hair test, find out what it means when you cut hair. It does not always mean you have a complete edge. It is not definitive.
I spent an hour setting this bevel on a 1k on my best razor and I am seriously starting to worry about how much metal I am removing.
And that is part of your problem, you cant baby it, it needs what it needs. In surgery it is called Cutting to the Margins, cut enough to remove all the damaged tissue, and a little extra, so you do not have to go back in.
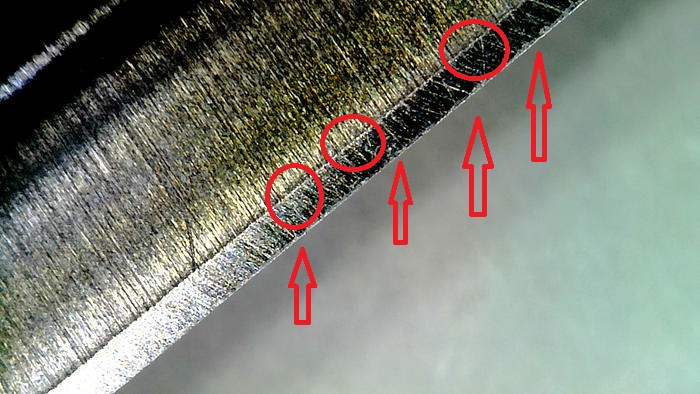
It should not take an hour, for your final 1k finish laps, lap your stone to ensure a clean, flat aggressive cutting surface. Look at all the stria that is not going in the same direction, that is not from the X stroke, and look at the edge. It is not straight and full of chip, large chips.
Shinny bevels, even stria are by-products of proper honing, not the goal.
But super straight, smooth shaving edges generally have even stria and shinny bevels with synthetics. The goal is the edge.
My edge below doesn't have the scratches all in the same direction as the one in your pic. Mine was honed toward a smile with the blade turning and swooping so the scatches are not all in the same direction.
I hope that it isn't a problem that my scratches are not all the same direction because I will remove them on the 4K anyway.
Look at all the stria that is not going in the same direction. That is not from the X stroke and look at the edge. It is not straight and full of chips, large chips.
No, you will not remove them on the 4k, that is the problem, (heres that ladder again). You must hone the bevels to get to a straight edge. It is not about a shiny bevel, it is about the edge. Look at the edge, forget about cutting hair, make the edge straight. Make the stria uniform, as perfect as you can. If you do that, the edge will be straight and meeting.
The bevel is not set.
Last edited by Euclid440; 08-28-2020 at 04:36 PM.
-
08-28-2020, 09:08 PM #3Senior Member
- Join Date
- Oct 2019
- Location
- Kingsville On, Canada
- Posts
- 2,435
Thanked: 207
I decided not to practice on my best razor anymore, I am practicing with my no name English practice razor now.
I added 1 layer of electric tape and 1 of kapton.
I did only x strokes to try and get the scratch pattern all the same direction.
I did:
20 laps with pressure and check x 4 for 80 strokes.
Jointed lightly on the corner.
5 strokes no pressure and check x 6 for 30 strokes
Jointed lightly on the corner.
5 strokes no pressure and check x 4 for 20 strokes.
I stopped there while I still had some razor left!
I do hope there is a decent improvement because quite honestly I am starting to wonder if honing is for me.
I'm not too worried about any chips because I reckon my thumb nail and anoth 3 or 4 strokes could fix them.
Last edited by STF; 08-28-2020 at 09:13 PM.
- - Steve
You never realize what you have until it's gone -- Toilet paper is a good example
-
08-29-2020, 12:16 AM #4Skeptical Member

- Join Date
- Nov 2016
- Location
- Colorado Springs
- Posts
- 10,486
Thanked: 2186
Just to let you know... Honing takes time to learn. I think i was at it for next to 2 years becore it all clicked. Sure, i could make a shaveable edge after a couple months but the next razor i picked up failed. I still get a fail now and then but I know what to do to correct my mistakes now.
Some say honing is easy. Wrong. Honing and getting it right takes time! Now I only had a few hours to practice on my weekends so it took me longer than others.
Just listen to marty and dont give up. One day something will click and its like a slap in the face. You will say to yourself, "why didnt i see that before. It make sence". That is when it starts to come together. Just keep at it. Learn as you go. Take a break when it gets you down but dont give up.
Killing the edge or jointing is done lightly. Its just enough to take a microscopic amount off the edge. Then it should only take a few laps to bring the edge back. I do this often while honing to be sure im getting the most out of my edge before going to the next stone. Learning on your favorite razor was a wrong move. Glad you realised this before it was too late.It's just Sharpening, right?
Jerry...
-
The Following User Says Thank You to Gasman For This Useful Post:
STF (08-29-2020)
-
08-29-2020, 01:03 AM #5Senior Member
- Join Date
- Apr 2012
- Location
- Diamond Bar, CA
- Posts
- 6,553
Thanked: 3215
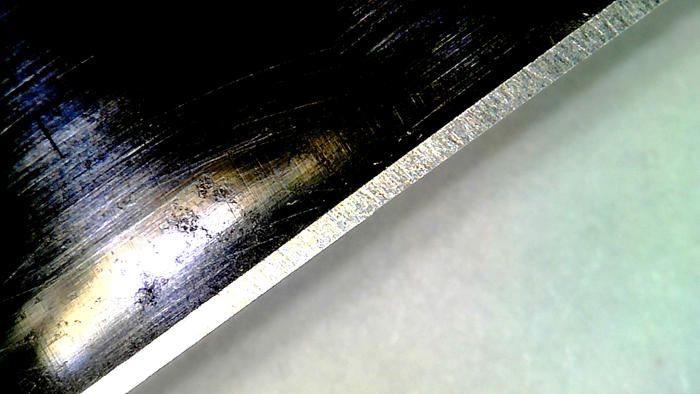
It is difficult to tell much from the last photo because it is not focused on the edge. Focus your micrograph pics on the edge.
Also focus on your honing, you are kind of all over the map, now switching razors again.
So, lets back up a bit. A fully set bevel is 1. Flat from heel to toe, from the back of the bevel to the edge, a single plane. 2, That plane must be in the correct bevel angle, and 3, the bevels must meet in a straight, smooth, chip free edge. If any of those 3 things are not done fully the bevel is not set. It meets the 3 criteria or not.
None of this, I'm not too worried about any chips because I reckon my thumb nail and anoth 3 or 4 strokes could fix them. It meets the 3 criteria or not. If you do not do the things needed to get all three of these criteria to happen, to fully set the bevel then honing is not easy, and will fight your every step, as you are experiencing.
Because in addition to cutting a smooth flat bevel on butter soft steel there are going to be other issues, there are always other issues. The steel is super hard, super soft, pitted, cell rotted, has a warp, a twist, a warp and a twist, hard steel, it chips, the heel need reprofiling, the stabilizer are too big, the edge is smiling, or has a frown, the spine is hone worn and the angle is too shallow, the spine is too thick and the angle is too wide, or any of a multitude of issues, like stone issues and on.
Minimize the variables, control the things that can be controlled. Make each step as perfect as you can, don't get lazy, it will bite you.
The first goal is to grind the bevels flat, I do it with circles on a 1k. Circles cut quickly but create a burr because you are doing multiple laps on one side at a time. When we do multiple strokes on one side, no matter the stroke, circles, half laps, or x strokes it causes a burr. When you flip and do the same on the other side the burr lengthens.
So, grind the bevels flat, then cut off the burr on the stone and do single stroke laps. Alternating single laps are less likely to create a burr, because each time you flip you cut off the micro burr and do not allow the burr to grow.
What I do is, 20 circles with pressure, to get flat. Then check the bevel and edge. If needed do more circles in sets of 10, alternating until flat.
Then do half lap strokes in sets of 10, 5, 2 and 1 alternating after each set. (The Ax Method) a la Alex Gilmore.
Joint, cut off any burr and straighten the edge, then do X strokes with lighter pressure, to reset the edge and lay down a uniform stria pattern. Joint as needed and do X laps, 10-20, until the pattern is uniform and the edge is straight. You are now polishing the bevel on the 1k.
Compare your bevels and edges to the 1k photos in the Second Try at Honing. It takes, what it takes.
When you get the edge straight, joint it and go to the 4k. Do 20 circles to remove the deep 1k stria and check the bevel and edge. Do sets of 10 Ax method laps and check the bevel and edge, stay on the 4k until all the 1k stria is gone.
-
The Following User Says Thank You to Euclid440 For This Useful Post:
STF (08-29-2020)
-
08-29-2020, 03:13 PM #6Senior Member
- Join Date
- Oct 2019
- Location
- Kingsville On, Canada
- Posts
- 2,435
Thanked: 207
I did exactly as you described, thank you for sharing your method.
I don't doubt that you will see where I am still going wrong but I do think things are looking up.
I jointed the edge on the corner of the stone and did the 10 polishing no pressure x strokes and lightly jointed again to be on the safe side and did another 10 no pressure strokes.
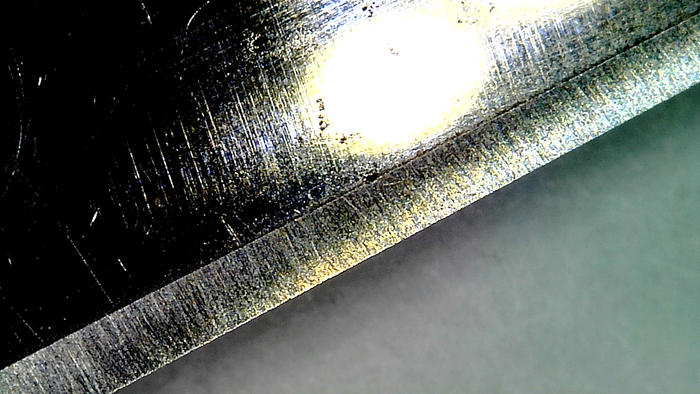
The edge does look good with a loupe and does cut stomach hair (my arms are bald).
The image does seem to show small chips, I mention it because I have learned by now that you will find them just a sure as god made little green apples.
I don't understand why I have those small chips as I only did 10 no pressure x strokes since jointing the edge on the stone. I have heard guys here talk about edges that keep crumbling or chipping. Is it possible I have one like that because I can't think for the life of me why I am getting those chips after just 10 no pressure strokes.
 - - Steve
You never realize what you have until it's gone -- Toilet paper is a good example
-
08-30-2020, 04:05 PM #7Senior Member

- Join Date
- Dec 2018
- Location
- Gainesville, FL
- Posts
- 5,982
Thanked: 610
That edge looks much better. You're improving just in the course of this thread. Don't get discouraged, you'll get it. It takes a while and each razor is different. As Jerry said, one day you'll have the eureka moment. Stria is important but try and remember to focus on the edge. You have gotten good instruction. Maybe try to take a little time to digest it. Don't worry. You'll get it. I admire your determination but cut yourself some slack. You still only have a relatively short time in it.
Are you cleaning your stone often? Chips can come from foreign grit or swarf build up among other things. That's an easy one to eliminate by keeping the stone smooth and clean.
I wouldn't worry quite as much about metal loss from what you have done. You aren't using really low grit stones or doing thousands of laps. It is a danger but I don't think you have removed enough to make that an issue YET.
Keep at it. You're making more improvement than you think. You just have to have patience and be deliberate. I believe in you Steve. Iron by iron is sharpened, And a man sharpens the face of his friend. PR 27:17
-
The Following User Says Thank You to PaulFLUS For This Useful Post:
STF (08-30-2020)


 Reply With Quote