Page 1 of 3 123 LastLast
Results 1 to 10 of 22
  1. #1
    Junior Member denisb's Avatar
    Join Date
    Oct 2011
    Location
    Massachusetts, U.S.A.
    Posts
    18
    Thanked: 4

    Default How to hone a Japanese wedge?

    I just recieved this "Tensui 57mm Double bevel edges Watetsu/Fuji no Shiro" razor. Before I touch it, I'd very much appreciate some advice how to hone it, please. I've been into straight razors for about 9 months now, so I know just enough to be dangerous.

    Name:  400401134.jpg
Views: 901
Size:  15.3 KB

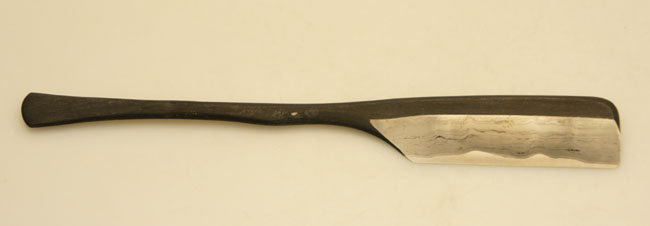
    I think these are the salient points:

    * It's not a kamisori: it's symmetrical.

    * The blade is a true wedge: it has no hollow and no secondary bevel.

    * The blade is laminated from two types of steel, with the edge harder than the body.

    Looking at advice found on line about Western wedges, I worry how much of it applies to this different Japanese blade. In particular:

    How does the difference in hardness affect the honing process? Do I need to worry about losing more steel in the body of the blade than the edge, thereby changing the geometry?

    I could tape to avoid honing the body, but I don't want to introduce a secondary wedge [oops, I mean bevel], do I?

    FYI, here's the honing equipment I currently have to work with:

    - DMT D8EE
    - Naniwa 12000 Super stone
    - Standard coticule bout
    - Hard arkansas oilstone

    FYI, I bought the razor from aframestokyo.com (otherwise known as Huckleberry Vintage Fishing Supply, of Mililani, Hawaii). They shipped it to me on the East Coast in three days -- not bad.

    TIA
    Last edited by denisb; 03-04-2012 at 02:31 AM. Reason: Mispelled Japanese in title

  2. #2
    The Hurdy Gurdy Man thebigspendur's Avatar
    Join Date
    May 2005
    Location
    New Mexico
    Posts
    32,761
    Thanked: 5017
    Blog Entries
    4

    Default

    Hmm, hard to tell from the picture but it looks like some hybrid type of thing. Depending on it's geometry and how the spine is you might get away with typical wedge honing (check the wiki) or you might have to do some improvisation. it's hard to tell from the picture for me to say much more.
    No matter how many men you kill you can't kill your successor-Emperor Nero

  3. The Following User Says Thank You to thebigspendur For This Useful Post:

    denisb (03-03-2012)

  4. #3
    I used Nakayamas for my house mainaman's Avatar
    Join Date
    Aug 2009
    Location
    Des Moines
    Posts
    8,664
    Thanked: 2591
    Blog Entries
    1

    Default

    Impossible to hone properly within any reasonable amount of time at least.
    I had a go at one of those and it sticks to the hones like crazy.
    From what I heard, those are an attempt by a tool smith to make kamisori, the grind is off though , it is true wedge and it should have some hollow to hone properly.
    Stefan

  5. The Following User Says Thank You to mainaman For This Useful Post:

    denisb (03-03-2012)

  6. #4
    Junior Member denisb's Avatar
    Join Date
    Oct 2011
    Location
    Massachusetts, U.S.A.
    Posts
    18
    Thanked: 4

    Default

    Thanks for looking at it. Maybe these extra pix will clarify more:
    Name:  400391909.jpg
Views: 491
Size:  26.0 KB

    That bevel is about 13mm (1/2") wide. The spine is 4mm (3/16") wide:
    Name:  400391913.jpg
Views: 456
Size:  10.8 KB
    As you can see, all the surfaces are unmachined except for the ground facets of the bevel, which are perfectly flat. So any taping would involve irregular surfaces, which makes me think it's not a good idea.

    Here's all the vendor says about honing: "It has no concave (hollow ground) on the both sides of the blade. It has flat bevels on the both sides. It is easy to sharpen keeping on the bevel on whetstone surface with right angle."

    The thing feels almost shave-ready to me; am hoping a few of the right strokes on the right stone will get me there.

  7. #5
    I used Nakayamas for my house mainaman's Avatar
    Join Date
    Aug 2009
    Location
    Des Moines
    Posts
    8,664
    Thanked: 2591
    Blog Entries
    1

    Default

    Is the back hollowed or flat, the pic does not show very well?

    There are many threads on honing kamisori, here is one I was able to find
    http://straightrazorpalace.com/honin...-kamisori.html
    it has some useful links in it, hope that helps.
    Last edited by mainaman; 03-03-2012 at 11:29 PM.
    Stefan

  8. #6
    Junior Member denisb's Avatar
    Join Date
    Oct 2011
    Location
    Massachusetts, U.S.A.
    Posts
    18
    Thanked: 4

    Default

    Both sides completely flat -- nothing hollow. Thanks for the link. I've looked at some kamisori articles, but haven't found any on honing a wedge like this. Your experience might explain why :-(

  9. #7
    I used Nakayamas for my house mainaman's Avatar
    Join Date
    Aug 2009
    Location
    Des Moines
    Posts
    8,664
    Thanked: 2591
    Blog Entries
    1

    Default

    Quote Originally Posted by denisb View Post
    Both sides completely flat -- nothing hollow. Thanks for the link. I've looked at some kamisori articles, but haven't found any on honing a wedge like this. Your experience might explain why :-(
    No these are very new production, maybe the started to appear in the last 3-4 months.
    A very viable option is to regrind it or have it reground by someone that has the tools.
    Also you can return it I think Takeshi has a nice return policy especially if you have not worked on the razor yet.
    Stefan

  10. #8
    The Great & Powerful Oz onimaru55's Avatar
    Join Date
    May 2008
    Location
    Bodalla, NSW
    Posts
    15,596
    Thanked: 3748

    Default

    Quote Originally Posted by denisb View Post
    How does the difference in hardness affect the honing process? Do I need to worry about losing more steel in the body of the blade than the edge, thereby changing the geometry?
    On standard kamisori you use fingertip pressure with your second hand to keep the honing more to the edge rather than spine, much like you "torque" a western blade for the same reason but a flat grind is not a desirable thing IMHO.
    “The white gleam of swords, not the black ink of books, clears doubts and uncertainties and bleak outlooks.”

  11. The Following User Says Thank You to onimaru55 For This Useful Post:

    denisb (03-04-2012)

  12. #9
    Know thyself holli4pirating's Avatar
    Join Date
    Feb 2008
    Location
    New York
    Posts
    11,930
    Thanked: 2559

    Default

    My first thought, if it is a true wedge, is to try to build up the spine. One way to do this is to cut strips of electrical tape down the middle (the long way), and add a couple strips of those to build up a sort of faux-spine. Once you figure out how many you want, add one more piece of normal tape. That way, you can just keep replacing the outer piece as needed and keep a consistent base.

    Another option that is less precise is to put something under the tape. I did this once on a microtome that had a fully flat side to it. I took a toothpick, broke it to the size I wanted, and then taped it to the spine to create a surface that would sit on the hone and create an angle for the bevel. This was tough, because if you don't tape it tightly, the toothpick can move, and that can prevent progress on the edge, as it will change the honing angle. Again, I would recommend two pieces of tape so that you keep the base layer constant and only change the outside.

    As far as your hones, I would use a light slurry on the coticule.

  13. The Following User Says Thank You to holli4pirating For This Useful Post:

    denisb (03-04-2012)

  14. #10
    I used Nakayamas for my house mainaman's Avatar
    Join Date
    Aug 2009
    Location
    Des Moines
    Posts
    8,664
    Thanked: 2591
    Blog Entries
    1

    Default

    Quote Originally Posted by holli4pirating View Post
    My first thought, if it is a true wedge, is to try to build up the spine. One way to do this is to cut strips of electrical tape down the middle (the long way), and add a couple strips of those to build up a sort of faux-spine. Once you figure out how many you want, add one more piece of normal tape. That way, you can just keep replacing the outer piece as needed and keep a consistent base.

    Another option that is less precise is to put something under the tape. I did this once on a microtome that had a fully flat side to it. I took a toothpick, broke it to the size I wanted, and then taped it to the spine to create a surface that would sit on the hone and create an angle for the bevel. This was tough, because if you don't tape it tightly, the toothpick can move, and that can prevent progress on the edge, as it will change the honing angle. Again, I would recommend two pieces of tape so that you keep the base layer constant and only change the outside.

    As far as your hones, I would use a light slurry on the coticule.
    My thought exactly, and tried both with tape and also raised spine with very thin acrylic strips, still did not work well.
    The tape would need replacement very often, and eventually after a while I gave up, I just did not see enough improvement to justify more time and effort on that razor.

    IMO the soft iron will be easy to regrind then the razor should hone fine.
    Stefan

Page 1 of 3 123 LastLast

Posting Permissions

  • You may not post new threads
  • You may not post replies
  • You may not post attachments
  • You may not edit your posts
  •