
Results 1 to 10 of 15
 12Likes
 LinkBack URL
 About LinkBacks
-
09-28-2012, 04:59 PM #1Member


- Join Date
- Dec 2011
- Location
- Finland
- Posts
- 59
Thanked: 2 Light Reflection Test (LRT) - on bevel setting
Forgive me if I am stating the obvious, but here goes.
I wanted to raise conversation on bevel setting issue I struggled with in the beginning of my razor honing. I have had a very hard time going from some sensations on the thumb-nail-test (TNT) and cutting arm hair test (AHT) to getting the sticky feeling on the thumb-pad-test (TPT). Given that the above tests are very objective and require experience to interpret correctly led me to constantly hope that I had bevel set when in fact I had not set bevel. The test that finally allowed me to zero in on setting the bevel and getting TPT and TNT truly pass was the light reflection test from the edge (LRT).
First I took a kitchen knife and looked at the reflection, which obviously was very wide and strong, to give me an idea what is not wanted. Then I took one of the razors I had been trying to set bevel on. The reflection was still very pronounced. At that instant, I knew that I was not yet close to having bevel set. As I kept patiently honing and checking under light I could see the reflection go smaller and fainter gradually. And sure enough, when the reflection was very faint, the TPT started passing too. If there was no improvement, occasional backhoning helped to clear any burr/wire-edge and allowed to progress forwards.
I think this test can be very useful to beginners, like me, and to some degree to the more experienced honers when setting the bevel. I had read the wiki and watched many of the videos, and nowhere was it clearly stated and illustrated that this kind of test could be used to assess the edge. Of course this test is not bullet proof, but should a be seen as an additional tool to the existing tests.
I took couple of photos and made a crude illustration to explain the test. The razor should be held under a strong light (like led flashlight, or countertop light) so that the light itself does not blind the viewer. Then the angle of the razor should be varied and at some angle there will be a reflection. Dark background helps to see the reflection.
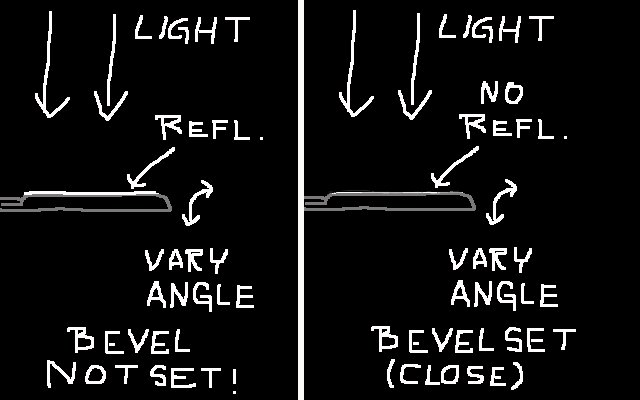
And here is an actual picture of a reflection when the bevel is not set.

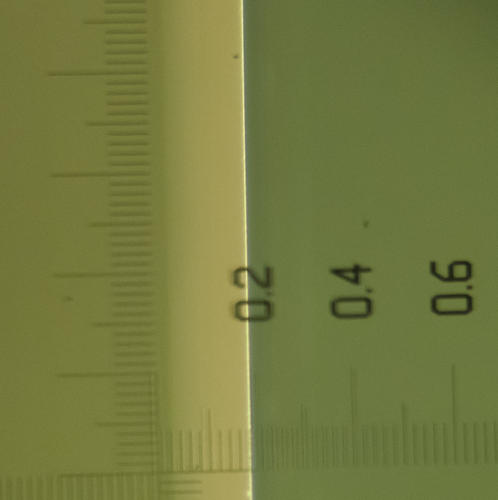
Moreover, if a magnification device is available, the actual edge width can be examined viewing it directly above with the help of a strong light.
I hope this proves useful to others who are struggling in the beginning. Especially if you are trying hone those ebay razors.Last edited by MikkoK; 09-28-2012 at 08:16 PM.
-
09-28-2012, 05:22 PM #2
The little reflection should start to go away when the end of the bevel (the so-called edge) becomes thinner than the wavelength of visible light, which is between ~0.4 and ~0.7 microns
racerfozzy likes this.
-
09-30-2012, 06:37 PM #3Member
- Join Date
- Dec 2011
- Location
- Finland
- Posts
- 59
Thanked: 2
I wanted to show what you can see with a microscope looking down directly at the edge. These photos have been taken with a 60x meopta glass.
On the first one bevel is not set, not even close.

On the second one the bevel is set or at least very close. I am not experienced enough to be 100% sure. However, this helps me to troubleshoot bevel setting greatly. One AHA-moment was when I realized that I was close to bevel set all along. The edge reflection did not get narrower after a certain point and I thought there must be something wrong in my technique that prevents me from taking those last steps. At this point tpt was already semi-grabby/sticky and cutting hair, but not effortlessly. My x-stroke grip (place of the index finger) was torquing the edge differently in the away and toward strokes. Additionally, I was coming heel-heavy on the toward stroke and doing rolling-x on the away stroke (x-stroke). After I started to concentrate on these issues, my bevels are setting much better and the scope also verifies this.
You can see these same things without the scope, like in the above example, but it is more evident with the scope. If you should try this, keep in mind that the direction on light source is crucial. It should be parallel and above the edge.Last edited by MikkoK; 09-30-2012 at 09:34 PM.
kelebekcc and racerfozzy like this.
-
09-30-2012, 09:06 PM #4Senior Member

- Join Date
- Nov 2006
- Location
- New Jersey
- Posts
- 1,139
Thanked: 173
So you are looking straight down at the edge?
Michael
-
09-30-2012, 09:36 PM #5Member
- Join Date
- Dec 2011
- Location
- Finland
- Posts
- 59
Thanked: 2
Yes, directly down at the edge.
-
09-30-2012, 09:46 PM #6Senior Member


- Join Date
- Dec 2010
- Location
- Virginia
- Posts
- 3,362
Thanked: 581
I've always used this method of bevel/edge checking and find it far more objective than the tactile tests. If you can see the edge, you don't have one yet.
-
The Following User Says Thank You to ace For This Useful Post:
tiddle (10-01-2012)
-
09-30-2012, 09:50 PM #7There is no charge for Awesomeness


- Join Date
- Aug 2006
- Location
- Maleny, Australia
- Posts
- 7,977
- Blog Entries
- 3
Thanked: 1587
I've never used this test, but will have to try it next time. Personally I have always had a lot of success with the wet thumb nail at the bevel setting stage but, as they say, whatever works for you!
James.<This signature intentionally left blank>
-
10-01-2012, 01:40 PM #8Member
- Join Date
- Dec 2011
- Location
- Finland
- Posts
- 59
Thanked: 2
ace should have the credit for this, since after he said it, I understood what to look for. I had been looking at the bevel and the edge from the side all this time. Originally Posted by ace

-
10-01-2012, 01:45 PM #9Member
- Join Date
- Dec 2011
- Location
- Finland
- Posts
- 59
Thanked: 2
I have used TNT as well, but the light reflection (especially with the scope) helped me to troubleshoot when the whole edge was not passing TNT. The fact that you can see how far off you are in different parts that helps in corrections. If the reflection is very small, then you know that the corrections needed are not that big either and so on. Originally Posted by Jimbo
Last edited by MikkoK; 10-01-2012 at 05:12 PM.
-
10-01-2012, 02:12 PM #10Senior Member
- Join Date
- Dec 2010
- Location
- Virginia
- Posts
- 3,362
Thanked: 581
Yep, when you know what to look for, it does help. When you can't see it anymore, then you're done with bevel setting and it's on to polishing.


 Reply With Quote
