Results 1 to 6 of 6
Like Tree5Likes
  • 5 Post By gssixgun

Thread: Lifting a worn down hone or a thin hone

  1. #1
    At this point in time... gssixgun's Avatar
    Join Date
    Jun 2007
    Location
    North Idaho Redoubt
    Posts
    26,960
    Thanked: 13226
    Blog Entries
    1

    Lightbulb Lifting a worn down hone or a thin hone

    So I realize that this is not a huge concern to most, but here is a trick I have been using for some time for thin hones, odd shaped hones, and worn out hones..

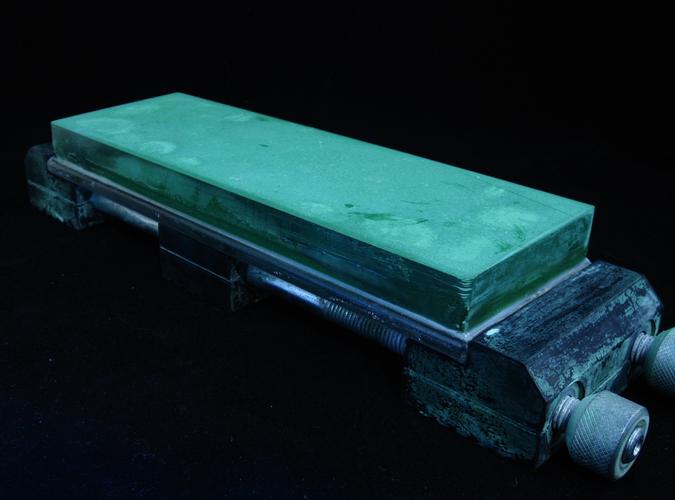
    I like the Hones being up off the table I am honing on, so I most often use either an actual Waterstone holder like the SteelEx or the Shapton System holder ($$$$) or the Hone that have their own bases (Naniwa SS)

    A problem occurs when the hones are thin too begin with (Long Swaty, Dragon's Tongue, etc: etc) when you are using the SteelEx type holders, the holder grips on the bottom 1/4 inch of the hone.. Well with thin hones and hones that are weariing down or oddly shaped hones I cheat..

    I got a few sheets of 1/4 Plexi from the Glass shop up here they are cut at 8x3 or 8.5x3 to fit most every hone, I also use these for smaller hones like a Escher or a Charnley Forest or even odd shaped hones.. By mounting them on the Plexi with Epoxy I save the labels forever and I make all the bases uniform... The 1/4 thickness of the Plexi lifts the hone so that it is entirely above the holders cutouts.. It gives me quick uniform changes and keeps the hone higher for me.. I just round the edges and mount the Hones/Stones using 2 part Marine Epoxy, make sure you are careful to watch them as they set up, you do not want the hone to slide around on the mount..

    Just an old idea I think I have posted before when the question of saving labels came up, but with my Chosera 1k thinning down (25mm to 14mm) I just mounted it, so I thought I would revisit the idea for ease of use also...


    Name:  IMG_4076.jpg
Views: 249
Size:  19.4 KB

    Name:  IMG_4077.jpg
Views: 251
Size:  22.0 KB

    Name:  IMG_4078.jpg
Views: 269
Size:  26.8 KB


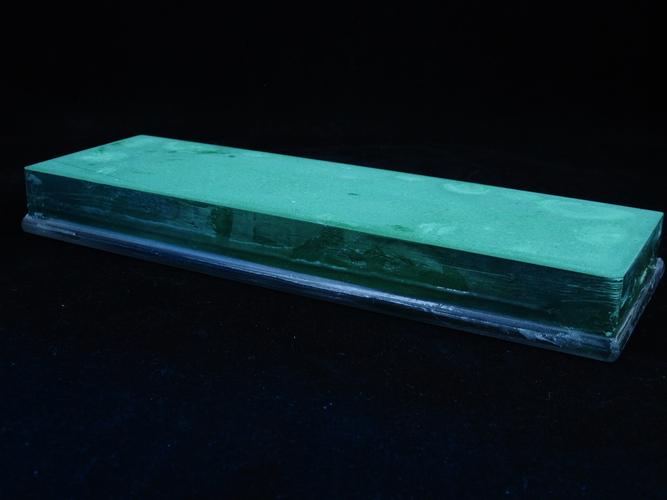
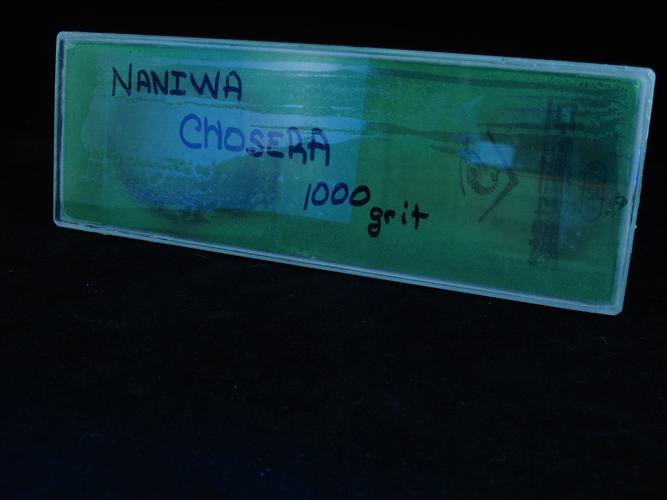
    As you can see above a Label or the stamps will show through the Epoxy and the Plexi, (the writing is actually on the hone) just make sure you seal the entire edge so you don't allow water to get under there, just make a bead like you would for tub and tile caulking...
    Last edited by gssixgun; 02-18-2013 at 07:05 PM.
    Jimbo, Terje K, Hirlau and 2 others like this.

  2. The Following 2 Users Say Thank You to gssixgun For This Useful Post:

    Cangooner (02-18-2013), Hirlau (02-18-2013)

  3. #2
    There is no charge for Awesomeness Jimbo's Avatar
    Join Date
    Aug 2006
    Location
    Maleny, Australia
    Posts
    7,977
    Thanked: 1587
    Blog Entries
    3

    Default

    I tend to just hold the stone in my other hand, but this is a neat trick Glen!

    James.
    <This signature intentionally left blank>

  4. #3
    Junior Member
    Join Date
    Feb 2013
    Location
    Texas
    Posts
    7
    Thanked: 3

    Default

    That is a really good idea - thanks.

  5. #4
    Senior Member mjsorkin's Avatar
    Join Date
    Nov 2006
    Location
    New Jersey
    Posts
    1,139
    Thanked: 173

    Default

    What if one side is lapped and the other side is still dished?

    I have a stone that's really thin and I'd like to mount it but I'm unsure how to mount the dished bottom side.

    Michael
    “there is the danger that the ignorant man may easily underdose himself and by exposing his microbes to nonlethal quantities of the drug make them resistant.”---Fleming

  6. #5
    Modine MODINE's Avatar
    Join Date
    Dec 2009
    Location
    Lee's Summit, Missouri- (KC)
    Posts
    1,442
    Thanked: 730

    Default

    Thanks Glen, another good idea. Depending on how dished out it is use can use the method Glen just described by putting shims “in” the epoxy. This will keep the adhesive from “oil-canning” out of the seam.
    MIke

  7. The Following User Says Thank You to MODINE For This Useful Post:

    mjsorkin (02-19-2013)

  8. #6
    At this point in time... gssixgun's Avatar
    Join Date
    Jun 2007
    Location
    North Idaho Redoubt
    Posts
    26,960
    Thanked: 13226
    Blog Entries
    1

    Default

    You could also "Layer" the dished side with Epoxy first, by building it up in the dished section until it was flat then finally attaching it to a base

  9. The Following User Says Thank You to gssixgun For This Useful Post:

    mjsorkin (02-19-2013)

Posting Permissions

  • You may not post new threads
  • You may not post replies
  • You may not post attachments
  • You may not edit your posts
  •