
Results 1 to 10 of 13
 4Likes
 LinkBack URL
 About LinkBacks
-
03-04-2008, 05:08 AM #1Senior Member

- Join Date
- Feb 2008
- Location
- Taiwan
- Posts
- 226
Thanked: 44 Photo pointers (sorry, no real razor content)
Hello!
I asked in another thread if someone would be interested in a few techniques for photographing their purchases or products, and at least one member said they would appreciate it, so here we are. I am posting in this forum since it may be relevant to folks who are interested in photographing their acquisitions just as much as folks who are selling their wares.
Now, I'm not going to discuss very serious product photography which can involve a lot of expensive equipment, but some basics that may be useful to a variety of people who don't really want to *replace* professional work, but still do a good job of showing off their stuff. Look at this pic set of a Kershaw Rainbow Leek (a very shiny, almost mirror-finished knife that many have found tricky to photograph), taken with an old 4mp digicam and no real lighting equipment.

Equipment
To be honest, you only need a camera, preferably one with a "macro" feature (usually identified by a flower symbol), the thing you want to photograph, the spot to photograph it, and the light to photograph it with. I'll also recommend a few large pieces of heavy white paper or even corrugated white plastic, a tripod, and a secondary (or even tertiary) light.
Some people think you need to have a "light tent" or "light box" for photography, and the truth is that you don't really! It can be a useful tool, but does not replace technique.
Goals
As a photographer, your goals are to get a picture. Simple right? Yes and no. There are a few things you need to do in order to get a good photo:
- Diffuse light and counterbalance shadows with secondary lights or reflectors when you do not want shadow
- Use oblique lighting (low-angle) to accentuate features and textures, high angle lighting to create a flatter look.
- Prevent unwanted reflections from appearing on shiny surfaces (they reflect anyway, so you will be controlling WHAT it reflects)
- Convey color in a reasonably accurate manner (camera white balance and light color)
- Have enough light for handheld photos (typically minimum 1/60th second for reliable results), or stable camera mounting for long exposures
- Consider angles, orientations, and perspectives to make best use of the frame (not too much dead space)
Daylight Photography
Taking photos during the day can give you some fabulous photographs if you know how to control the light that you are getting. Many will tell you that a north-facing window can provide excellent diffused, indirect light. East-west orientation may mean too little light or too much direct light, depending on the time of day.What is diffused light, some of you may ask? Normally light will come pretty directly from its source, which is basically a point. In a light bulb, that point is the filament that gives off light. During the day, the point of light is the sun. When you have an exposed point of light shining on you, you will cast an obvious shadow. But what happens if you spread that light over a larger surface? Where does your shadow go on a cloudy day? It is reduced because light is shining on you from different angles, which "fills" your shadow with light and makes it disappear.Regardless of your orientation, try to select a spot where you can take the photograph with plenty of ambient light, but where the sun is not visible. Balconies can work well, windows can be great, inside a garage with an open garage door, or even in plain daylight are OK. The last option should be considered more as a "last resort" if it is sunny, as the sun is very direct and would need to be diffused (a good case for using light tents/boxes).
A light tent or light box is a small frame with a thin translucent membrane over it, used to diffuse light from multiple directions. Sometimes this comes in a cube or rectangle format (box), or simply a panel that "leans" over the subject (tent). The terms are often used interchangeably.Have a surface prepared that you can set your object on top of (a piece of paper will suffice most of the time--getting too creative too quickly with this part will yield unpredictable results), and place the object on it. How's it look?

Hmm not too bad a start...not much shadow, thanks to the light coming down on top of it. Ugly background, and the pic looks quite harsh. Why? Light looks like it's coming from the rear-right side (look at the shadow around the tip and the front end of the bolster), but more importantly is still somewhat direct...the small shadows are a bit dark, because the light is coming down too strongly. This also makes the carbon fiber look harsh, and the blade also looks a bit unpleasant with the bevels being similar tones.
I ditched that bubble envelope, put the knife on a nice piece of bright white paper, moved it back a little bit so the main light source was at a lower angle to the knife. But, you may be saying...that would also make the shadows bigger! Yes, and I'll even rotate the angle so that the shadow is a few degrees more on the CAMERA side of the knife! Blasphemy!

Wait, what the..? Why did it turn out better? One thing I did was eyeball the lighting on the knife, rotating it a little here and there. I found that the most pleasant angle was even more oblique than I could obtain with just the knife laying flat so I put a little spacer behind the knife to tilt it edge-down. Then, I took 2 pieces of paper and made reflectors to soften the shadows and reflect white on the back of the handle (notice how the carbon fiber looks so much smoother and nicer? It's due to that off-centered white reflection). Same camera, same window. Had to use a tripod and a timer so I could hold both pieces of paper, but one reflector (typically shadow-softener) can be self-standing.
Since every knife, razor, watch, etc. is a bit different, there is no perfect lighting angle for all of them, so experimentation is necessary. Once you know what conditions to look for though, it'll be much simpler each time...
I'll make a post about desktop lighting soon...so stay tuned!petercp4e likes this.
-
The Following User Says Thank You to Tierdaen For This Useful Post:
Limey (04-18-2008)
-
03-04-2008, 05:54 AM #2Senior Member
- Join Date
- Feb 2008
- Location
- Taiwan
- Posts
- 226
Thanked: 44 Desktop Lighting
Desktop Lighting
Many of us don't always have the luxury of daylight when the itch to photograph strikes, and beautiful as the light of the moon and stars may be, it's generally just not right for product photography. Thus, we must use artificial lighting to get the effects we want. Most of the same things that apply to sunlight also apply to artificial light, with a few adjustments...
How many lights?
One to four. Two is the general "standard" for basic product photography, though more lights and light modifiers become necessary with more complex pieces. For fixtures...clamps or flexible desk lamp styles are good. Flexibility with the ability to hold a pose are good.
A light modifier is any piece of equipment that is used to manipulate light as it comes out of the primary source(s) or as they reflect on/around the subject. Some make the beam of light more direct, while others make the beam of light more diffuse. Reflectors are very versatile and include not just white ones, but colored, metallic, and even black (absorber). Have a piece of shiny damascus or textured object that won't show its character? Try a black piece of paper as a "reflector"!If you have a light tent, there are still many things to think about. Do you want just 1 light source or several? Do you want reflectors on the sides? What angle should the lights be? How far away should they be? Many of these you don't REALLY need to worry yourself over, but the important ones are:
- light angle
- light distance
- tent surface distance (from subject)
However, it is important to know that if you're just using 1-2x 100w bulbs, you may discover your shutter speeds will be low. A tripod is very handy if you don't have 3-4 bulbs or larger halogens. In all cases, take precautions for fire hazards as bulbs do get hot.
Where do the lights go?
This is a hard question! If there was just "one" correct way to place lights, this would be much easier! Generally, you will want one light that acts as your main light (called "key" light) and another that acts as your secondary light ("fill" light). The key light is meant to illuminate the subject in a pleasant way. The fill light will then fill in gaps and shadows that the main light creates. If key and fill are the same power bulb, then the key should be a little closer than the fill. When you set up the lights, experiment with just the key to find out what angle works well (with sunlight, you can only move the subject...with movable lights, you only need to move the lights).
What kind of lights should I have?
I suggest daylight bulbs of 100w output or higher. You can use whatever you have on-hand, but make sure you have enough light to get the photo! Mixing lights can yield cool effects, but usually in the beginning it's helpful to be consistent.
(1x daylight bulb, 1x yellow; both Philips 18w Energy Savers in desk lamps)
Also notice the shadows? This is the great thing about photography. Sometimes, shadows cause problems, but other times, they add tension, depth, mood, etc. It's important to remember to adjust the angle AND distance of lights, to maintain a good relationship between texture, shadow, and illumination. No lightbox was used in that picture, and the camera again was a cheap point and shoot digital camera.
Let's pull the angles even lower and move the main light to the rear a little, swapping the background with a different texture. I'll also leave the white balance less corrected so you can see the relationship of the 2 lights (yellow and blue):

What is white balance?
White balance is basically the colors of light that your camera sees. If you use a yellow light bulb, the camera is seeing yellow light. If you want to make colors more "true to life" with an incandescent light, you need to change the white balance to something else (many cameras have an "incandescent/tungsten" setting), which artificially adds opposing color (blue) to the image to balance that is being illuminated by largely yellow light. You may find many pictures that look somewhat yellow/orangish, or even green, and that is because your camera is not compensating accurately for the color of light present. Learning how to set white balance on your camera can be a very useful skill.
This is the advantage of having a WHITE paper background. It allows you to see if there is a white balance problem easily, and can be corrected more easily in software. It also helps you train your eye with regard to shadows. Black backgrounds can be difficult to work with, just to let you know!
Hopefully thus far, I've given a few people some stuff to consider experimenting with. I'd take photos of a photo setup, but I'm preparing to move and am not able to easily arrange that at the moment. Maybe soon though!
Stay tuned for an "on-the-fly" sample or two with very little (or no) preparation...
*Robert.petercp4e likes this.
-
03-04-2008, 06:31 AM #3Senior Member
- Join Date
- Feb 2008
- Location
- Taiwan
- Posts
- 226
Thanked: 44 Additional Tips
Here are some extra tips to consider when you are photographing stuff like razors:
---
Object and reflector size
Handle and blade when opened can be quite large, and a single piece of paper may not be sufficient to give a good reflecting surface or shadow-compensating surface. Stiffer reflectors make the task easier since you can use a larger surface. Why a larger surface? Let me show you what a single piece of paper will do:

Note this was taken with 20 seconds of setup, turning the camera on, and holding the paper (1 sheet of A4) while taking the picture. Not good, but one could use it. The tricky thing was the shininess of the plastic handle, which wanted to reflect the paper I used, but the paper was not large enough to both a) function as reflective material for the blade; and b) reflect over the whole handle length. Note how halfway down the handle the white reflection just cuts off? That's because the reflector is too small. Had the reflector been larger, this would not have been a problem, and it would have also likely reflected more material into the shadows to help fill them more. This would be a good place to use a large reflector. If you look at the tip of the blade, there is a bit of copper color cast; that is again from the reflector being too small and not managing to cover the whole blade, so some light reflected in from a nearby brick wall.
Closing the blade mostly would make it more compact and easier to cover with the small reflector, which could then be used more closely in order to actively negate shadows.
---
Macro and perspective distortion
Digital cameras with "macro" feature allow the greatest closeup at the widest angle of the camera usually. This allows you to get closer, but the result is more distorted due to perspective. Perspective distortion at the wide angle will mean the closest thing to the lens will appear much larger than the things farther away. This can be very useful if you are doing some artistic, dynamic photographs. However, it is not very useful if you are trying to make an honest depiction of the object, which should show size and proportions accurately.
---
Shutter speed and blur
This may be obvious for most who know how to use a camera here, but remember that most blurry pictures are blurry due to movement. If your shutter speed is too slow, you will not be able to hold the camera perfectly still long enough to get the picture, and the result will look blurry. This can happen when doing desktop photography with normal lights, and even with daylight at times. The old rule of thumb in 35mm photography was the reciprocal of the focal length in seconds for reasonable handholdability (e.g. a 50mm lens would need 1/50th second or faster). For you, it may be 1/15th second or 1/60th second, or even more. Some cameras even include image stabilization or vibration reduction, which compensate for small movements you cause while taking the picture! However, remember that most blurry pictures are the fault of motion blur, not because the camera is bad. A tripod can be your best friend!
---
Angles
One of the difficult part about things like razors is the hollow grind and sometimes mirror polishes. It then becomes important to find an angle from which you can photograph the blade without letting yourself or other unwanted objects get reflected in it. The best way to learn this is through experimenting with angles. A few degrees one way or another can make a huge difference.
Further, remember that angles are not just angles of light source and subject, but also angle of photographer. There is no absolute rule here, but remember that you can change little things and make big differences.
---
Exposure
When a knife or razor or other object is placed on a piece of white paper, the camera will usually take a picture noticeably darker than it needs to. It does this because the light meter in the camera measures light and calculates exposure settings based on how to achieve a certain overall brightness. When a scene is dominated by all light or all dark, it is sometimes necessary to adjust that in the camera or in software. Many cameras have a setting for exposure compensation, or +/-EV which will allow you to make the default brightness higher or lower.
note: if there is not enough light present, the camera may use its slowest values (capture the most light possible) and still be too dark. In this case, you must either adjust in software, or add more light.If your background is mostly white, you will likely dial in something like +1EV or so. +2 EV would achieve a very bright white (perhaps too bright in some situations, exceeding the camera's range or "blowing out"), but if you're on a digital camera, feel free to experiment, and don't rely on the camera LCD, but on the final pictures in your computer. Also, it may be useful to adjust the levels in Photoshop to ensure that your blacks are black and whites are white. Do not do this too too extremely, but minor adjustments can be useful.
---
Hope that is somewhat helpful. Please ask any questions you may have, or post your own photos and advice if you like.
That's it for now...
*Robert.
-
03-04-2008, 08:05 AM #4Senior Member
- Join Date
- Mar 2007
- Location
- Queensland, Australia
- Posts
- 286
Thanked: 4
Brilliant mate... fantastic information
It obviously took you a long time to type in...
So be certain that more than one member appreciates the trouble you went too.
Big thanks
Greg Frazer
-
03-04-2008, 11:49 AM #5.


- Join Date
- Sep 2006
- Location
- Richfield, Ohio
- Posts
- 2,521
Thanked: 597
Great post! Thanks for doing it.

-
03-04-2008, 05:45 PM #6Senior Member

- Join Date
- Jun 2007
- Location
- North Carolina, USA
- Posts
- 558
Thanked: 6
REMARKABLY informative and detailed post. Thanks!
-
03-04-2008, 05:46 PM #7Senior Member

- Join Date
- Oct 2007
- Location
- Fulton, Missouri
- Posts
- 846
Thanked: 183
Excellent work. That was a good read and great advice.
bjDon't go to the light. bj
-
03-04-2008, 07:26 PM #8Senior Member
- Join Date
- Jan 2008
- Location
- Brighton, MA
- Posts
- 226
Thanked: 3
I haven't had the time to read through it all yet, but I can tell there's lots of info there and so far it all sounds very helpful. Many thanks for the contribution. Hopefully soon people will actually be able to see the progress I've made on a restoration instead of seeing two gray blobs.
-
03-05-2008, 02:44 AM #9Senior Member
- Join Date
- Feb 2008
- Location
- Taiwan
- Posts
- 226
Thanked: 44
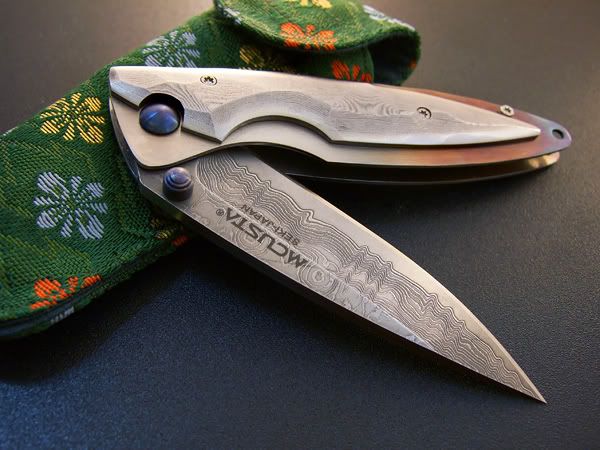
So this morning I noticed the light in my East-facing (but diffused) window was nice and bright, so I thought I would pull out my EDC pocketknife, which is very dirty and beat-up now...and give it a quick couple of pics with the technique I outlined here. I didn't bother doing much prep work (didn't want to overbrew my tea) and just did a couple quickies, so this should show what one can do with very very minimal prep and 20 seconds of levels/contrast correction in Photoshop. Now I have my tea and would like to share with those of you who enjoy aimless verbosity.
First I decided to take a picture of the knife fully open in front of my window:

Note from this angle, you can see how the light plays on the surfaces (remember the advantage of oblique angles?), and the blade is roughly the same shade as the handle material, but when I moved directly above to get a photo, I got this:

Now this isn't a terrible picture, but notice how much darker the blade looks than the handle scales? In fact, it was so much darker that I had to change levels in Photoshop (my camera has very strong contrast, so I had to pull the middle slider [midtones] in the levels window down). Why? Reflection angles--the handle scales in this orientation are reflecting much more of the window light into the camera. How could we change that? we could rotate the blade to a direction where it will reflect more of the incoming sunlight...

Due to the low angle of light, you can easily see a shadow on the far side. The piece of paper was able to weaken it slightly, but if you want to really take it down, a mirror or smooth sheet of aluminum foil would reflect more light. A much larger piece of white paper would also work well if leaned forward a bit to bounce the light down more...but this is what was in front of me, so it's what I used. How did this picture turn out?

See how much more light the blade is getting now? Again, a bit of levels tweaking in PS and I actually used the "dodge" tool to lighten up the darkening of the upper-left corner, but that's not really necessary...just a habit I have.
Just for fun I decided to take that piece of paper away and shoot on the black surface (a computer case cover, if you wanted to know)...

Notice the paper is close and sort of leaning over the knife? Again, a mirror or metallic surface would reflect more light and better control the shadows, as would a fill light if one were so inclined...but is it necessary to go to a lot of extra trouble? I guess it's up to the individual to decide. I would not use photos like these in a photography portfolio, but for eBay or general show and tell, they're not too shabby, and they're pretty quick and easy!

And on a final note: If you're going to take pictures of a knife or razor or anything, do what I didn't do: clean it first!
-
03-05-2008, 02:54 PM #10Member

- Join Date
- Jan 2007
- Location
- Metro Atlanta, GA
- Posts
- 67
Thanked: 1
Robert - thank you for your thoughts and efforts in the post. I enjoyed the 'learning'.


 Reply With Quote