Results 11 to 20 of 25
Thread: Cutting board repair
-
12-10-2014, 04:38 AM #11

One more thought before I go to bed. What if I glue it first. I don't think it will be perfect. But then I would be able to use the table saw and as one piece run down the crack and remove 3/16 or whatever the blade is wide and remove the imperfections. Then reglue it a second time.
I have a feeling I am way over thinking this!
Good night. Tim
-
12-10-2014, 04:41 AM #12
-
12-10-2014, 04:47 AM #13Senior Member


- Join Date
- Nov 2012
- Location
- Across the street from Mickey Mouse in Calif.
- Posts
- 5,320
Thanked: 1185
jig saw then
Good judgment comes from experience, and experience....well that comes from poor judgment.
-
12-10-2014, 04:52 AM #14

Morning Tim,
I'd see what happens once you get it glued back together, then you can explore your options. I would be sure to take every measure you can to make sure that it glues up properly/straight/level/aligned etc
Please remember that it's an heirloom, keep it as close to original as possible. If it ends up being a display piece, so be it. You wouldn't be the only one who wanted to share something that they held dear but was damaged beyond repair:
http://straightrazorpalace.com/razor...forgotten.htmlOur house is as Neil left it- an Aladdins cave of 'stuff'.
Kim X
-
12-10-2014, 11:51 AM #15

Good morning,
I don't have enough room to display it even if it was pretty enough to. I want to continue to use it.
My wife just had the idea that I should continue to cut it up further and make a puzzle for the grandkids.
Now off to work!
-
12-10-2014, 04:28 PM #16Senior Member

- Join Date
- Jul 2013
- Location
- Dacusville,SC
- Posts
- 290
Thanked: 44
Depending on which way you go, woodworking biscuits would make the joint very strong.
Amateurs built the ark. Professionals built the Titanic!
-
12-10-2014, 05:17 PM #17

Get some saw dust from the same timber as your board, and mix it with glue to make a thick paste. Glue like normal, using regular glue, and stuff your glue/sawdust paste into all the cracks. Sand it down when dry. I doubt you will even see them afterwards.
-
12-10-2014, 10:46 PM #18

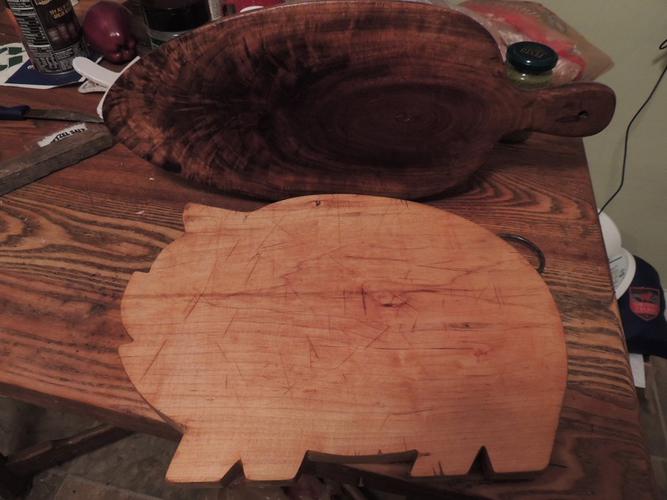
Thank you all, good thoughts. Today I took it to work and at break used some titebond [spell?] to glue it up. I should have used the sawdust idea but I didn't read that until after the fact.
 One side there is no indication of a crack unless you use a magnifier. The other you can see the crack but it is filled except for about 3/4 inch that I can feel. That is not deep though. Some of the old marks are just as deep. In the picture is my second wood board that I think I posted somewhere else but it also has a story. It is made from a Black walnut Burl that my Uncle Harvey found hard to sand. He got a friend to help him and the took it to the bridge in town and he grabbed the bumper of a car and "surfed" across the concrete bridge to sand it.

-
12-10-2014, 10:56 PM #19
-
The Following User Says Thank You to JazzWillie For This Useful Post:
32t (12-10-2014)
-
12-10-2014, 10:58 PM #20

Looks Great!
 Nice Job and a Good Save!
Oh, please put me in touch with your Uncle Harvey as I do believe that I'd like to party with that man!


 Our house is as Neil left it- an Aladdins cave of 'stuff'.
Kim X


 39Likes
 LinkBack URL
 About LinkBacks


 Reply With Quote


