
Results 1 to 10 of 10
 8Likes
Thread: First restore: W&B in Jade Ghost
 LinkBack URL
 About LinkBacks
-
03-09-2014, 04:56 AM #1Junior Member

- Join Date
- Jan 2013
- Posts
- 23
Thanked: 0 First restore: W&B in Jade Ghost
I just recently completed my first restore. I picked up this W&B at an antique store for $10. It was in pretty good shape when I got it, here's the before:
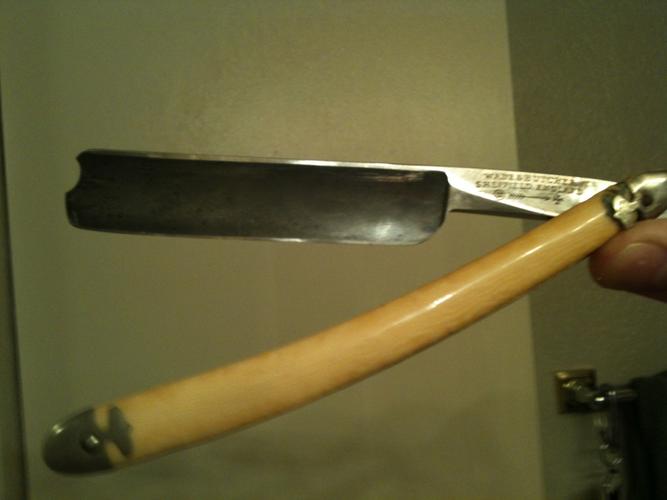
The blade had some pitting & stains, & was pretty dirty. The scales were broken at the top pin.
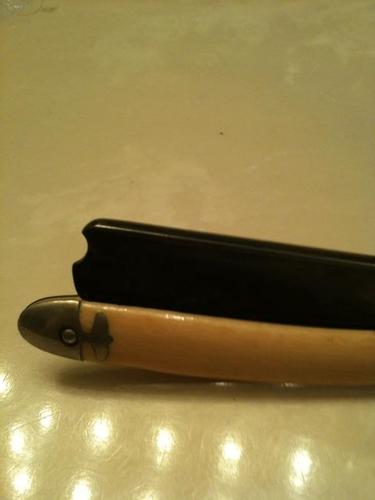
Worst of all, the blade didn't even fit the scales! Whoever scaled this last just shoved the blade in there as far as they could .
.
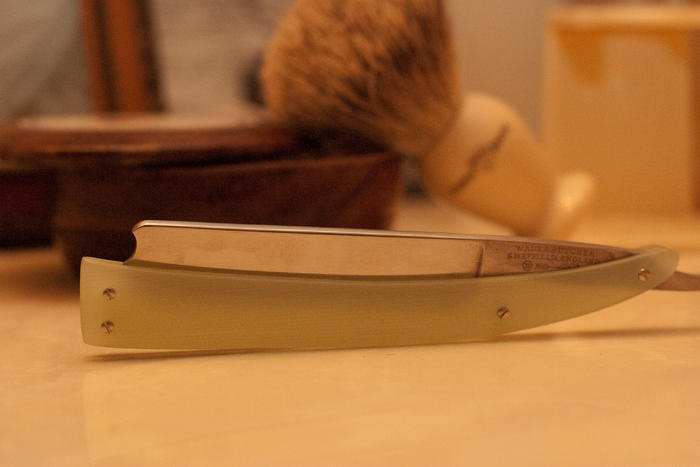
So I ditched the scales & made some new ones out of g10, jade ghost. I did did my best to hand sand most of the pitting & scratches away. It's not perfect, but a lot nicer looking from when I got it.
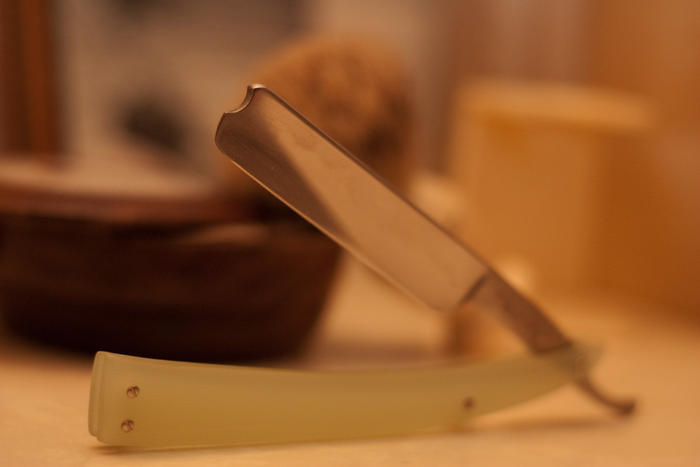
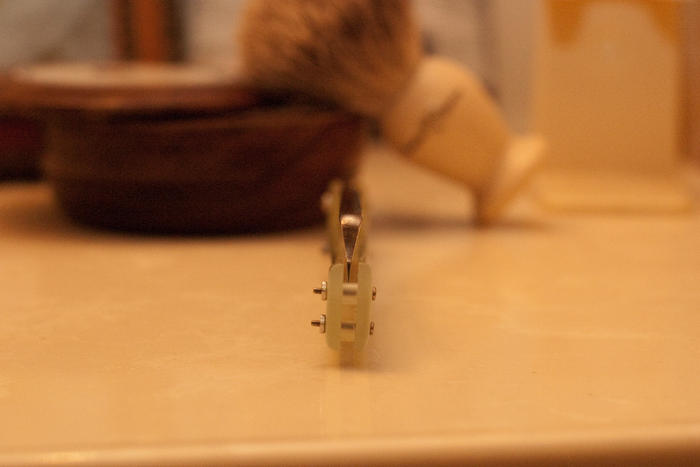
I decided to skip the pinning process and go with micro-screws instead...much easier!
One question: how do you sand the tang without erasing the stamp? I didn't do too much sanding on the tang for this reason...
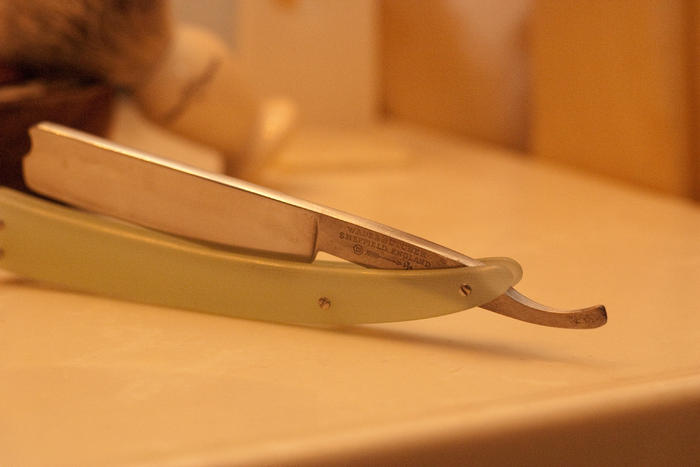
Also, I got a little impatient towards the end and decided to skip the wedge, just using clear spacers instead.
Technically I'm not quite done yet-- I still need to file down the excess screws, but I think I'll save that for another day.
The honing was a royal pain. The blade is a little warped, so I could never seem to get an even bevel on it. I tried 100 different ways -- J stroke, leading with the heel, tape gymnastics galore....Finally I read a post from someone who said they started with 3 layers of tape, then went to 2, then down to 1. DMT 1200, norton 4k/8k using the pyramid method, did a rain dance, spun in a circle three times, & threw some rune sticks up in the air and.... it worked! (I'm not really sure which method it was that worked...I kind of think the razor gods had pitty on me because I had been at it for so long...).
Best part of the story: She shaves like a dream. When I first brought the razor up to my face I braced myself for a rough shave (I've only honed a few razors so I honestly wasn't expecting it to be that good). After the first stroke I had to consciously keep myself from smiling. I've never had that good of a shave, it was like slicing through soft butter! This was also my first time using a W&B.
It has definitely become my favorite shaver.
Feedback? What do you guys think? Anything else I could/should do to it?
-
03-09-2014, 05:30 AM #2Senior Member

- Join Date
- Feb 2013
- Location
- Knoxville, TN
- Posts
- 112
Thanked: 7
I can't offer much in the way of constructive criticism, not being a razor restorer YET, but I will say I think the razor turned out very nicely. I am quite fond of the Jade Ghost G10. I have a 5/8 C-MON with jade ghost scales that are complimented nicely by brass pins and wedge.
Once again, nice job, and not a bad find for $10.
-
The Following User Says Thank You to broger For This Useful Post:
disgruntledseacucumber (03-09-2014)
-
03-09-2014, 05:45 AM #3Shave This

- Join Date
- Jan 2014
- Location
- Pickering, Ontario
- Posts
- 1,036
Thanked: 183
The use of spacer tubes instead of a solid spacer or wedge is something I've never seen before. I think they complement the over all look in this case.
I hope you saved the bolsters.
-
The Following User Says Thank You to Hart For This Useful Post:
disgruntledseacucumber (03-09-2014)
-
03-09-2014, 05:59 AM #4Does this title make me look fat?

- Join Date
- Apr 2011
- Location
- Medieval Kansas
- Posts
- 148
Thanked: 27
That's a good save, enjoy that razor.
Personally, I hate making wedges and spacers and the endless fiddling to get them right. I have 8 razors on the bench (um... dining room table) that have brand-new scales and I just can't get motivated to do the spacers and get them finished. Your tubes are an interesting lateral approach to the problem.
-
03-09-2014, 06:08 AM #5Junior Member
- Join Date
- Jan 2013
- Posts
- 23
Thanked: 0
Yeah, I made the scales last summer, and have been fiddling with the blade off and on for the past few months. The hang up was the wedge and the pins -- I knew I needed to do it, but I also knew it would be a pain, so it just sat collecting dust. Finally I just went to McClendon's hardware (in seattle) and, surprisingly, they had micro screws! Since I've never made a wedge or done a classic pinning job I can't really give an honest comparison, but I'm pretty sure this way was 1000 times easier.
-
03-09-2014, 06:10 AM #6Senior Member

- Join Date
- Feb 2014
- Location
- California
- Posts
- 463
Thanked: 51
Does the pivot 'ride' on the threads or is it sleaved? Looks great btw!
-
The Following User Says Thank You to HaiKarate For This Useful Post:
disgruntledseacucumber (03-09-2014)
-
03-09-2014, 06:40 AM #7Junior Member
- Join Date
- Jan 2013
- Posts
- 23
Thanked: 0
Good point, HaiKarate, I hadn't thought of that. Right now the pivot is sort of riding on the threads. I say 'sort of' because I had to fill the razor hole with epoxy and re-drill it because the pin hole was pretty worn. So the threads are not in direct contact with the metal. Is there a reason that I should put some sort of sleeve on the pivot screw?
-
03-09-2014, 07:24 AM #8Senior Member
- Join Date
- Feb 2014
- Location
- California
- Posts
- 463
Thanked: 51
Has to do with wear on the threads by the steel of the pivot hole. Now theres epoxy. I better let someone with more experience at threaded pivot pin wear chime in here.
 I must say i'm liking those spacers.
-
03-09-2014, 11:13 AM #9Shave This
- Join Date
- Jan 2014
- Location
- Pickering, Ontario
- Posts
- 1,036
Thanked: 183
Looking at it again, I have to admit the the slot drive screws with their low profile pan heads are good looking too, and I usually don't like micro fasteners.
Than ≠ Then
Shave like a BOSS
-
03-10-2014, 11:39 PM #10Senior Member

- Join Date
- Jun 2009
- Location
- Wisconsin
- Posts
- 285
Thanked: 449
I think that you made it functional again, it looks good and you made it your own.


 Reply With Quote