
Results 21 to 30 of 30
 9Likes
 LinkBack URL
 About LinkBacks
-
06-01-2014, 01:31 AM #21Junior Member

- Join Date
- May 2014
- Location
- Tallahassee, Florida USA
- Posts
- 20
Thanked: 0
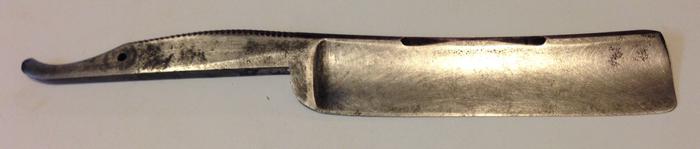
There were no washers on the outside of the scale pins, only two on the inside next to the blade. Is that normal?
-
06-01-2014, 01:45 AM #22Captain ARAD.


- Join Date
- May 2011
- Location
- Pacifica, CA
- Posts
- 2,474
Thanked: 2226
It's quite normal for ivory scales, yes. Originally Posted by ClydeWigg3
 -Zak Jarvis. Writer. Artist. Bon vivant.
-
06-01-2014, 03:22 AM #23Junior Member
- Join Date
- May 2014
- Location
- Tallahassee, Florida USA
- Posts
- 20
Thanked: 0
The ivory scales are so very thin it's a wonder they didn't completely break off 100 years ago. I may only use this once and put it away. Ha.
-
06-01-2014, 07:23 PM #24Junior Member
- Join Date
- May 2014
- Location
- Tallahassee, Florida USA
- Posts
- 20
Thanked: 0
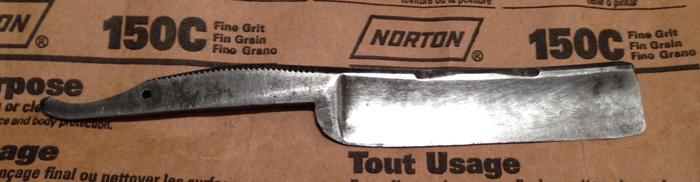
How far should I go with the 60 grit sandpaper. Did these blades come with a mirror finish? Obviously I don't want to lose too much metal, but I want to at least get all of the "black" off of the blade. I'm hand sanding and using a piece of pipe for a sanding block. The plan of course is to work my way up to a very fine sandpaper.
-
06-01-2014, 11:35 PM #25Senior Member


- Join Date
- May 2011
- Location
- Ipswich, Australia
- Posts
- 481
Thanked: 64
Firstly congrats on finding a family heirloom razor to restore. It looks like it could become a nice shaving razor. I have no knowledge whether these razors had a mirror finish on them, perhaps some more experienced members can provide help here.
Take care with the amount of pressure used sanding at 60 grit as it can leave deep scratches in the metal that could be very time consuming to remove. Also the more sanding you do the thinner the metal becomes, this is especially important closer to the edge as you could sand through the blade.
I have seen some products mentioned here that will remove rust and the like from metal - a quick search for rust removal showed this thread http://straightrazorpalace.com/razor...t-removal.html - have a read through it and then read some other results. There is some very good information to be found there. You may find that the rust is too deep to completely remove all the pitting but you can stop the active rust. The black you see is what is left after the rust is gone.
Some people have suggested sandblasting with something like Aluminium Oxide will certainly get you back to shiny metal, but the pitting will still be there.
The scales will certainly need some special attention to repair them to their best. This may be a job for a pro restorer to do - for those who don't know how to do this (myself included) I would suggest this is the better method than doing it myself.
What ever you decide to do this will be a special razor to use.
Best of luck to you.RickyB
-
06-02-2014, 04:03 AM #26
You can only remove steel, and if you want smooth metal you have to sand everything down to the bottom of the lowest pit. The problem with deep pitting from extensive rusting is that by the time you get there you may not have much blade left. So it's a judgement call based on what you're seeing in front of you. Originally Posted by ClydeWigg3
I think you have to accept that the razor will never look like new, even if you make it nice and shiny and smooth and even have no pitting, there would be too much metal gone to look like it once used to. I'd suggest you don't chase that mirage but appreciate the razor for what it is after its long history in your family, including the abuse/neglect it has suffered.
You don't seem to have any more active rust and if this is indeed the case from this point forward is entirely up to you how far to go and where to stop.
-
The Following User Says Thank You to gugi For This Useful Post:
ClydeWigg3 (06-03-2014)
-
06-03-2014, 08:00 PM #27Junior Member
- Join Date
- May 2014
- Location
- Tallahassee, Florida USA
- Posts
- 20
Thanked: 0
Moved up to 150 grit today. I appreciate and understand what you said Gugi. I guess right now I'd like to at least get the black staining off the blade. I'm not that familiar with staining on metal. How deep could I expect that to go? If I can get that off the blade then I'd be happy and work my way on up through the finer grits of sandpaper quickly. I'm okay with a little pitting on this blade, as I don't want to destroy it. This picture isn't as clear as I'd like, but the black spots I'm speaking of are represented here on the right side in the upper corner.
Last edited by ClydeWigg3; 06-03-2014 at 08:03 PM.
-
06-03-2014, 09:09 PM #28Junior Member
- Join Date
- May 2014
- Location
- Tallahassee, Florida USA
- Posts
- 20
Thanked: 0
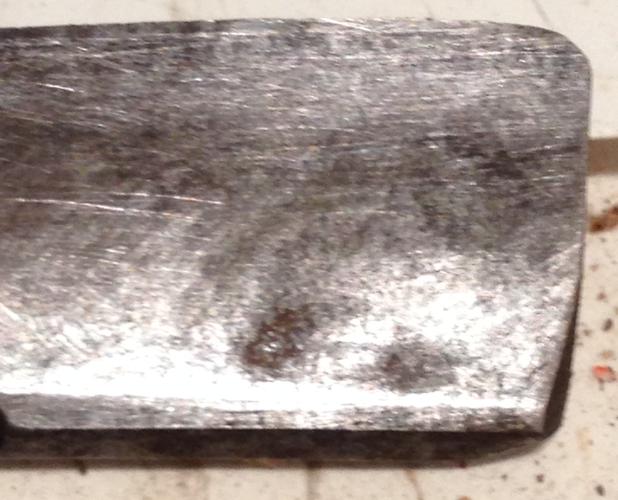
Better picture of the black staining. The two spots at the bottom are what I'm talking about.
-
06-04-2014, 07:40 AM #29
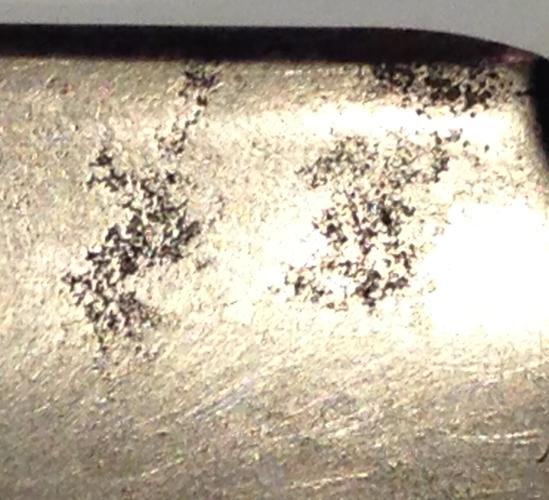
On that latest picture it seems you still have rust.
The black staining is just a different form of oxidized iron than the red. It is no longer steel, it is relatively weakly bound to the steel surrounding it and when you knock it off there remain pits in its place.
BTW, chemically rust is ill-defined because it's hydrated ferric oxide, but my guess is that you don't want very much details of the chemistry, so I'm avoiding getting into more precision.
You can use some machine type of oil while sanding (wd-40, 3-in-1, etc.) it will probably be helpful.
-
The Following User Says Thank You to gugi For This Useful Post:
ClydeWigg3 (06-04-2014)
-
06-05-2014, 12:28 AM #30Junior Member
- Join Date
- May 2014
- Location
- Tallahassee, Florida USA
- Posts
- 20
Thanked: 0
Today's progress with the hand sanding. Still with the 150 grit, but threw some WD40 in the sanding mix. I think I'm making pretty fair progress, but now I see in the bottom picture that those black marks I've been sanding off are deep pits. Since I don't want to take off too much metal from this family treasure, I'm going to move up to finer grits and work on finishing it out. Does anyone have an idea how much of a sheen these blades had when new? Would they all come with a mirror finish, or were some more nickel/pewter colored?


 Reply With Quote
