
Results 1 to 10 of 15
 24Likes
Thread: My Blade Holding Tool......
 LinkBack URL
 About LinkBacks
-
07-16-2015, 02:42 AM #1
 My Blade Holding Tool......
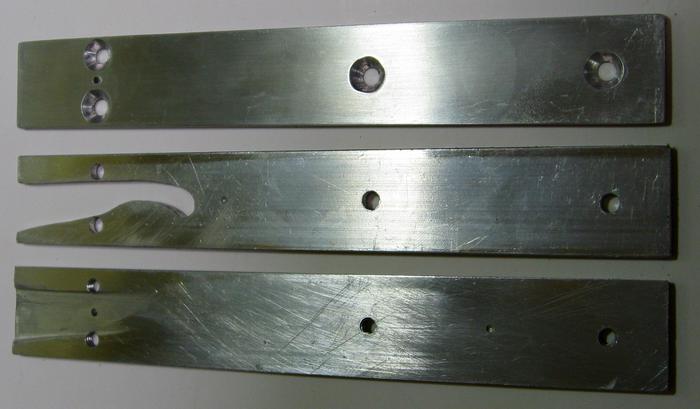
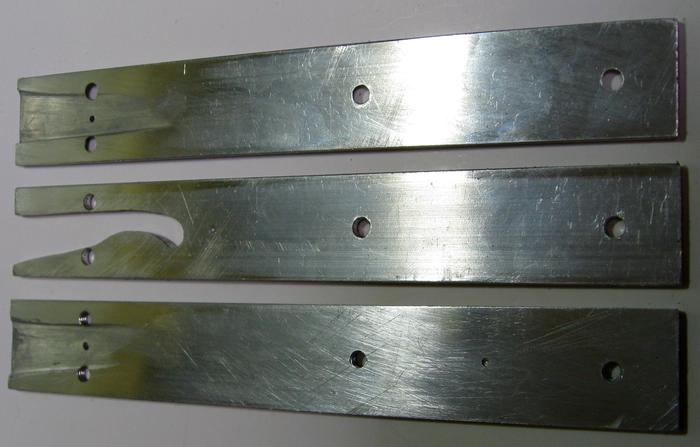
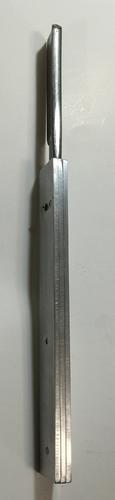
Well, I'm sure many have had good luck with polishing on a buffer & also using greaseless compounds but after having 2 Wade & Butcher blades slip from my hands & get the edges chipped or cracked, I went to Home Depot & bought a piece of aluminum 1/8" thick X 1" wide & 36" long.
I got home & measured 3 pieces 7" long each & proceeded to make myself a blade holder instead of just holding it by the tang & the blade. I also bought some 8-32 x 1/2" countersunk brass screws. I drilled 4 small holes in them at first, then later drilled them out to the right size but I used my tap & die set to thread the holes in one piece of aluminum. I took the opposite side along with the middle piece & drilled the holes larger for the screws to fit through & used my countersinking tool in my drill to countersink them on the outside piece so they would be nice & flush. I took the center piece & drew out a tang section which I cut & filed out. I then made a small hole where the pivot would be to hold the blade in place & to keep it from falling out while grinding or polishing. I have a screw & nut to hold the blade in at the tang. I also had to file some ares on the insides of the outer pieces since some tangs are more than 1'8" thick & I wanted it to al fit together nicely. I also had to cut the 8-32 screws a little so the remaining part wouldn't stick out. They didn't have any 3/8" long. I haven't finished it yet but I thought I would show what I have so far. This will be my prototype since it could be maybe 1/2" longer or maybe an inch but what I have will do the job for now. I want to make some finger & thumb areas on it to make it more ergonomically fit to my hands. I also want to sand it down in progressions & polish it like a nice tool. I'm sure I will have to make another center piece for different shaped tangs. I'm sure some may not find they need such a tool but I think it would help me & maybe a few others.
This is what I got so far.


Last edited by engine46; 07-16-2015 at 01:07 PM.
-
-
07-16-2015, 03:13 AM #2Senior Member


- Join Date
- Mar 2015
- Location
- Akron, Ohio
- Posts
- 12,061
Thanked: 4312
Sweet, nice set up steve. [emoji106]
engine46 likes this.Mike
-
The Following User Says Thank You to outback For This Useful Post:
engine46 (07-16-2015)
-
07-16-2015, 03:22 AM #3Senior Member

- Join Date
- Dec 2012
- Location
- Perth, West Australia
- Posts
- 1,431
Thanked: 497
Great set-up Steve (as Outback said)....that will be something I will try
 http://straightrazorplace.com/workshop/18504-welcome-workshop-how-do-i-where-do-i-what-do-i-answers-here.html
-
The Following User Says Thank You to bongo For This Useful Post:
engine46 (07-16-2015)
-
07-16-2015, 03:27 AM #4
Thanks Mike
 Originally Posted by outback

I think it will help me to hold it more steady. I sometimes shake which is why I use my tripod when taking pics but I don't always need it. It's a big help though. I'll set it for macro shots & then set it for timed delay, focus & click. I think this homemade tool will help me a lot.
Thank you too Bongo, I'm glad you like it. Like I said, I may have to make different center sections for different tang shapes or even a whole new holder. The hardest part was filing out the inside parts of the outer pieces because all I had were the files but if I had access to a milling machine, I would do it all on a mill with an endmill. Originally Posted by bongo
Last edited by engine46; 07-16-2015 at 04:03 AM.
-
The Following User Says Thank You to engine46 For This Useful Post:
outback (07-16-2015)
-
07-16-2015, 06:34 AM #5Senior Member
- Join Date
- Sep 2014
- Location
- Bulgaria
- Posts
- 840
Thanked: 168
Home made instruments for cpecific tasks are precious and very usefull i like it =
engine46 likes this.
-
The Following User Says Thank You to RusenBG For This Useful Post:
engine46 (07-16-2015)
-
07-16-2015, 01:02 PM #6
Thanks my friend! Originally Posted by RusenBG
-
07-16-2015, 02:05 PM #7Str8Faced Gent.


- Join Date
- Aug 2013
- Location
- Orangeville, Ontario
- Posts
- 8,449
- Blog Entries
- 1
Thanked: 4206
Nice work Steve. A confident grip is a safer, more controlled grip.
I've been told, many times actually, that I need to 'get a grip'.
Think in a different context though.. engine46 likes this."Depression is just anger,, without the enthusiasm."
Steven Wright
https://mobro.co/michaelbolton65?mc=5
-
The Following User Says Thank You to MikeB52 For This Useful Post:
engine46 (07-16-2015)
-
07-16-2015, 02:07 PM #8Senior Member

- Join Date
- Jun 2013
- Location
- NRH, TX
- Posts
- 124
Thanked: 23
Sheer genius! Clean, sturdy and I like the fact you used the tap and die set to make it more secure.
 engine46 likes this.
-
The Following User Says Thank You to cahnwulf For This Useful Post:
engine46 (07-16-2015)
-
07-16-2015, 03:21 PM #9Boker Fan

- Join Date
- Oct 2014
- Location
- South Wales
- Posts
- 722
Thanked: 100
Very clever idea. Necessity is the mother of invention!
engine46 likes this.
-
The Following User Says Thank You to wayne394 For This Useful Post:
engine46 (07-16-2015)
-
07-16-2015, 03:30 PM #10Senior Member

- Join Date
- Sep 2014
- Location
- Yorkton, Saskatchewan, Canada
- Posts
- 1,171
Thanked: 230
Very nicely made tool, Steve.
So this is the prototype before mass production?
I can see where it would be very useful......
Is it over there or over yonder?
-
The Following User Says Thank You to Willisf For This Useful Post:
engine46 (07-16-2015)


 Reply With Quote