
Results 1 to 8 of 8
 1Likes
Thread: My first restoration attempt.
 LinkBack URL
 About LinkBacks
-
12-03-2015, 04:34 PM #1Senior Member

- Join Date
- Oct 2015
- Location
- Vermont
- Posts
- 167
Thanked: 8 My first restoration attempt.
Just thought I'd share those with you
 photosguys. I got this from ebay for 15$ I thought it was a steal! So I have poor new scales onto it yet but probably this weekend I'll bands some and throw them together. I'll post a complete finished product when it's done. Lame know what you all think! Attachment 220671
So I can't figure out how to upload from photos I already have, so I cant show any before photos. Just know it was very rusted and totally black with tarnish. I chose not to sand all the pitting away in order to save the etchings. I mean this thing is beautiful, the photo doesn't really show all of its glory, but anyway there it is. Thanks!
Last edited by Dramadon3151; 12-04-2015 at 03:33 PM. Reason: New
-
12-03-2015, 05:55 PM #2Senior Member

- Join Date
- Dec 2013
- Location
- Texas
- Posts
- 1,568
Thanked: 269
Congrats, it looks like it cleaned up well
 For pictures, it is easy to use a site like Photobucket to upload nice big pictures.
By the way- You should have taken some before pictures too!!
-
12-03-2015, 09:41 PM #3Senior Member


- Join Date
- May 2015
- Location
- Humboldt, iowa
- Posts
- 244
Thanked: 17
The more pictures the better!
Do you have any before pics?
-
12-04-2015, 03:36 PM #4Senior Member
- Join Date
- Oct 2015
- Location
- Vermont
- Posts
- 167
Thanked: 8
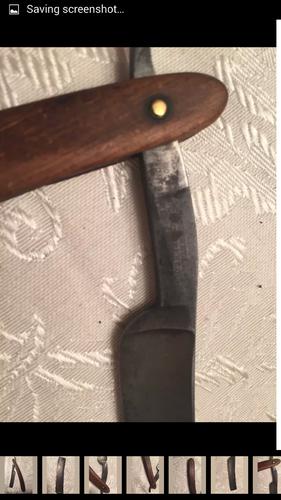 here another before photo shows the blade as I found it. There was also some chips neat the very top of the toe
-
12-04-2015, 03:59 PM #5Senior Member
- Join Date
- Oct 2015
- Location
- Vermont
- Posts
- 167
Thanked: 8
Just wanted to throw this out there as well. The Green chromium oxide crayon on a buffing wheel wrapped in burlap is what I rigged up to get most of the rust and scratches out, once I was close to what I figured was the end. It worked phenomenally well. I think next time I'll try the micro mesh progressions.....idk.
-
12-04-2015, 04:06 PM #6Senior Member
- Join Date
- Oct 2015
- Location
- Vermont
- Posts
- 167
Thanked: 8
I also want to thank Thank jockeys41 for his rotary tool restoration videos on you tube. They came in very helpful, so Thanks man! !
Guidry likes this.
-
12-05-2015, 12:29 AM #7Junior Member
- Join Date
- Nov 2015
- Posts
- 17
Thanked: 1
Let us all know how this goes. I'm looking to get into straight razor shaving but I like working on things so I may be trying to mess with a razor I just got for 10 bucks on evay.. But still looking for a shaving razor so I know what to compare to. Good luck
-
The Following User Says Thank You to Mikebo86 For This Useful Post:
Dramadon3151 (12-05-2015)
-
12-05-2015, 12:59 AM #8Senior Member
- Join Date
- Oct 2015
- Location
- Vermont
- Posts
- 167
Thanked: 8
Will do. Idk if I just got lucky or all the hours of videos and snooping around for info was the key, but it isn't super difficult to do. Just go easy and remember that there are times when less is more. Good luck!


 Reply With Quote