
Results 41 to 50 of 51
 81Likes
Thread: Truefitt razor
 LinkBack URL
 About LinkBacks
-
12-31-2017, 10:57 PM #41Senior Member


- Join Date
- Apr 2013
- Location
- Rural Missouri
- Posts
- 4,981
Thanked: 972
Looks nice. Now you just need to load up some T & H Trafalgar or 1805 and take the razor for a trial run.
GabrielMartin likes this.
-
The Following User Says Thank You to Leatherstockiings For This Useful Post:
GabrielMartin (12-31-2017)
-
12-31-2017, 11:57 PM #42Senior Member

- Join Date
- Jul 2015
- Location
- Scotland, UK
- Posts
- 195
Thanked: 35
Thank you! Happy New Year to you too! Originally Posted by dimab

-
01-01-2018, 12:03 AM #43Senior Member
- Join Date
- Jul 2015
- Location
- Scotland, UK
- Posts
- 195
Thanked: 35
Thank you! Will be giving it a test run tomorrow! Will post here when I do Originally Posted by Leatherstockiings
 Leatherstockiings likes this.
-
01-01-2018, 12:05 AM #44Senior Member
- Join Date
- Jul 2015
- Location
- Scotland, UK
- Posts
- 195
Thanked: 35
Thank you & it sure is a keeper Originally Posted by mwnc252
-
01-01-2018, 12:16 AM #45Razor Vulture


- Join Date
- Oct 2010
- Location
- Lone Star State
- Posts
- 26,134
Thanked: 8615
HOLY SMOKES, Gabe!

Great job!
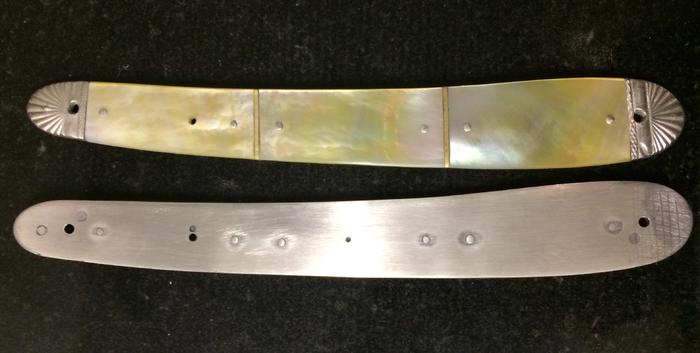
Details? 3 panels. Silver separators. 2 pins per panel!
How on Earth did you accomplish this?
Remarkably beautiful! Will we see it on SOTD to-morrow?
Well-Done! GabrielMartin likes this.
-
The Following User Says Thank You to sharptonn For This Useful Post:
GabrielMartin (01-01-2018)
-
01-01-2018, 12:49 AM #46Senior Member
- Join Date
- Jul 2015
- Location
- Scotland, UK
- Posts
- 195
Thanked: 35
Thank you Sharptonn! I’ll be posting shave of day back on this thread if I can’t find the right place to post it lol Originally Posted by sharptonn
Yeah it was kinda tricky for me, a few times it nearly didn’t happen so i’m Really relieved it’s done! I will post more pics tomorrow of how but it was all new to me, never worked with mop before & because it’s expensive stuff I really was nervous lol Happy new year btwsharptonn likes this.
-
The Following User Says Thank You to GabrielMartin For This Useful Post:
sharptonn (01-01-2018)
-
01-01-2018, 01:17 AM #47Senior Member

- Join Date
- Jun 2016
- Location
- NH
- Posts
- 1,924
Thanked: 1363
Congrats, that is very impressive work! Like was said, the details!! The more details, the trickier the project and your result was perfection. Goodness, that's sweet!
sharptonn and GabrielMartin like this."Go easy"
-
The Following User Says Thank You to xiaotuzi For This Useful Post:
GabrielMartin (01-01-2018)
-
01-01-2018, 01:35 AM #48Senior Member
- Join Date
- Jul 2015
- Location
- Scotland, UK
- Posts
- 195
Thanked: 35
Thank you very much! Indeed I will post more details tomorrow, I was going to post them with the finished pics but just didn’t have time but I will. Again thank you! Originally Posted by xiaotuzi

-
01-01-2018, 04:22 PM #49Senior Member
- Join Date
- Jul 2015
- Location
- Scotland, UK
- Posts
- 195
Thanked: 35
In order to explain what I had to do to restore the razor I have to go back to the beginning.
But before I start, just to let you know I have never worked with mother of pearl before this razor, trial & error so please bear with me, thank you
After I started this thread I had another good look at it.
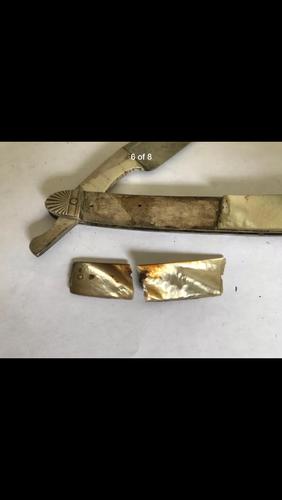
One side of the scales was broken in three, it was like that when I bought it.
I tried to clean the pieces & put them together but didn’t look right, I knew I had to replace, for one side anyway...so far.
At this stage I didn’t know that the silver was real silver until later.
Looking at the silver plate that the mop was attached to on the unbroken scale, the mop was coming away.
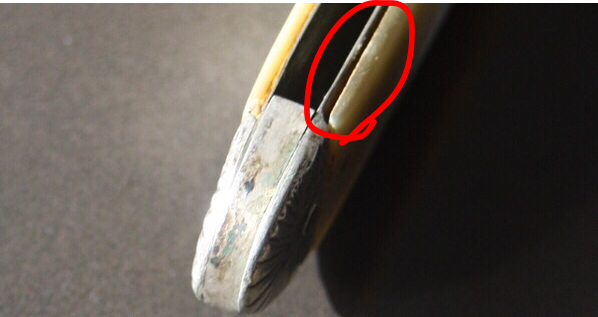
Some of the pins were loose, others were really stuck in there but I knew I had to take it apart because where it was coming away, grime & dust or whatever had been building up in there over the years & if I were to just glue it up, chances are it would not hold.
So first I de-pinned the wedge and razor then I thought on how I was to take off the mop without breaking them.
As I said earlier some pins were loose which wasn’t a problem but the ones that were stuck in there was a problem.
I tried very gently to take out the pins with a very small set of pliers, I didn’t want to drill them out in case the mop cracked.
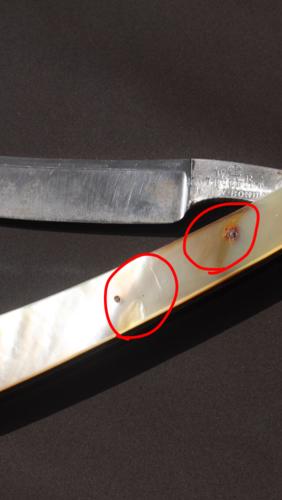
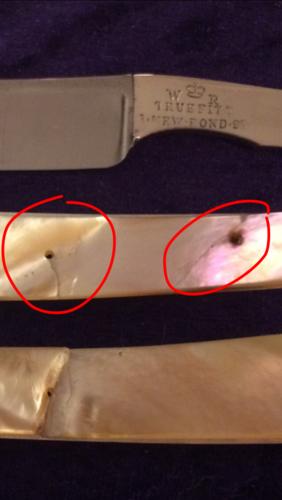
It worked with some but the middle pin & the pin with the rust I tried dropping oil & left it for a while to soak in, didn’t work.
The mop cracked at both the middle & where the rust was.
I tried gluing them together with Loctite glue which worked but the shape was now slightly off with the shape silver plate it was attached to, so new mop for both scales were needed.
Looking back at the before pics, I looked at where the mop cracked and sure enough there is a flaw at the middle pin where it split.
The one with the rust was probably inevitable, I think it was going to break no matter what gentle approach I took.
With the mop now off I started looking for the tools and materials needed.
I measured the diameter of the pins, the holes so I could order the drill bits.
I done research on how to cut mop, what was needed for it & for the replacement mop itself which wasn’t easy as they apparently don’t make them 5” long anymore.
When I found a seller and purchased the pieces it took weeks for the mop to arrive but worth it.
I then had to buy a jewellers saw with very fine blades.
I also bought different sizes in drill bits and Sterling silver wire for the pins.
Sizes were 2mm for the pivot & wedge, 1mm for the pins that held the mop in place and 1.6mm for the pin that the thumb notch of the razor rests on.
Finally with everything that I ordered arriving, I went to work.
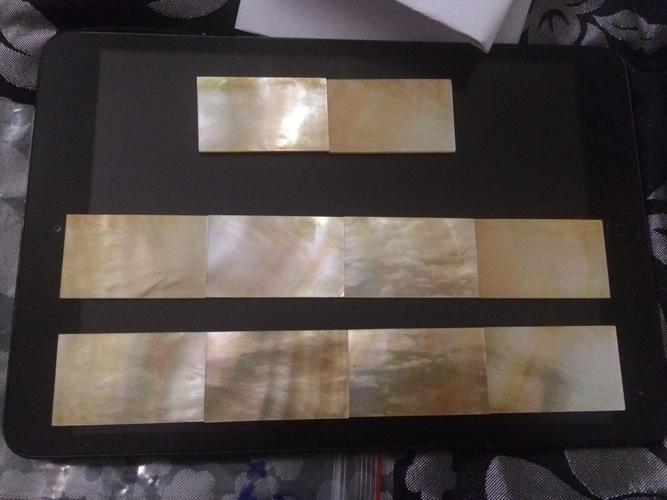
First I had to rearrange what pieces of mop I would use, (the type of mop is gold lip and was hard getting a hold of in UK) I wanted to use the pieces that had most of the gold for more affect.
Ten pieces of mop and all were not long enough so I had to use three pieces per side.
I stuck the six chosen pieces onto a thin piece of cardboard using water based glue then put green masking tape on top so the mop wouldn’t move & more importantly, didn’t crack.
I drilled new holes through the silver plates for the mop to attach to.
Using the silver plate as a template I drew the outline of the shape onto the masking taped mop, including where the new holes were going to be.
I also marked where each piece of mop were.
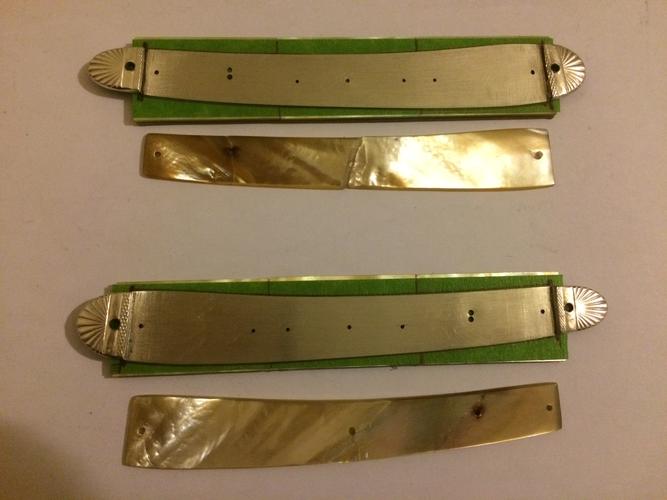
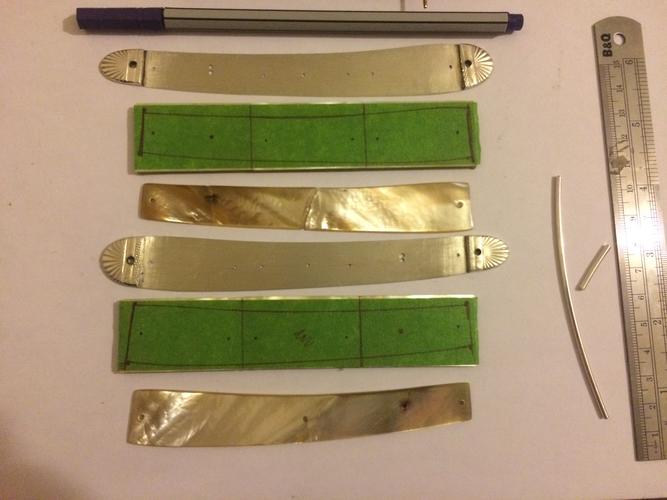
I double checked the measurements of where to drill the holes and they were drilled when I was confident they would line up.
I drilled the holes before I cut the shape while the masking tape was still on, that way less chance of cracks.
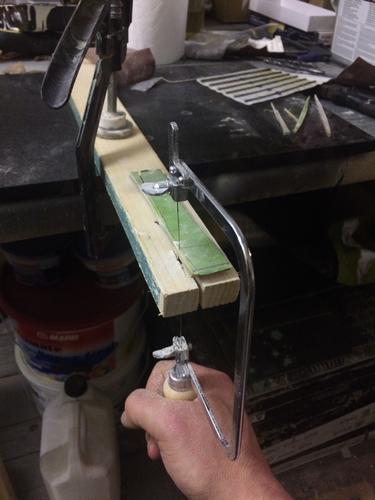
So with that done, I got a piece of wood and sawed it down about three inches in the middle, for the jewellers saw to go into.
Cutting mop has to be done in a certain way, with the mop laid flap and cutting done with the saw vertically.
Very important that a mask is worn while any cutting is involved, especially mop.
With the mop cut to rough shape I soaked them in water to remove the cardboard & glue which only took minutes to do.
I removed the masking tape to see no cracks or any flaws.
I cut some silver 1mm wire and put the wire into the drilled holes of the mop.
I then tested it to line up with the silver plate, a little bit of sanding to the ends were needed and it fit perfectly.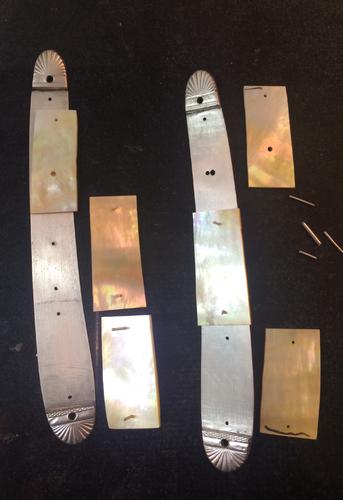
Next was the gluing!
When I first took the original mop off the silver plates, I did notice the the silver plates were not scribed with marks so the mop would have more of a grip.
This was corrected on both the plates & underside of each mop piece before gluing.
I glued starting with the middle panel, with the pins in.
The glue is very good stuff and very fast acting so there is only one shot with each panel.
I pressed each panel onto the plates with just my hands, pressing firmly. I couldn’t clamp them down because of the pins.
After holding each panel until it was secured onto the plates I then cut back the pins on each side to the height of their diameter.
Using a flat solid clean surface, using a 2oz ball peine hammer I gently peened each pin until it was fully down on both sides.
Happy with that I took both to the belt sander to take the sides of the mop scales level to the outer edge of the silver plates.
I tried to gently cover the joins of where each panel of mop meet using fine sandpaper but I noticed the whole scale kept bending, causing where the joins were to open ever so slightly.
Not good!
Using the jewellers saw I cut down to the silver plate at each of the joins to allow for a spacer to fit for more stability.
I don’t have spare silver/nickel sheet but I do have brass.
With the brass cut I glued them in and left it to fully cure.
Next was to finish the over all shape, sand down any roughness and to check if both sides of scales were correct shape to each other.
With that done I did a mock up with the razor and wedge in the scales, the wedge being a wedge was creating the scales to bend, as wedges are designed to do but this was putting pressure onto where the joins of the mop where.
There was also a listing of the razor to one side of the scales while closing.
So I ground the wedge to a spacer so the scales wouldn’t bend, I would also add thicker inside washers at the pivot, to compensate for the loss of thickness of the wedge when I levelled it to a spacer.
I did another mock up with these changes, the razor closed ever so slightly over to one side but this might change with peening.
The razor itself has a slight warp along its spine & tang which will be causing this listing to one side.
A factor could also be the original pivot hole or it could be diameter of the pivot pin in a 2mm pivot hole.
Silver is a soft steel as you know & the silver rods I have are half hard, might not be strong enough so I opted to use nickel rods, this would allow me to use nickel solid triple stacked collars that in using, would spread the pressure of peening out so the silver bolsters wouldn’t bend inwards with the pressure of peening the spacer & pivot.
Peening a nickel rod that was to go through both scales at the thumb notch area, would also stop the scales from bending out and at same time, push the pivot bolsters outwards away from the razors pivot so the inside washers would make better contact with the scales & razor, in hope it would straighten the listing out.
I started with the peening of the spacer, just when it was getting tight I started peening the razor until it was getting tight.
I then started peening the middle rod gently while pressing the scales inwards.
Jumping back and forth from each, peening with the razor open and closed on both sides of the scales.
As it was getting tighter, with the razor open, putting a slight bend while holding the scales, while peening pivot, bending in the direction of where the razor listing was going so it would close in opposite direction of where it was going.
This pic is just an example using a different razor.
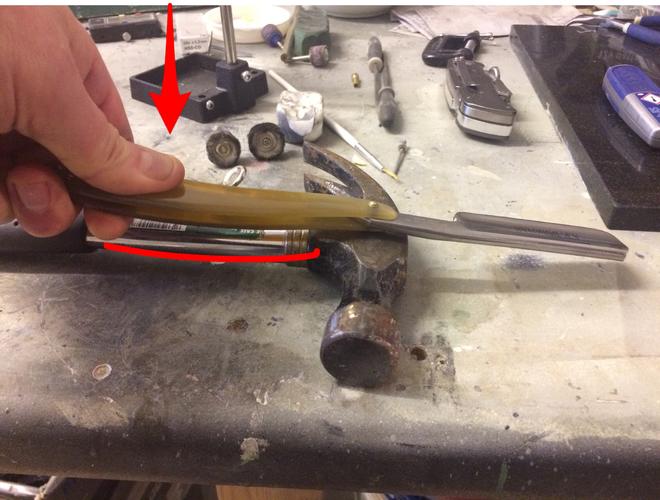
End result is that it opens & closes with the razor, edge & tail not hitting inside of the scales, the scales are solid and won’t bend keeping the razor and the joins of the mop intact.
Happy with the best I could get it, I moved onto the honing.
Using electrical tape on spine I started on a 1k naniwa stone, when it was cutting are hair I then jumped onto a Welsh purple Lynn slate.
After the stones it was sterilised in babercide for ten minutes.
Stropping was next & done on a denim strop with mastro livi green paste, then after that I stropped on a soft material that’s used for cleaning reading glasses with micron diamond spray (1/4 micron).
Next was the canvas strop and ending on the soft felt side of kangaroo leather.
It passed hht along with the tree top test (I think that’s what the latter test is called?)
A good hand polish all over then a shave with it this morning.
I had a weeks growth of stubble & the first pass was a little rough for my liking but the 2nd & 3rd passes were surprisingly really good, very sharp, precise & smooth.
Normally if a razors edge isn’t good my skin comes out red with aggravation but none of that here.
I used a Haryali brush, Phoenix & Beau Whitechapel soap and a Steve Woodhead shaving scuttle which I only got as a Christmas present last week.
The razor might need to go back to the stones but right now I’m happy that it’s finally finished.
Thank you all for all your help, encouragement, advice, positive feedback & of course your interest.
I wish you all the very best for 2018 and to another year of great enjoyment of shaving.
All the best
Gabe

-
-
01-01-2018, 04:49 PM #50Razor Vulture
- Join Date
- Oct 2010
- Location
- Lone Star State
- Posts
- 26,134
Thanked: 8615
Thanks for the pictures and process, Gabe!
With 2 panels it seems obvious where the scale will flex, but with 3 there is no way to know.
Going with a spacer was a great idea. Well-done.GabrielMartin likes this.
-
The Following User Says Thank You to sharptonn For This Useful Post:
GabrielMartin (01-01-2018)


 Reply With Quote