
Results 1 to 10 of 25
 71Likes
Thread: My newest project
 LinkBack URL
 About LinkBacks
-
02-26-2019, 05:09 AM #1Senior Member


- Join Date
- Feb 2019
- Location
- Salida, CA
- Posts
- 600
Thanked: 94 My newest project
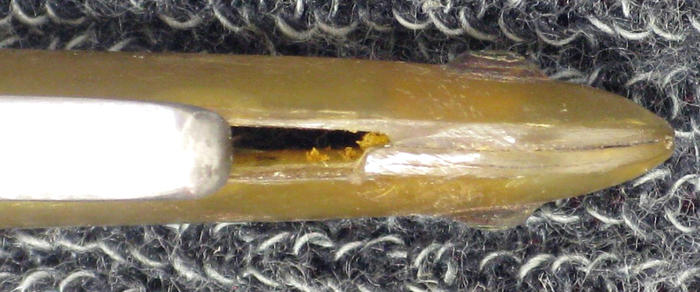
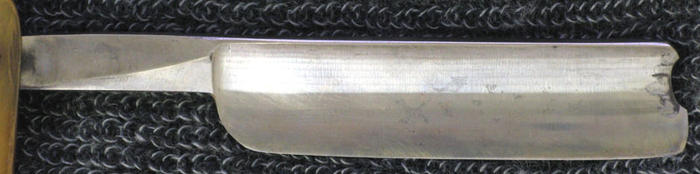
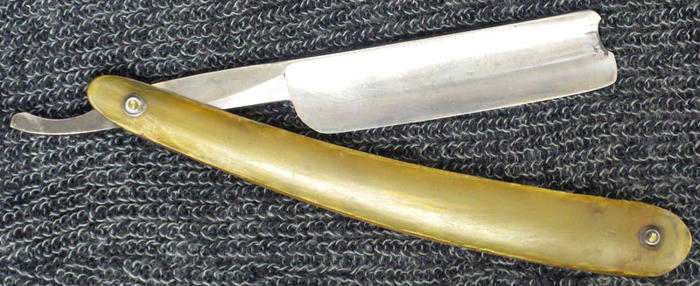
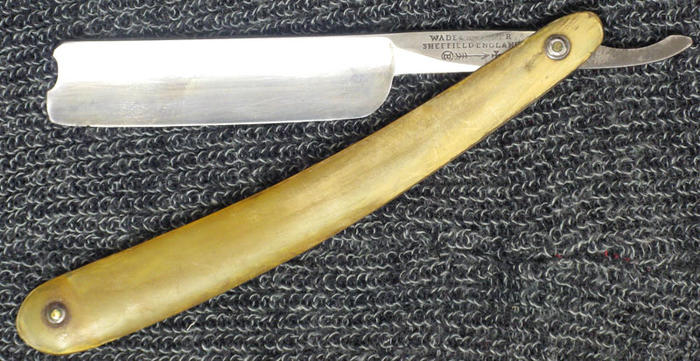
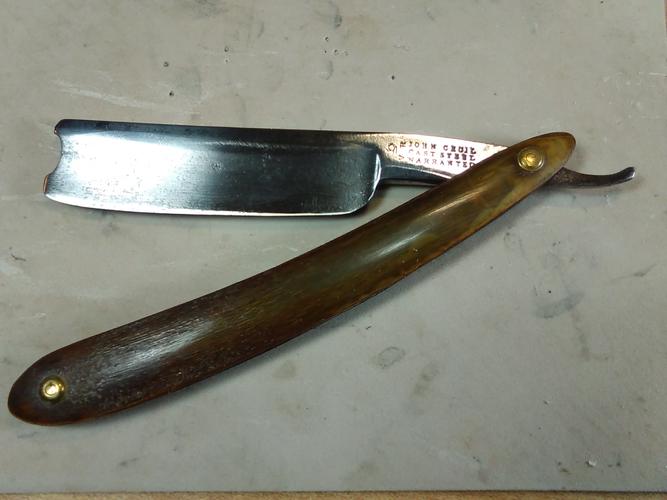
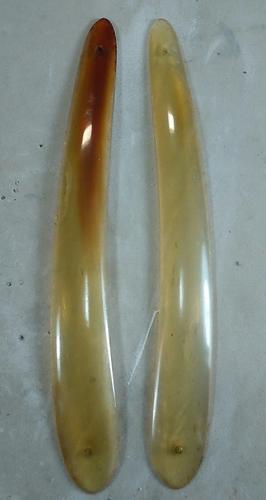
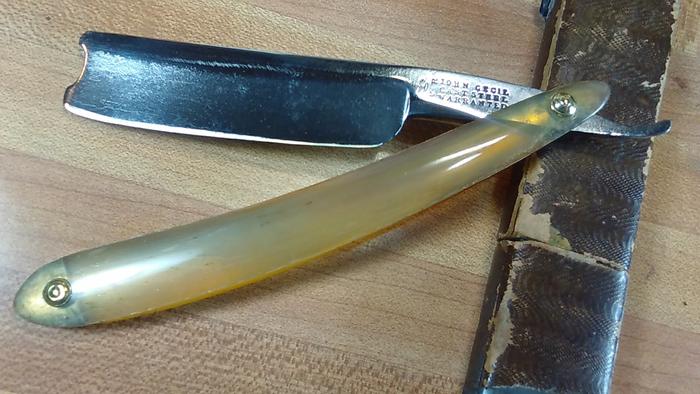
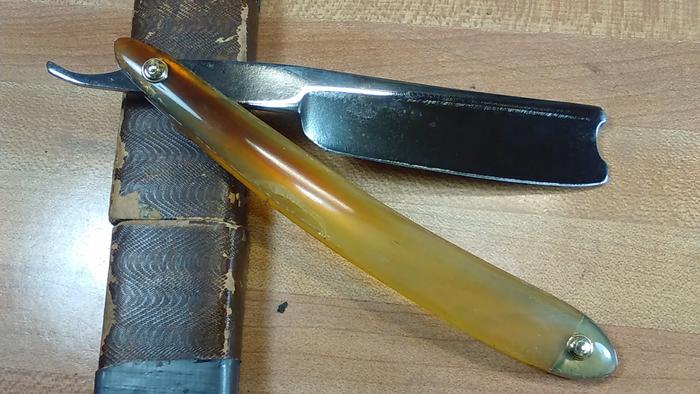
Been looking for a barbers notch to restore for a while. I came across this at a pretty good price and took a chance. It's a 6/8 with bone scales and is in a lot better condition than I thought it would be
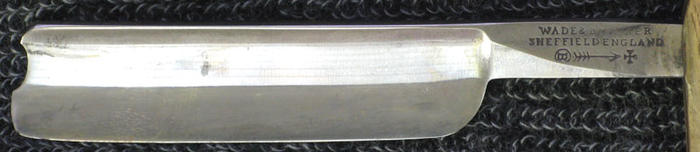
 . The scales have an integral wedge, witch confused me a little as I've only seen this with plastic, but I tested them and they're definitely horn. The scales need some help, but they should be savable. They're slightly translucent now, so I can't wait to see them polished. There's only a couple of pin point pits on one side of the blade and a few more on the spine. The tang has some mild rust around the pivot, so I'll be unpinning it. But, I'm probably not going to do much to the blade. There's very little hone wear and it has an even bevel. The tang stamp indicates 1900 to around 1950 manufacture (if anyone can narrow that window a little...). The tang stamp is Wade & Butcher over Sheffield England over a circled B and an arrow with four fletches pointing to a maltese cross. Got a couple of projects ahead of this one, but I'll probably be asking for some advice in the workshop when I start. Pictures below.
-
02-26-2019, 05:40 AM #2Senior Member


- Join Date
- Mar 2012
- Location
- Thunder Bay, Ontario, Canada
- Posts
- 17,334
Thanked: 3228
I'd say you got yourself a quality razor in very nice condition. There appears to be very little if any hone wear too. You are right, it won't take much restore it too.
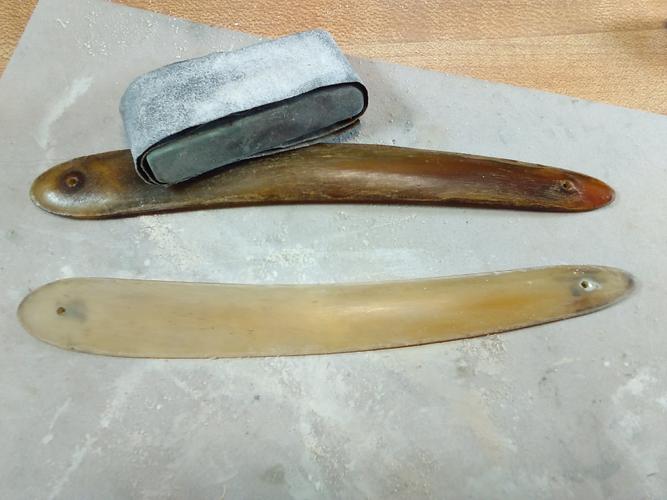
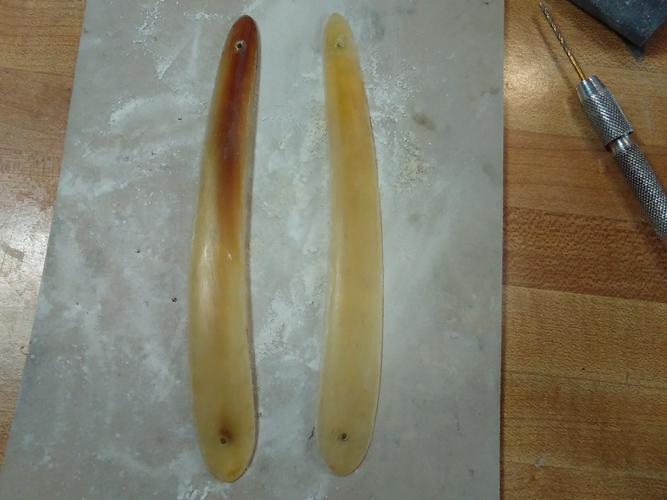
The scales are highly savable. When you get them unpinned soak them in pure Neatsfoot oil for a few days to rehydrate them, wipe them dry and allow to air dry for a few days. If there is any delaminating fill with crazy glue and sand. When all the repairs are done sand and polish. For more info on restoring horn scales type "restoring horn scales" in the search box in the upper right corn of the page. You will find threads like this https://sharprazorpalace.com/worksho...rn-scales.html .
If you can't save the original domed washers when you unpin replica ones are available on the net.
Can't help narrowing down the date of manufacture unfortunately. Hopefully one of our members may be able to help in that regard.
Have fun with the project.Life is a terminal illness in the end
-
-
02-26-2019, 05:48 AM #3Skeptical Member


- Join Date
- Nov 2016
- Location
- Colorado Springs
- Posts
- 10,554
Thanked: 2195
They did make scales with wedges like that. As you said, mainly on plastic but they did it with horn too. It looks to me as if the collar at the pivot end is different than the one at the wedge end. This could mean the scales are not original to the blade. But a set of horn scales is always nice.
As for unpinning I use a drill press and drill out the peen after taking a tiny flat file to the peen. This gives you a flat spot to drill into. By the time you drill enough to knock the collar off the pin should come out. Gently pry between the scales and it should come apart. But I do mean gentle. I broke a few in my efforts to remove pins.
The horn scales should be soaked in oil for a few days. Neatsfoot oil is great for this. And even if you soak for 2 weeks the scales will be fine. They will need to dry for a couple days after the soaking. Sand and polish the scales. If you find some delaminations in the scales you can clean them out with brake cleaner or starter fluid spray and use a couple drops of super glue in the delaminations. But do this before the oil soak.
That will get you started. I'd recommend you buy a set or 20 (HA) of collars and some pinning rod from AJ Kenney. He is on eBay and is a member here. Just PM him and he can fix you up. You got a good looking blade there so be gentle sanding and it should turn out just fine. Lots of info on restoring razors can be found here. Just take your time and enjoy the fun. Good luck and keep us in the loop as you go.
Looks like Bob and I were typing at the same time. LOL. Dating a W&B can be difficult. They were made for so many years.Last edited by Gasman; 02-26-2019 at 05:50 AM.
It's just Sharpening, right?
Jerry...
-
The Following User Says Thank You to Gasman For This Useful Post:
JellyJar (02-27-2019)
-
02-26-2019, 06:00 AM #4'with that said'

- Join Date
- Aug 2010
- Location
- Walla Walla in WA State USA
- Posts
- 11,254
Thanked: 4238
You've gotten some very sound advice from the posts above.
As far as if the collars can't be salvaged (I've messed up my share) here's a link to Austin here at SRP from there he can direct you to where you can purchase some very nice replacement collars. He's a great guy to work with and his products are top notch! He's also a Vet! 

Last edited by cudarunner; 02-26-2019 at 06:04 AM.
Our house is as Neil left it- an Aladdins cave of 'stuff'.
Kim X
-
02-26-2019, 06:02 AM #5Skeptical Member
- Join Date
- Nov 2016
- Location
- Colorado Springs
- Posts
- 10,554
Thanked: 2195
You forgot the link Roy.

BTW, Austin is AJ Kenney.Geezer likes this.It's just Sharpening, right?
Jerry...
-
02-26-2019, 06:06 AM #6'with that said'
- Join Date
- Aug 2010
- Location
- Walla Walla in WA State USA
- Posts
- 11,254
Thanked: 4238
Thanks Jerry, but when I went to fix my FU it showed that I did indeed put the link in my post..That's really strange! Originally Posted by Gasman

So let's try posting Austin's link again here--
http://sharprazorpalace.com/members/ajkenne.html
Ok, I checked on the preview and the link is there.Last edited by cudarunner; 02-26-2019 at 06:08 AM.
Our house is as Neil left it- an Aladdins cave of 'stuff'.
Kim X
-
-
02-26-2019, 07:46 AM #7Truth is weirder than any fiction..

- Join Date
- Jun 2012
- Location
- Land of the long white cloud
- Posts
- 2,946
Thanked: 581
That don't need no restoring.
Spit, polish, hone and shave...Last edited by Grazor; 02-26-2019 at 08:10 AM.
Into this house we're born, into this world we're thrown ~ Jim Morrison
-
02-26-2019, 12:36 PM #8Senior Member


- Join Date
- Mar 2015
- Location
- Akron, Ohio
- Posts
- 12,112
Thanked: 4314
I've worked some magic with horn.
Feel free to PM me on any questions or concerns you might have.
Those should come out great.!
Honey horn has got to be the toughest to repair, for me. Being its transparent, its easy to see the repairs on some, others come out looking new.
I always start with a good scrubbin, let dry, then make sure their flattened with the use of a clothes iron. Then sand the scales to remove the nasty oxidation off the outer skin, make all repairs needed, then soak in Neatsfoot for several days. Depending on how dry they are.
Remove from oil, wipe excess off with paper towel and let rest for a day. Sand with steel wool, (0000) then polish.
 Mike
Mike
-
The Following User Says Thank You to outback For This Useful Post:
MisterClean (02-26-2019)
-
02-26-2019, 01:44 PM #9
FWW:
I have seen two diameters of "bullseye" domed washers on a Sheffield razor the little ones were enough smaller to be noticeable.Thay were on the pivot end of the scales.
~RichardLast edited by Geezer; 02-26-2019 at 01:59 PM.
Be yourself; everyone else is already taken.
- Oscar Wilde
-
The Following User Says Thank You to Geezer For This Useful Post:
Gasman (02-26-2019)
-
02-26-2019, 04:24 PM #10Senior Member
- Join Date
- Apr 2012
- Location
- Diamond Bar, CA
- Posts
- 6,553
Thanked: 3215
Nice find. Unpin by facing the pin head, filing a flat on the dome of the pin. Cut a piece of wood the length of the razor and drill a hole the size of the pin collar for the razor to rest in and keep from trying to balance on the pivot pin on the other side.
Center punch the pin with a sharp punch and drill using a No. 1 Center Drill, not a twist drill bit. A 1/16th inch drill bit will flex and wander.
If you want a clear look you have to finish the inside of the scales, and you can only do that by un-pinning. But you could clean it up a lot without unpinning.
If you do decide to go that way, you can toss the whole razor in a Ziplock bag and soak. As said make any repairs first then soak. The neatsfoot will not harm the blade or pins.
The blade should clean up with some 1000 wet and dry, 600 on the heavy rust spots, and polish up with 0000 steel wool and any good metal polish.
The chips on the edge should come out on the 1k. Make sure to hone with a rolling X stroke to keep that nice smiling edge. And use tape, no sense in wearing away a spine that has lasted all these years.
-
The Following User Says Thank You to Euclid440 For This Useful Post:
JellyJar (02-27-2019)


 Reply With Quote