
Results 1 to 10 of 16
 7Likes
 LinkBack URL
 About LinkBacks
-
10-02-2014, 09:28 PM #1Junior Member

- Join Date
- Oct 2014
- Location
- United States
- Posts
- 6
Thanked: 1 Illinois 6515 Double Leather Strop Question
I am a safety razor convert who's trying to resurrect an old straight razor.
I just received an eBay leather strop. Instead of having a leather strop and a fabric/paste strop it has two leather strops. One is thicker than the other.
Do you have any idea which one I should strop the blade with first? Does one of them get paste put on it?
I have some time to kill before I need to know...the 3000/10000 grit stone I ordered is probably two weeks away until delivery.
Thanks!
-
10-02-2014, 10:05 PM #2Senior Member


- Join Date
- Jun 2013
- Location
- Gladstone QLD AUSTRALIA
- Posts
- 3,245
Thanked: 804
Welcome to SRP Gitch
Post some pics if you can mate
It may help those who do know strops a lot easier & those of us who don't, it will also help later if we come across itSaved,
to shave another day.
-
The Following User Says Thank You to Substance For This Useful Post:
gitch414 (10-03-2014)
-
10-02-2014, 10:23 PM #3Senior Member


- Join Date
- Oct 2013
- Location
- Oakland Tn
- Posts
- 6,588
Thanked: 1894
keep the smooth clean side for stropping finish,, but pictures would help to see what you have ,, have you ever honed a straight? tc
I,m getting the impression that everyone thinks I have TIME to fix their bikes
-
The Following User Says Thank You to tcrideshd For This Useful Post:
gitch414 (10-03-2014)
-
10-02-2014, 10:50 PM #4Senior Member

- Join Date
- Feb 2013
- Location
- Haida Gwaii, British Columbia, Canada
- Posts
- 14,443
Thanked: 4828
I'm with the others and pictures would be helpful. Some strops, both vintage and new have a smooth leather strop for finishing and a suede finish strop for sharpening. The suede is in place of the linen, cotton, or nylon component that is the more common second material.
JoelLewicki likes this.It's not what you know, it's who you take fishing!
-
The Following User Says Thank You to RezDog For This Useful Post:
gitch414 (10-03-2014)
-
10-03-2014, 03:07 AM #5Senior Member

- Join Date
- Feb 2013
- Location
- Gosnells Perth Western Australia
- Posts
- 7,217
Thanked: 656
Hi and welcome. Do both sides have the Illinois stamp or just 1. If just 1 that is the finishing side most likely.
Substance likes this.My wife calls me......... Can you just use Ed
-
The Following User Says Thank You to eddy79 For This Useful Post:
gitch414 (10-03-2014)
-
10-03-2014, 01:51 PM #6Junior Member
- Join Date
- Oct 2014
- Location
- United States
- Posts
- 6
Thanked: 1
Wow! Thanks for all the responses!
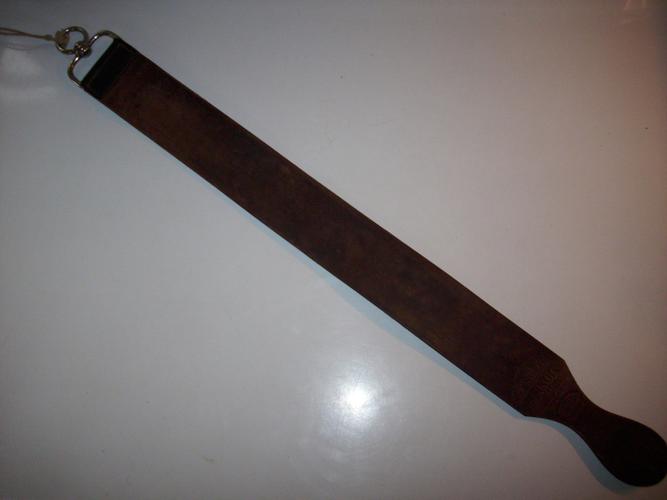
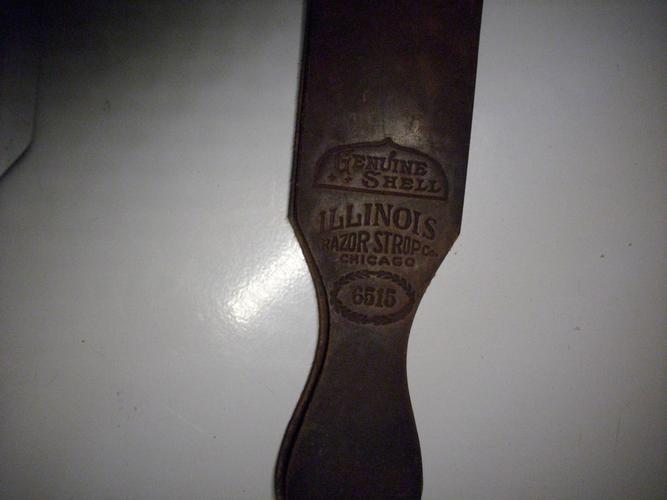
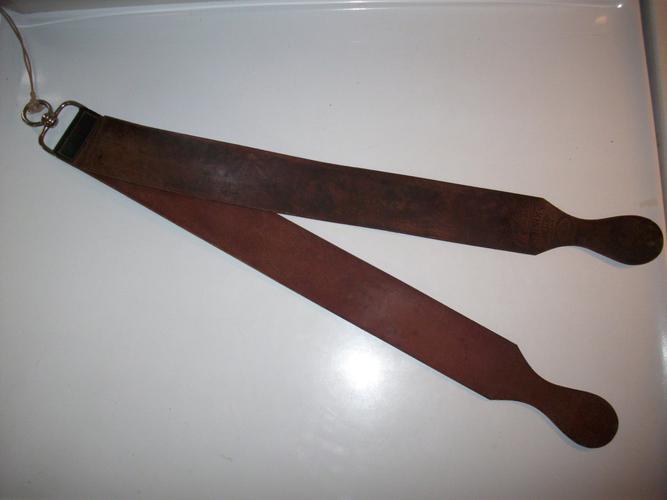
Below are the pics. eddy79, only the top side of the thinner leather has the Illinois stamp.
Tcrideshd, I have not yet honed or sharpened a straight razor. I have read some general advice about restoring a straight razor and watched a number of geofatboy (Shave Nation) videos on stropping and shaving with a straight razor.
The razor I have is a Geneva Cutlery I picked up at a second hand store for $4. I think it's a great opportunity to get my hands dirty and experiment without a huge investment.
The strop part with the stamp has a smooth top side with a sheen on it. The under side is soft and supple, as is the inside face of the thicker leather. The bottom side of the thicker leather is weathered and rather rough. If that's the side I'm supposed to use with the razor I will need to recondition it somehow (if possible) or figure out another kind of strop.
Here are the pics:
 Phrank likes this.
-
The Following User Says Thank You to gitch414 For This Useful Post:
Blistersteel (10-04-2014)
-
10-03-2014, 02:18 PM #7Senior Member
- Join Date
- Feb 2013
- Location
- Gosnells Perth Western Australia
- Posts
- 7,217
Thanked: 656
The side with the stamp is the finishing side. From the wording genuine shell it is a good quality horse hide strop and worth cleaning up and using. The other outside piece when flipped over is the piece you would normally use first. You haven't posted a pic of that so it is hard to give advice but from what I can see it looks like a keeper.
Phrank likes this.My wife calls me......... Can you just use Ed
-
The Following User Says Thank You to eddy79 For This Useful Post:
gitch414 (10-03-2014)
-
10-03-2014, 02:48 PM #8Junior Member
- Join Date
- Oct 2014
- Location
- United States
- Posts
- 6
Thanked: 1
I didn't think I could get good enough pics to show the area I'm concerned about, but below are my best efforts:

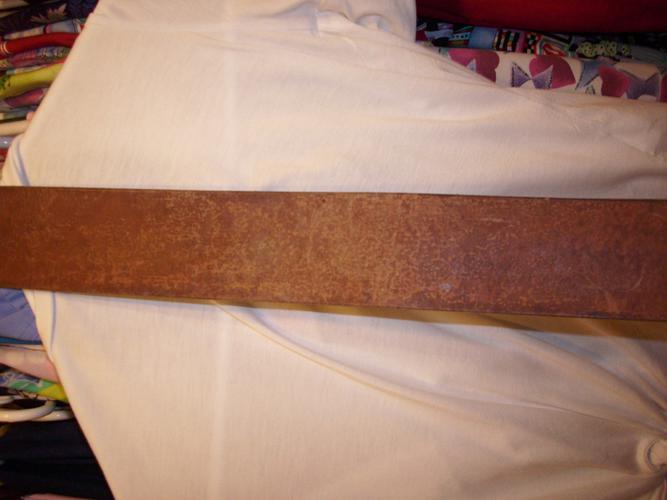
Each end of this side are smooth to the touch and look much like the top strop. This middle section is kind of rough. Can that be worked on? Is there a spot on the forum dedicated to strop maintenance?
Thanks again for your guidance, Eddy!
-
10-03-2014, 03:16 PM #9Senior Member
- Join Date
- Feb 2013
- Location
- Gosnells Perth Western Australia
- Posts
- 7,217
Thanked: 656
you could try lightly sanding the affected area with W&D paper. Starting at a medium grit and work your way up. You just want to remove a bit to get past the roughness not make it a suede. Do a search for strop restoration there will be heaps of info. It doesn't look to bad. A light sand a (very) little neatsfoot oil and a smoothing and hopefully it should be good again. It does look like part of the problem was drying out. The neatsfoot will help this. Just a couple drops worked in with a rag at a time. Go slow this may be a week or two in the doing. You can add but is hard to remove things once soaked in so do a bit and leave and come back to check in a day or two
My wife calls me......... Can you just use Ed
-
The Following User Says Thank You to eddy79 For This Useful Post:
gitch414 (10-03-2014)
-
10-03-2014, 03:32 PM #10Junior Member
- Join Date
- Oct 2014
- Location
- United States
- Posts
- 6
Thanked: 1
Cool! Since I'm waiting for my honing stone to arrive I have time to work on this. I love bringing old used things back to life! I'll post again as I go along so others can check out what I've done.
eddy79 likes this.


 Reply With Quote