Results 11 to 20 of 29
Thread: Odd question about strops
-
04-06-2019, 02:57 AM #11

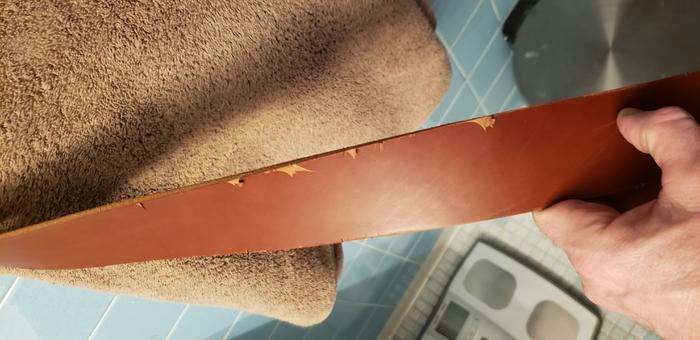
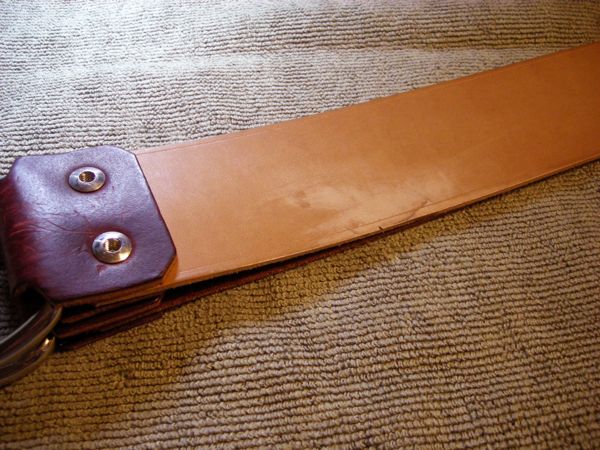
Here is the current state of the smooth side of the strop.
-
04-06-2019, 03:23 AM #12Senior Member


- Join Date
- Apr 2012
- Location
- Diamond Bar, CA
- Posts
- 6,553
Thanked: 3215
Glue down the flaps with rubber cement and sand the cut once dry.
Start with some 400 and a hard backer to try to smooth it out. Can you flip the strop so you are stropping on the other non cut edge?
If that does not work, scrape the back.
-
04-06-2019, 06:29 AM #13

I was thinking the same. If possible, Take strop apart and flip it around. Then your stropping on the other edge. Still, sand out and glue. This will keep bad things from happening for now. Your a bigger man than I. I wouldn't show what I did to my first. It went in the trash as soon as I bought a second. Ashamed is the word. But it happens to most of us in the beginning.
It's just Sharpening, right?
Jerry...
-
04-06-2019, 12:09 PM #14Senior Member

- Join Date
- Nov 2016
- Location
- Chicago Suburbs
- Posts
- 1,105
Thanked: 292
Each of us has our own budget constraints. There are lots of nice strops that can be purchased for under $100. For example, Tony Miller currently has his 2 1/2" Plain Vanilla strop on sale for $45. It is not as elegant as Tony's premium strops, some of which do cost over $100.
The suggestions for reversing the direction of the strop to put the nick on the far side, do make sense if you do not wish to purchase a new strop at this time.
-
04-07-2019, 02:37 PM #15

The rough side can work quite well actually depending on the roughness and how it is used. The Illinois 827 for example, their Russian strop is actually the reverse, flesh side of the hide.
I enjoy using a fairly 'tame" rough/flesh side leather as it gives and increased draw which I prefer for heavier razors and even my knives. A slightly rougher flesh side may be good as a preliminary strop before going to a smoother one and some guys use a progression of strops ever time before shaving. of course the rough side can also be handy pasted in more of a honing mode. I have used both veg tanned rough sides as well as waxed/oiled bridle type rough sides with good results.
TonyThe Heirloom Razor Strop Company / The Well Shaved Gentleman
https://heirloomrazorstrop.com/
-
The Following 2 Users Say Thank You to Tony Miller For This Useful Post:
bluesman7 (06-10-2019), FatboySlim (04-09-2019)
-
04-11-2019, 03:32 AM #16

lightcs1776, I wouldn't despair over your cut-up first strop. All of us have cut up ours, but not all of us have the humility to show our handiwork in the raw. You have my respect.

As Tony said, flesh-side-out can work well. I have one of Tony's flesh-side-out "Russian style" steerhide strops, and I use it for two situations: first as a super quick drying strop to get any moisture off the edge after a shave when I'm in a hurry to get to work and don't have time for a full post-shave stropping sequence. It ensures the edge is dry better and faster for me than any linen or smooth strop I've used. And as Tony also said, I use it as part of a strop "progression", going from linen, to "Russian", to smooth steerhide or Kangaroo as a finisher.
But on your smooth side, I wouldn't give up. When you cut your strop, never peel off the cut part (that creates an uneven surface), glue the cut flap down immediately. A little rubber cement or super glue (what I use) to glue down the cut surface, followed by sanding with 600 or 1000 grit sandpaper, followed by a lot of hand rubbing over time, will bring it back. It may not look great cosmetically in the places you repaired the cuts, but it will still work as good as it ever did, in my experience.
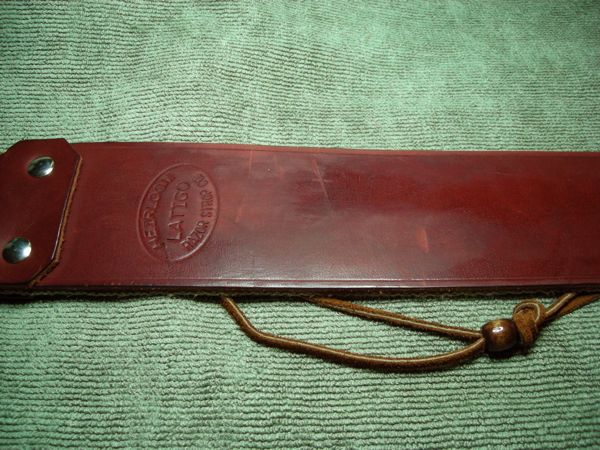
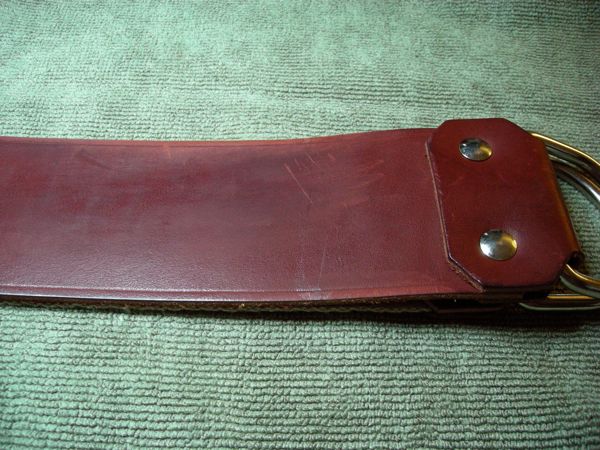
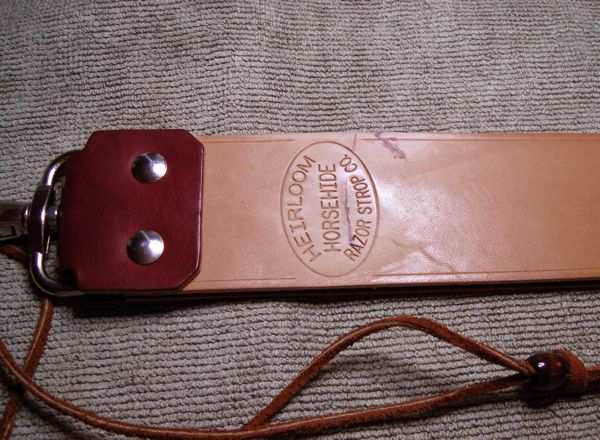
Here are some shots of my first Tony Miller 2.5" latigo and glass-slick 2" horsehide, which I more or less cut to pieces over the first few years of use. On the horsehide, I almost cut the thing half in two right up across the logo. But a great strop is a great strop, and I'm not going to toss a trusted old friend because of a few mistakes. I'm not cheap, I'm sentimental.
I glued down the cut "flaps" I created, weighted them down with heavy books to press them down during drying, sanded them after fully drying, hand rubbed a lot, and they still work fine today. Now they have character. Use more glue than you think you'll need, it will sand off. Better too much glue that will easily sand off, than a stray piece of "flap," which actually will affect your stropping and edge. All those lines you can see on the strops were originally full-blown flap cuts, mostly pretty deep ones, especially on the horse. If I run my finger over them since the repair, they are like glass, I can't feel them.
-
04-11-2019, 03:43 AM #17

@FatboySlim I will try gluing the smooth side down. I assumed it was far too gone for that, but it is definitely worth a try. Thanks.
-
04-12-2019, 01:49 AM #18Senior Member


- Join Date
- Oct 2017
- Posts
- 576
Thanked: 110
@lightcs1776.... I have had a couple strops with nicks just like yours.. After spending time glueing or bonding the leather tabs down they usually didnt turn out that well ... So to my rescue was a long time shaver and member.. He told me to use a new SE razor and cut the flaps as flush to the strop as possible, rolled up 400-600 grit sandpaper to about cigarrette size or a little bigger, slowly, softly smooth out any divet ridges then continue to blend that smooth divet outward until it feels like you sqeezed the leather hard and thats the indent it leaves.. I like thick cowhide so this was easy for mine as i then proceded to sand the whole strop face down with quite a bit of leather dust.. Clean the keather and Neatsfoot a little at a time.. After my 1st strop got cut down to smaller bench, paddles, etc.. All others that for nicked up pretty good ive done this and they still work great. Just another way to keep your strops going... Peace all! Scott
-
04-12-2019, 02:08 AM #19

My everyday strop has 2 big cuts in it and Gasman beat me to the thought of flipping it over.
I am right handed and my mistakes are on the right side......
For "relatively" minor cuts I would rather trim them out and continue on my ways.
Jnat users trim inclusions from their stones and don't say that effects them. And that is with an edge leading stroke.
For a smaller OOOPS smooth it out and go on with your shaves.
-
04-12-2019, 04:26 PM #20

Small dips or nicks, not proud of the surface will have no effect on stropping. The one issue may be if directly on an edge and your razor sort of drops into that "pothole" on each stroke. It becomes a little disconcerting to the fluidity of stropping but even then should have no real negative effect on the edge.
The Heirloom Razor Strop Company / The Well Shaved Gentleman
https://heirloomrazorstrop.com/


 65Likes
 LinkBack URL
 About LinkBacks


 Reply With Quote


