
Results 11 to 19 of 19
 9Likes
Thread: Wish me luck!
 LinkBack URL
 About LinkBacks
-
08-04-2013, 06:15 PM #11

Nothing wrong with "butt ugly" its not like you are dating it, it is a mans tool, that now has a manly scar, thanks to surgery administered by your man hands.
crouton976 and tintin like this.Bread and water can so easily become tea and toast
-
08-05-2013, 11:59 PM #12'with that said'


- Join Date
- Aug 2010
- Location
- Walla Walla in WA State USA
- Posts
- 11,260
Thanked: 4238
Well since you haven’t reported any problems, it sounds like your solution was sound!!
I really like that you used the torch to pre-heat and clean up any contaminates! Also the use of the torch to ‘Slowly’ bring the welding and the surrounding area down to a lower temp is a Very Nice Touch!!
My dad used to hate to weld cast iron motor blocks! He always said that if he wasn’t careful that he’d be ‘chasing’ cracks! (That’s having to try to weld the cracks as well)!
Good Job!!
-
The Following User Says Thank You to cudarunner For This Useful Post:
Magpie (08-09-2013)
-
08-09-2013, 04:18 AM #13The First Cut is the Deepest!

- Join Date
- Feb 2010
- Location
- Upper Middle Slobovia NY
- Posts
- 2,737
Thanked: 481
Thanks Cuda!
The repair SEEMS sound, though I have yet to put it to an actual usage test. I am a one man band working the whole shebang by myself, so I have not had time to repair the damage I caused to the chuck when I dismantled it all. That bit is plain steel, and should be a lot easier to weld up. All of this would be easier if I actually knew what I was doing. The stick welder is something my dad left behind, but never got around to teaching me how to use. I practiced a bit on plain steel first, and did as much reading and research on the methods of welding cast iron. I had heard many stories of woe and despair back in my days of engine rebuilding. (we sent cracked blocks out for repair only if insisted on by the owner, or needed for a full restore) so I thought it prudent to educate myself as much as possible before going at it. Before Youtube and Google I never would have been able to succeed in such a quest, let along even gather such useful information!
-
08-09-2013, 05:14 AM #14'with that said'
- Join Date
- Aug 2010
- Location
- Walla Walla in WA State USA
- Posts
- 11,260
Thanked: 4238
While the chuck may be of plain steel it is a precision part!!! Please be sure that every thing is properly aligned!
You may need to grind a trench and then fill it in with weld!
Make sure that you are using the proper rod and the proper setting on the welder!!
If in doubt, take the part out and have an expert weld it for you!!
The base can be ground/shimmed etc to make it right however with the chuck, it Has To Be Right From The Start!!
I hope that this has been helpful!
-
08-12-2013, 07:07 PM #15The First Cut is the Deepest!
- Join Date
- Feb 2010
- Location
- Upper Middle Slobovia NY
- Posts
- 2,737
Thanked: 481
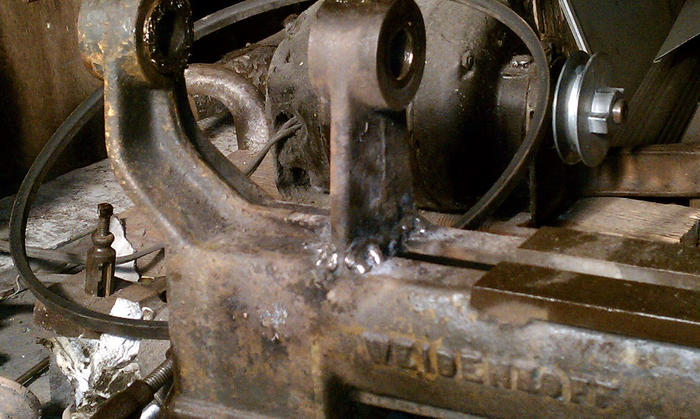
Finally got around to getting a photo of the welding. First is a photo of the actual welded area. I had ground out a "V" channel on the inside along the entire length, clamped the whole unit from top to base. Did the welding in 3/4 inch steps with the small propane torches playing on the base and broken end the entire time. Once the channel was filled in, I went over it again building up some material best I could. Then went over the reverse side of the break hoping to also build up some material.
I'm sure the welds are flawed, but when I tap with a small hammer, I get "ping" and not "clunk" and it past the basic test of installing and spinning the shaft, so in my mind that is good enough for what I use it for.
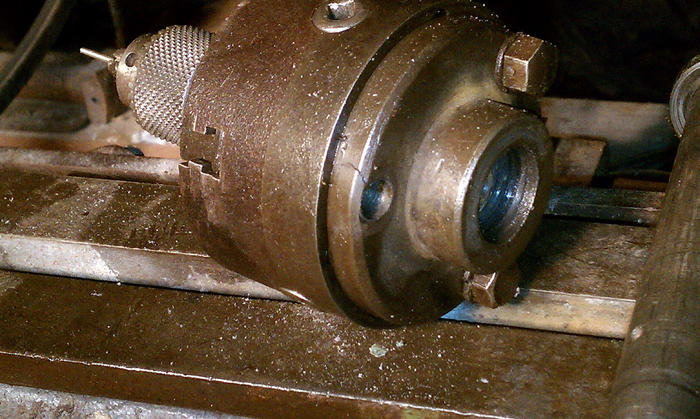
Other photo is of the 3 jaw chuck, showing where the back plate broke at the screw hole. There are 2 cracks, radiating out from the hole, either side, so the circumference area is about to snap right off. I have not yet welded that part up. I suspect it will require disassembly, and instead of repairing the cracked piece, removing it and using the weld to build new material, and then redrill the hole. The bolt is a 3/8 I believe, to give you an idea of how small the chuck is.
Last edited by Magpie; 08-12-2013 at 07:37 PM. Reason: piss poor photos!
-
08-12-2013, 07:31 PM #16Senior Member

- Join Date
- Jan 2011
- Location
- Roseville,Kali
- Posts
- 10,432
Thanked: 2027
Cannot see the weld or the cracks in the chuck.
-
08-12-2013, 07:39 PM #17The First Cut is the Deepest!
- Join Date
- Feb 2010
- Location
- Upper Middle Slobovia NY
- Posts
- 2,737
Thanked: 481
Sorry Pixel, using my phone camera, I had to redo the photos. Not sure why the pics got cropped like that. All better now!
-
08-12-2013, 07:51 PM #18Senior Member
- Join Date
- Jan 2011
- Location
- Roseville,Kali
- Posts
- 10,432
Thanked: 2027
The weld looks great,some grinding,some bondo,some paint.Good as new. Originally Posted by Magpie

On the chuck.I would remove the mounting plate and really inspect it to see if those cracks extend into the plate more than what you see.
At best you will get a surface weld/fill,that plate undergoes a tremendous amt of tourq and stress even on simple drilling operations.
Should it come apart during use that could be a disaster,JMO
-
08-12-2013, 08:20 PM #19The First Cut is the Deepest!
- Join Date
- Feb 2010
- Location
- Upper Middle Slobovia NY
- Posts
- 2,737
Thanked: 481
Just So! Having been witness to all sorts of shop disasters (only ONE of my own thank goodness!) I agree with you wholeheartedly. Inspection shows the crack runs almost all the way through on both sides. Similar to if the bolt had been over tightened on a brittle cast iron piece. It would be possible to simply replace the bolt, and the washer/bolt assembly would hold the plate and broken piece in position, but thats a half assed way of doing things, and I am no fan of that mode of operation.
cahnwulf likes this.


 Reply With Quote