
Results 1 to 10 of 13
 7Likes
 LinkBack URL
 About LinkBacks
-
11-02-2013, 03:12 PM #1Senior Member


- Join Date
- Apr 2009
- Location
- Boulder County CO
- Posts
- 1,004
Thanked: 127 Salvaging Crown Embossing on Scales
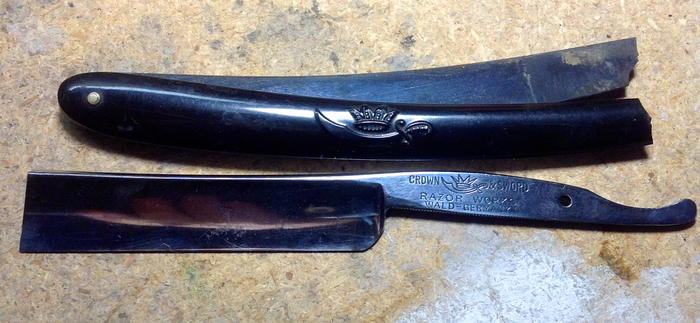
Here's a fun little project I decided to dive into finally. A while back I picked up a nice Crown and Sword razor but the scales were completely cracked off on the pivot end (picture below). I like the embossed (or whatever it's called) crown and sword logo on the scales and would like to salvage them. I thought about cutting off both sides of the scales and trying to attach some G10 or other materials to both ends but will need to experiment a bit first. Also thought about thinning the newly trimmed scale pieces and mounting both on copper or brass again using some material to make up both ends.
Any ideas? Anyone done something similar?
-
11-02-2013, 03:17 PM #2Senior Member

- Join Date
- Jan 2011
- Location
- Roseville,Kali
- Posts
- 10,432
Thanked: 2027
Really no clue, but an interesting potential project.
-
11-02-2013, 03:25 PM #3Senior Member
- Join Date
- Jun 2013
- Location
- Pompano Beach, FL
- Posts
- 4,048
Thanked: 636
I had a boker that I restored. The scales were broken. I cut out the logo in an oval shape and inlay it in a new set of purple heart wood scales. I had to use the dremmel to make a recess for the oval to fit into and it worked. Good luck
AirColorado likes this.
-
11-16-2013, 11:20 PM #4Senior Member

- Join Date
- Apr 2012
- Location
- Diamond Bar, CA
- Posts
- 6,553
Thanked: 3215
What about scarfing a contrasting piece on the pin ends of both scales and lining with some metal or thin Carbon Fiber.
AirColorado likes this.
-
11-17-2013, 12:58 AM #5Senior Member


- Join Date
- May 2011
- Location
- Redbank, Queensland, Australia
- Posts
- 1,639
Thanked: 291
I had one that was broken too and I made an inlay out of sheet aluminium and finshed the hardwood scales in CA.
I really should get my camera outAirColorado likes this.Hang on and enjoy the ride...
-
11-17-2013, 01:28 AM #6Senior Member

- Join Date
- Mar 2012
- Location
- Thunder Bay, Ontario, Canada
- Posts
- 17,372
Thanked: 3228
 Originally Posted by Euclid440

I think you are on to something there. Another possibility is to use a scape scale of the same material instead of a contrasting piece still using a thin metal liner to hold it all together.
BobAirColorado and Euclid440 like this.Life is a terminal illness in the end
-
11-17-2013, 03:24 AM #7Senior Member
- Join Date
- Apr 2009
- Location
- Boulder County CO
- Posts
- 1,004
Thanked: 127
Thanks gents - lots to consider. Though while pondering this one I started another 3… Seems I'm a bit hyper these days. One of the projects I'm working on right now involves Micarta and I'm doing some inlay as well as contouring the scales. If that works out I may try something similar with this one - or go with the idea of adding a liner and salvaging the Crown by bracketing that piece. I'll resurrect this thread and post some pics of what I decided when I get back to this one.
-
11-18-2013, 02:23 AM #8Senior Member

- Join Date
- Sep 2013
- Posts
- 314
Thanked: 49
Hey Guys,
How about creating a mould using latex, I have seen them do it on restoration shows. It looks like the original is not damaged by the latex so worst case you are where you started.
You could cut the original to size and then put some mockup ends to the the cut off bit, that way you could pour resin couloured to your liking into the latex mould.A good lather is half the shave.
William Hone
-
The Following User Says Thank You to Crackers For This Useful Post:
AirColorado (11-18-2013)
-
11-18-2013, 04:23 AM #9Senior Member
- Join Date
- Mar 2012
- Location
- Thunder Bay, Ontario, Canada
- Posts
- 17,372
Thanked: 3228
Crackers
There just might be a thread on that here now that you mention it IIRC.
BobLife is a terminal illness in the end
-
The Following User Says Thank You to BobH For This Useful Post:
AirColorado (11-18-2013)
-
11-18-2013, 06:00 AM #10Senior Member

- Join Date
- May 2012
- Location
- Oxford, Al
- Posts
- 1,605
Thanked: 407
You could cut it out in an oval or square shape the edges smooth, make a new set out of a dark wood, lay a layer of epoxy and scuff it with 220 then use a drop of super glue to held it in place, then apply another coat of epoxy and you got a floating emblem in your finish... just a thought for something unique.
Mastering implies there is nothing more for you to learn of something... I prefer proficient enough to not totally screw it up.
-
The Following User Says Thank You to tiddle For This Useful Post:
AirColorado (11-18-2013)


 Reply With Quote