
Results 1 to 10 of 13
 7Likes
 LinkBack URL
 About LinkBacks
-
11-08-2013, 07:09 AM #1Nautical Madman


- Join Date
- Dec 2012
- Location
- Santa Cruz, CA
- Posts
- 107
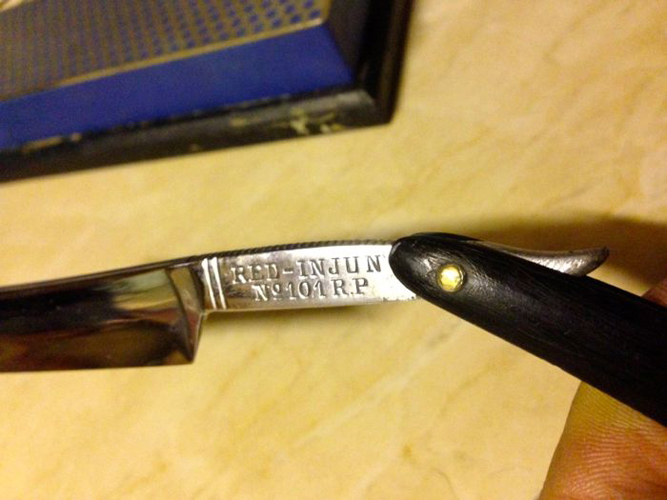
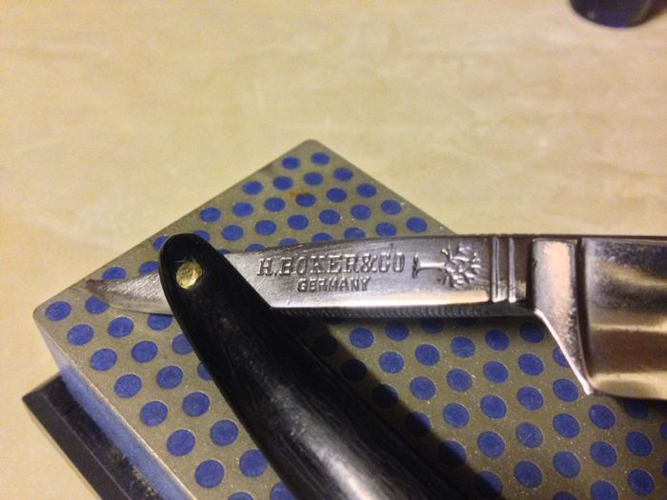
Thanked: 5 Advice for restoring H. Boker Red Injun
Hey all,
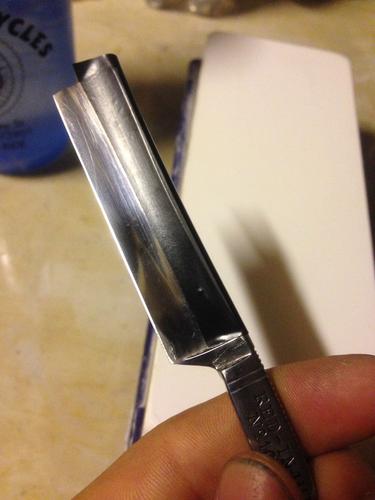
I finally found a candidate for my first true restoration attempt trolling through a local antique shop.I thought it might be too far gone, covered in stain, who knows maybe it is but with just a little bit of 3M Metal Restorer & Polish she seemed to shine up much better than I had anticipated.
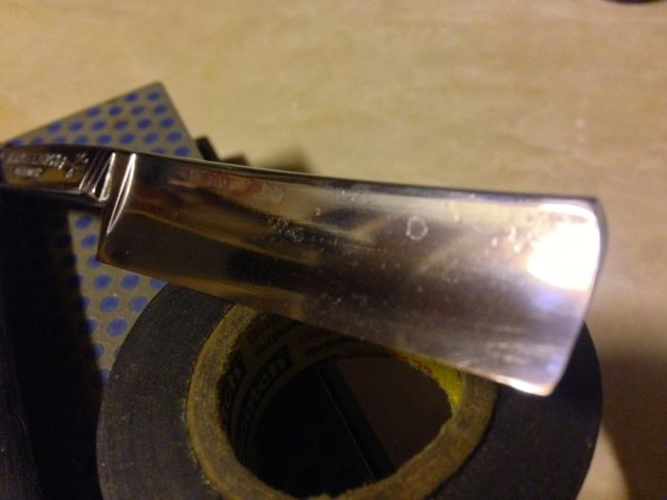
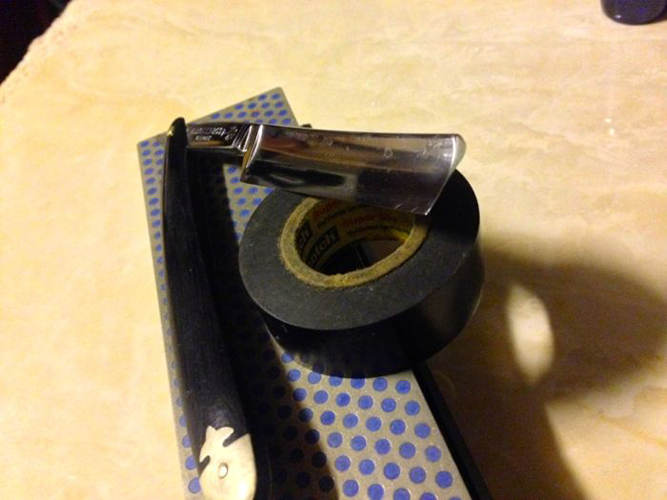
While I know many disagree with bread knifing there was a considerable amount of uneven hone ware on the heel, so its been done. Now that I have a flattened, dull, and hand polished blade how should I move forward. Does this polish appear to be good enough or would I be able to remove the pitting where the heavy stains were with a polishing wheel on a Dremel tool?
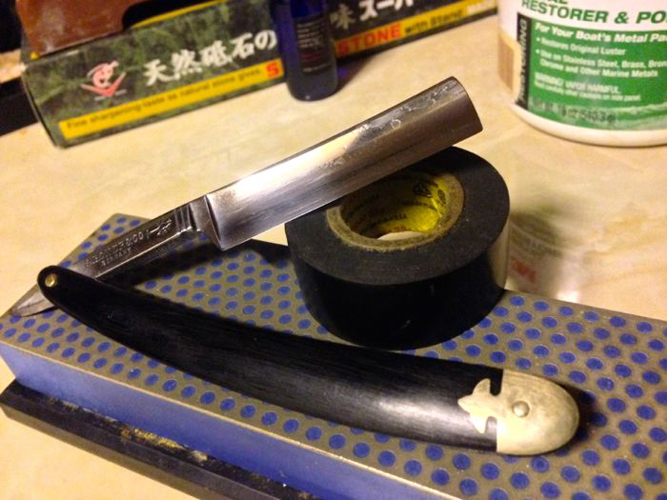
The monkey tail has been filed down by some previous miscreant, I was thinking that if I took precautions against heat with some form of heatsink I could maybe solder something on. Or perhaps bolt on? any thoughts or should I just leave it alone.
Honing: I have four stones now, a 6x2" dmt 325, Norton 4k/8k, Naniwa 12k, and an American Three Line Barbers hone.
I want to start setting the bevel, as suggested in the wiki I am using electrical tape on the spine for this part of the process. But is the dmt 325 either too small or too course a grit for the initial removal of material.
Sorry for the ramble! I am excited to bring this razor back to life it already looks worlds better than it did. Thanks in advance for any help I truly appreciate it
Last edited by SailorJ; 11-08-2013 at 07:24 AM.
Lemur likes this."One must always choose the lesser of two weevils." - Cpt. Jack Aubrey
-
11-08-2013, 08:04 AM #2'with that said'


- Join Date
- Aug 2010
- Location
- Walla Walla in WA State USA
- Posts
- 11,260
Thanked: 4238
SailorJ, Originally Posted by SailorJ

Your polishing looks nice, every razor doesnt have to have a near mirror finish! Id leave it where it is!!
The tail will always be that way, dont try to solder/braze etc, just live with it! (These are the kind of things to consider before purchase).
My concerns are these:
How did you breadknife the blade?? Did you have it at a 90 deg vertical angle, or did you have it at a 45 deg or less angle?
One method makes honing a hell of a lot easier than the other!
Also from what I can see you 'might' have a hook from the breadknifing that needs removed. (Its by the stabilizer)!
My last concern is how many razors have you honed from this extreme kind of restore? Just wondering!
I also highly recommend that you add there you are located in this world as there may be some more experienced help near by! You can't beat hands on learning!!
Keep up the efforts! It pays off in the end!
I can't wait to see/hear how your project works out!Our house is as Neil left it- an Aladdins cave of 'stuff'.
Kim X
-
The Following User Says Thank You to cudarunner For This Useful Post:
SailorJ (11-08-2013)
-
11-08-2013, 08:37 AM #3Nautical Madman
- Join Date
- Dec 2012
- Location
- Santa Cruz, CA
- Posts
- 107
Thanked: 5
Of course I took the scenic route, breadkniffing was done at a 90. And in truth this will be the first razor I have done quite this much honing on, though I have reset bevels a couple few times. I am unfamiliar with 'hooks' what are they and do you have any suggestions as to how they should be removed? Originally Posted by cudarunner
Thank you!"One must always choose the lesser of two weevils." - Cpt. Jack Aubrey
-
11-08-2013, 08:52 AM #4'with that said'
- Join Date
- Aug 2010
- Location
- Walla Walla in WA State USA
- Posts
- 11,260
Thanked: 4238
Here's a classic example of a 'hook' they happen when your removing excessive amounts of steel while doing the radical technique called 'breadknifing': Originally Posted by SailorJ
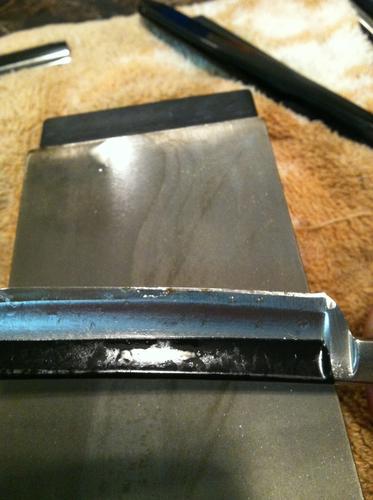
Can you see it at the far right? If this had kept progressing, the 'point' that you can see will turn 'curved' that's why it's called a 'hook'.
The DMT 325 will do the work that you will need to do. I highly recommend that you start at a 45 deg angle and then lower it. If you would have done the initial work while breadknifing at the 45 deg angle, you would have saved yourself time, effort and irreplaceable steel from the razor!
You have your hands full!!gssixgun likes this.Our house is as Neil left it- an Aladdins cave of 'stuff'.
Kim X
-
11-09-2013, 04:40 AM #5'with that said'
- Join Date
- Aug 2010
- Location
- Walla Walla in WA State USA
- Posts
- 11,260
Thanked: 4238
I'm a real Mastodon with this computer crap! However I hope this shows what I 'think' is the start of a 'hook'. It's cropped so I don't know how well it will come out but I hope it gives you something to look for so that you can finish bringing the razor back to life! It really feels good when you can!
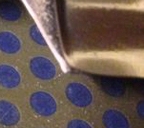
'IF' it is there you can use the DMT 325 to carefully reduce it down. Keep an eye on the area as you 're-breadknife' the blade at a 45 deg angle, then lower it to about a 22-23 deg, then finish with or without however many layers of tape you wish!
Remember that getting those coarse scratches out will be a job in it's own! It's not impossible, it's just going to take a lot of time to do it right! The Norton 4K will get them out, but a 1K would be much more efficient.
Let us know how it goes!
Our house is as Neil left it- an Aladdins cave of 'stuff'.
Kim X
-
11-09-2013, 04:47 AM #6Senior Member

- Join Date
- Apr 2012
- Location
- Diamond Bar, CA
- Posts
- 6,553
Thanked: 3215
Nothing wrong with bread knifing when needed, you will need to correct the heel, that corner will get sharp. Now is the time to correct it before you hone. There are good threads and some videos I think.
Some OOOO or OOO steel wool and polish will take out some of the stains, buffing will get them all out but will require more tools. Get a piece of 4mm dense craft foam 8X11 craft foam. Work on the pad as you polish. The edge will bury it self in the foam allowing you to polish up to the edge without any danger of cutting yourself and protect the blade from breaking from excess pressure.
That tail is a problem but not much can be done about it. If you can hold the razor to shave it will only be an aesthetic problem. Other than that the razor appears to be in good condition with very little hone wear, some polish on a paper towel will shine up the scales, they look like horn.
You will need at least a 1K to put a bevel on a bread knife edge and a lot of time. I tape the bevel with 2 layers of tap to protect the bevel. Start holding the razor at a 45 degree angle and take off the corner of the 90 degree edge. Once you get the bevels to meet, then put the razor on the stone with more pressure on the edge and the spine lightly on the stone. Remove the 45 degree corner until you have established a full bevel.
Now re-tape and hone normally and set a bevel. This is a lot of work on a 1K, Norton 1K is the best for this as they are a bit harder. It is much easier on a full set of hones going down to a 400, 600 and 1K or the 325, 600 and 1200 DMT. This is not something I would recommend to a new honer learning to hone. This is repair work and it can be work to do it without causing more damage.
If the bread knifing was lightly done you should be able to get er done on a 1K, it will depend how wide the 90 degree edge is.
How wide is the edge?SailorJ likes this.
-
11-09-2013, 05:10 AM #7Nautical Madman
- Join Date
- Dec 2012
- Location
- Santa Cruz, CA
- Posts
- 107
Thanked: 5
Progress and follies thus far.

I have been successfully honing my personal rotation for the last year now to the extent of professionally honed razors I have used. Though I have yet to try setting a bevel all the way from a bread knifed edge and here especially it is proving to be a good deal different.
Contrary to creating a hook the entire blade has actually now taken on a very slight smile. I've decided that's not a terrible thing since I would not mind trying out a smiling blade. I had difficulty getting the middle of the edge to sharpen up once graduating from the dmt 325 to the 4k w/ slurry. Changing my honing to very subtly moving pressure from heel to tow has gotten it farther, but so far it still does not cut anything.
The edge seems much closer, but perhaps it is time to go back to the 325 until the bevel is entirely set. ( after this I intend to get a chossera 1k asap). I'm a bit uncomfortable working with the 325 as it is only 2" wide."One must always choose the lesser of two weevils." - Cpt. Jack Aubrey
-
11-09-2013, 05:13 AM #8Nautical Madman
- Join Date
- Dec 2012
- Location
- Santa Cruz, CA
- Posts
- 107
Thanked: 5
I'm not sure, I did not measure it from the beginning. The metal seems to be coming to a reasonable point, the heel and tow bot had the bevel set, leaving out the middle though. Originally Posted by Euclid440
So close yet so far"One must always choose the lesser of two weevils." - Cpt. Jack Aubrey
-
11-09-2013, 05:23 AM #9Senior Member
- Join Date
- Apr 2012
- Location
- Diamond Bar, CA
- Posts
- 6,553
Thanked: 3215
The hook is the point on the corner of the heel, that should be rounded. Do a Google search of Red Injuns and look at the heels. Round that off with the DMT.
The DMT 3 Credit Card plate set is great for this kind of repair. I think they are about 20-30 bucks. You can also set a bevel from bread knife fairly quickly with the cards, though a full size stone is much better and easier..
If you are going to go from 325 to 4 K it is a jump. Bring the bevels togeather with the 325 then polish with the 4K, plan on spending some time on the 4K.
I advise the Credit Card plates they are also great Slurry and refresh lapping a stone.
Circles on the 325 until the bevels meet, then polish on the 4KLast edited by Euclid440; 11-09-2013 at 05:29 AM.
-
11-09-2013, 05:39 AM #10'with that said'
- Join Date
- Aug 2010
- Location
- Walla Walla in WA State USA
- Posts
- 11,260
Thanked: 4238
: Originally Posted by Euclid440
As I said, it's a lot of work. The 1k would really be nice! However the 4K will get the job done! Personally I'd be sure to us a slurry on the 4K it will cut a lot faster!
I should have mentioned that I'd also recommend doing some nice x-strokes after the circles just as a precaution!Last edited by cudarunner; 11-09-2013 at 05:59 AM.
Our house is as Neil left it- an Aladdins cave of 'stuff'.
Kim X


 Reply With Quote
